Recipes and Cooking Ideas for Homemakers and Amateur Cooks
 

French Toast with Homemade Butter

I love Saturday mornings.

It sounds like it’s Saturday morning right now. It’s not. It’s Thursday afternoon. But I do love Saturday mornings… 24/7 year round. I’ll tell you my secret for loving them: I kinda do whatever I feel like doing for the morning… drinking a few extra cups of coffee, reading, baking, playing Two Dots, etc., and not let myself be bothered with the 101 things I should be doing.

Last Saturday morning, I felt like making French toast. I had seen a French toast recipe in a cookbook awhile ago when I was looking for something else. It grabbed me because I was surprised there was a recipe for French toast… I thought everyone just did a ratio of about 1/4 cup of milk per egg, dipped the bread in, and fried it up. But this recipe had extra ingredients in it. Like, cinnamon and vanilla. Mmmmm!!

french toast

French Toastrecipe from Simple and Satisfying cookbook
3 eggs, beaten
3/4 cup milk
1/4 tsp. salt
1/2 tsp. cinnamon
1 tsp. vanilla
2 Tbsp. sugar
11 slices bread (or however many slices the mixture covers, this was only enough for 8 pieces, but maybe my letting them soak for a second was why)
butter, for frying

Mix together all but bread and butter. Dip bread into mixture. Fry in butter until golden brown, turning once.

You know what I loved about this recipe? While the French toast was frying, my kitchen smelled a.m.a.z.i.n.g! Of cinnamon and vanilla.

The recipe also has a Stuffed French Toast variation where you spread cream cheese on one slice of bread and jam on the other, put them together like a sandwich, dip the sandwich into the egg mixture and fry it. I’ve gotta try it sometime!

Also, for the first time ever, I made homemade butter. That is what is on top of the French toast up there. And I used buttermilk from the butter-making for the egg mixture. I felt so domestic. :) It also took me back to when I was a kid again… my mom used to make it often, and I loved watching.
The reason it’s piped into roses is because after it was made, it was just a boring lump. And it was so creamy that I wanted to make it pretty.
homemade butter

I’m not going to feature the butter here because… Jessie at The Hungry Mouse already did an amazing job of featuring it, with great directions and tips and pictures. So, go there for your instructions if you want to make it, that’s what I do! You’d be surprised how easy butter making is! I’m not planning to always make it because easy as it is, it’s still easier to break open a box and peel off a wrapper, but I am just happy to have the option of doing it.

Happy Saturday… oops, I mean Thursday.

4th of July Flag Watermelon Bowl

Probably most of you fit into 2 categories: rolling your eyes at all the red, white, and blue food and having “just grill me a juicy brown cheeseburger!” type of thoughts OR looking for red, white, and blue food ideas because you’re hosting or taking food to a 4th of July party.
This post is for the latter category. ????
If you want a cheeseburger, read this post instead (hmmm, not a bad idea actually, after looking at it to put the link here, makes me kind of hungry for a cheeseburger now!).

I bought a watermelon the other day. Among a few other fruits. It’s summer. I think there’s a rule that you need to have fruit on hand at all times during the summer. Or maybe it’s just a personal preference.
With the 4th of July coming up, I was also trying to think of something 4th of July-ish to make, just because I like excuses to play with food… ha. I always think of raspberries or strawberries (red), bananas (white), and blueberries (blue) when I make patriotic food. I wanted something different, and that’s when I thought of my watermelon I had just got. Watermelon actually has 2 of those colors! So, anyway, I ended up making a flag in the rind and used the watermelon for a fruit salad bowl.

4th of July flag watermelon bowl

I’ll show you how I did it. I’m sure this has been done before and there might be a better way, but this way was easy and quick. It was quick because I’m not a perfectionist. ????

Slice off an area of green, the size you want your flag to be. Just a thin slice, you don’t want to go deep enough to see any red! Not to sound mom-ish or anything, but be careful with this step! The rind is tough and slippery and while I was doing it, my knife slipped aaaaaaaand… I’m currently sporting a cut on my thumb from it.

Next, section off a box in the upper left corner for the star section. Then cut stripes. Slice underneath the stripes. Where the red stripes will be, cut the ends and you’ll be able to lift the white rind out and tada! red stripe.
I know, I had to cut off a white stripe so I could get my knife in there, then I just secured it back on with toothpicks.

4th of july flag watermelon bowl1

For the star section, I cut divots with the end of a vegetable peeler and then stuck blueberries in… some of them tucked snugly in and some of them had to be pinned in with a toothpick.

4th of july flag watermelon bowl2

4th of july flag watermelon bowl3

And there you go, a patriotic watermelon. :)

To make a bowl, cut a thin slice off of the bottom so it has a flat spot to sit on.
Scoop out the watermelon (but don’t get too close to the back of the flag, it needs to stay solid red there).
Now, fill your homemade festive American bowl with fruit salad.
It could be any fruit mixture… I just added blueberries and bananas to the watermelon to keep it red, white, and blue, and cut a few stars out of some watermelon just for fun.

4th of july watermelon bowl

Comments

One Response to “4th of July Flag Watermelon Bowl”

  1. Jan on August 8th, 2014 4:25 pm

    That is so cool! I know I’m a month behind, but it’s still cool! I want to do that sometime when I get big! :-)

Because I’m too cheap to give it to the dog

This happens pretty often. I hope when they have kids they have to eat ugly food sometimes too. ????

girls lunch my lunch

Comments

3 Responses to “Because I’m too cheap to give it to the dog”

  1. Shannon on June 25th, 2014 10:15 pm

    lol. At least they loved theirs! :)

  2. Rosanne on June 26th, 2014 6:49 am

    Aww, what a sweet mom you are. They will rise up and call her blessed!

  3. Nonna on March 27th, 2015 3:12 pm

    So … take the scraps and make them into a savory bread pudding by chopping them all up and pouring egg mixed with milk over it then topping with more cheese if you want. Bake 20 minutes and yours is BETTER than theirs.

A Step-By-Step of How To Have Your 8-yr-Old Make Dinner

Posted on June 14, 2014
Filed Under Cooks in Training, Easy meals

It’s easier than you think. In fact, Tiffany did it because I had another project going. My project was in the kitchen, so I was right there the whole time and pretty much just talked dinner into existence. :) That’s a lot different than how it used to be. It used to be that I wouldn’t let them cook unless I had my schedule cleared and plenty of time. And then my main job was damage control and cleaning up messes as fast as they made them. So, I’m here to say that there. is. hope. for little cooks to get trained. :)

tiff meal menu

So, here we go, a spaghetti & meatballs meal. I only have 2 pictures because I was busy doing other stuff.

Step # 1. Lower your standards. This is going to be a simple meal. Nothing gets mixed into the meat, for example. And there’s no garlic bread. She did want to get all fancy shmancy with the Parmesan cheese, though.

Step 2. Have a little lesson on how to turn the correct burners on on the stove (I actually thought Tiffany would know this, but she didn’t! I guess either I did it for her before, or they’re not born knowing this stuff.) So, we had a little lesson on how the “map” under each control matches the stovetop layout.

3. Have her get everything out: Spaghetti, kettle, frying pan, lb of burger, jar of pasta sauce, salt, Italian seasoning, canned green beans, bowl for green beans. That’s it.

4. Tell her to fill the kettle half full of water, sprinkle in some salt, put it on the stove, and turn the burner on Hi.

5. Tell her to put the frying pan on the biggest burner, turn it to 5, then take the burger and shape little balls and put them in the pan.
I had her use the stovetop frying pan even though I like the electric better… here’s why: the electric one has legs and a bit higher of sides, so it’s several inches taller and I thought she’d have a hard time comfortably seeing into it.
And it’s always good when a cook is able to see into her frying pan.
I had her fry instead of bake them because she hasn’t mastered the thing of getting stuff in and out of the oven yet, without burning her arm somewhere between her wrist and her armpit. She wants a pair of mitten hot pads that go all the way up her arms. Seriously, she does.  

6. The water was boiling by the time she was done making the meatballs, so I told her to put the spaghetti in and stir it a bit. Then flip the meatballs and to just kind of keep flipping them until no more pink was showing.

tiff meal cooking

7. The meatballs and the pasta were done around the same time, so I told her to turn the burners off and I helped her drain the fat off the meatballs, and then she sprinkled them with salt and Italian seasoning, dumped the pasta sauce over them, and turned the burner to Low.

8. Time to dump the beans into the bowl and microwave them for 2 minutes.

9. So now the beans are heating, the spaghetti is holding, and the meat is simmering in spaghetti sauce. Time to set the table, including getting out her beloved Parmesan grater and a chunk of Parmesan, and pour water.

10. Now everything is done. She was able to drain the spaghetti herself by dumping it into the colander in the sink. Time to dish up. Aaaaand grate Parmesan over everything. And call everyone to the table.

Thank you for making dinner, Tiffany. It was good!!

tiff meal done

She held the Parmesan grater hostage and the minute we dished food onto our plates, she was magically standing beside us saying, in what we call ‘the fancy lady voice’, “Would you like some Parmesan cheese?” and then we’d answer, with exaggerated politeness, “yes, I would, please” and she’d reach in and grate.

Comments

3 Responses to “A Step-By-Step of How To Have Your 8-yr-Old Make Dinner”

  1. Liz on June 14th, 2014 1:08 pm

    Kaitlyn thought this post was especially for me. :) Think she was trying to hint?

  2. Kay on June 14th, 2014 2:48 pm

    Ha, she’s so subtle. :)

  3. Shannon on June 14th, 2014 6:12 pm

    You go Tiffany! As soon as her cooking class is over I’ll be sending my girls down! :)

Memorial Day – Red White & Blue Parfait

Posted on May 26, 2014
Filed Under Holiday cooking

Breakfast on this Memorial Day…

memorial day parfait

RED raspberries
WHITE plain unsweetened yogurt
BLUEberries

Remembering the many heroes who died for our freedom.

Comments

3 Responses to “Memorial Day – Red White & Blue Parfait”

  1. Shannon on May 26th, 2014 10:29 am

    I’m coming down for breakfast. :)

  2. Kay on May 26th, 2014 10:35 am

    Great! Bring some granola! ????

  3. Liz on May 26th, 2014 12:14 pm

    I was just thinking – what it needs is a sprinkling of granola on top. :)

Chipotle Chicken Quesadillas

Summer is coming to Ohio. We think. Today we’re wearing jackets, but we’ve had a few warm days as teasers and the forecast looks promising.

These quesadillas are great for summer for 2 reasons: 1. They’re quick (summers seem busier, less time cooking) 2. They don’t use the oven.

These quesadillas are great year-round for 2 reasons too: 1. They’re easy. 2. They’re so good.

Sometimes when we have Grilled Chicken Breast Salad, I purposely have Shannon grill a couple more pieces of chicken than we’ll need. When I’m cleaning up after the meal, I chunk up the leftover chicken and put it in the freezer for such a time as this: Chipotle Chicken Quesadilla night.

chicken quesadillas

This is not a recipe from anywhere, it’s just a thrown together dish.

This is a good walk-into-the-kitchen-30-minutes-before-mealtime-thinking-“what-can-I-make-QUICKLY” option.

So, get out your frying pan and start heating it up, I set mine to 300 degrees, which would probably be medium-low on a stovetop. Get out the sour cream, frozen chicken chunks, tortillas, can of black beans, and shredded cheese. Put the chicken in the microwave for 1 min to thaw. Put a bit of olive oil in the frying pan, add the chicken, and sprinkle with chipotle seasoning. Fry and stir a couple times.
chicken quesadillas browning meat

While that’s frying, get the other stuff ready… Butter 1 side of each tortilla, drain the beans, open the sour cream and cheese.

Take the chicken out of the pan. Put 2 tortillas in the pan, butter side down. Smear with sour cream. Add chicken, beans, and cheese.
chicken quesadillas sour cream beans

chicken quesadillas sour cream beans cheese

Put the other tortilla, butter side up, on top.
chicken quesadillas frying

I didn’t time how long to fry it before flipping, I just waited til the bottom tortilla was nicely browned and the cheese started melting a bit. Flip quickly, but gently, if that makes sense. If you flip quickly and wildly, you may have beans and chicken chunks hitting the ceiling. :)
chicken quesadillas fried

After the second side is fried, put on a plate and cut into fourths with a pizza cutter. Top with sour cream and salsa.

For sides, I serve extra tortilla chips & salsa and applesauce.

I make four quesadillas total (only 2 fit in the pan at a time) and I tried something different for the second batch… Instead of layering, mix the sour cream, chicken, beans, and cheese together. Put 2 tortillas in the pan, divide the mixture between them, spread it out, and put the other tortilla on top. Either way works great and tastes the same.
chicken quesadilla

Now, for a bit of a concise recipe that doesn’t have pictures mixed in, in case you want to copy and paste it somewhere. These measurements will be very estimated because I never measure them and the chicken amount varies with how much leftover there is at the moment.

Chipotle Chicken Quesadillas …add or subtract to your liking

2 cups of chicken, chunked
1 Tbsp. olive oil
2 tsp. chipotle seasoning
3/4 cup sour cream, plus extra for garnish
1 can black beans, drained
2 cups shredded cheese
8 tortillas, each buttered on one side

If chicken chunks are frozen, thaw in microwave for 1 min. Heat electric frying pan to 300 degrees or medium-low for stovetop. Sprinkle seasoning over chicken and fry in olive oil for several minutes, stirring now and then. Take chicken out and put 2 tortillas in, buttered side down. Put 1/4 of the sour cream, chicken, beans, and cheese on each tortilla OR mix those 4 ingredients together and spread 1/4 of the mixture on each tortilla. Fry for several minutes, flip gently, and fry the other side. Put on a plate, cut into fourths with pizza cutter, and garnish with sour cream and salsa. Round out the meal with tortilla chips, extra salsa, and applesauce. And dinner is served!

Summer, we love you and welcome you! Please come and stay for awhile!

Cream Cheese Chocolate Cupcakes

Cream Cheese Chocolate Cupcakes

Posted on May 15, 2014 
Filed Under Cakes

You know how actions speak louder than words? These very cupcakes pictured here are a case in point of that. I made these one morning and what do you know, some utility guys came to replace the telephone pole out in our front lawn that afternoon. After they were here for awhile, I put a bunch of cupcakes on a glass platter, locked the dog in the garage, and took the cupcakes and a little table out, offered them as I was setting them on the table, and said I’ll just leave them out here, eat as many as you want.

There were 3 guys on the crew.
They ate almost all of them.
Or maybe they took some for the road.
Anyway, that has got to be one of my favorite things. Making a lot of something and seeing it get inhaled.

cream cheese cupcakes

They also did rave about them when they brought the platter and table to the door before they left. So, there were words, too. But the actions spoke louder.

Cream Cheese Chocolate Chip Cupcakes …from the Derstine cookbook

3 cups flour
2 cups sugar
2 tsp. soda
1 tsp. salt
1/2 cup cocoa
2 cups water
1 cup oil
2 Tbsp. vinegar
2 tsp. vanilla
Combine all dry ingredients in a bowl. Add water, oil, vinegar, and vanilla. Mix together until smooth. Here’s a tip for if you’re in a hurry… use a cake mix instead of mixing the cupcake batter from scratch. Fill cupcake papers 1/2 full. I made a note that says I used my biggest scoop for the cake part (which would be the Pampered Chef large scoop) and a heaping regular spoon for the filling. Put 1 rounded teaspoonful of filling on top of each one. Bake at 350 for 22 minutes. The recipe says 20-25 min, but 22 min was perfect for my oven. Makes 34 cupcakes.

FILLING:
1 8oz pkg cream cheese
1 egg
Pinch of salt
1/3 cup sugar
1 cup chocolate chips
Beat cream cheese, egg, sugar, and salt until smooth. Stir in chocolate chips.

cream cheese cupcakes1

You don’t need to drop the filling in all neat and stuff. Let them have some character. Imperfect perfection.

cream cheese cupcakes2

cream cheese cupcakes3
They come out of the oven all puffed up like this. ^^^

And then as they cool, they kind of go down a bit in the middle.
cream cheese chocolate cupcakes

And last, but not least, I have a little note by my recipe that says “165 calories each if makes 34.” I’m pretty sure I must’ve figured that out for a friend. Because why would I be eating cupcakes if I was on a diet?!

Comments

6 Responses to “Cream Cheese Chocolate Cupcakes”

  1. Shannon on May 15th, 2014 10:12 pm

    You know, for being a “non chocolate” person, I will eat one of these, if I must. :) I haven’t ever made them as cupcakes tho, I always pour a choc cake batter into a cookie sheet and the swirl the cream cheese thru it. They are much daintier this way. :)

  2. Kay on May 15th, 2014 10:16 pm

    Wow, good for you, Shannon, eating a CHOCOLATE something! :) I like your cookie sheet tip for a time saver. Going to try that sometime!

  3. Freida on May 15th, 2014 11:35 pm

    Oh la la. I love love love these cupcakes. They were my all-time favorite growing up and they still are. I don’t make them often because they are not safe in this house. Or maybe I should say I am not safe with them in the house. ????

  4. Kay on May 16th, 2014 1:02 pm

    Yeah, Freida, me too… not safe with them in the house! That cream cheese chocolate chip center just continuously calls to me!

  5. Mom on May 25th, 2014 4:35 pm

    These speak “Pennsylvania” all the way through the filling! Don’t PA cooks always have some kind of stuffing/swirl to their dishes? Anyway, it takes me back to our church’s first meals together with the PA influence. And good for you to serve to working men! They always perform better when you feed them – I periodically give to our mailman, and sometimes he brings the mail right to our door!

  6. Kay on May 26th, 2014 11:38 am

    Mom, whatever language these cupcakes speak, I am quite fluent in! :)

Olive Garden Salad

Olive Garden Salad

Posted on April 14, 2014 
Filed Under Salads, Side dishes

olive garden salad2 kitchen scrapbook

Have you ever had the salad at Olive Garden? What they lack in breadstick perfection, they make up for in salad (my opinion). We love this salad and it often accompanies our meals when we have Lasagna, Spaghetti & Meatballs, or Parmesan Chicken.

There are 7 ingredients: Romaine lettuce, tomatoes, black olives, pepperoncini, shredded mozzarella cheese, croutons, and dressing. Parmesan cheese is optional. This salad tastes exactly like one you’d get at Olive Garden.

Here’s why.

I think in any salad, the secret is the dressing. For this salad, I’ve tried dressing recipes that were named “Olive Garden Dressing”, but none of them tasted quite right. Sure, they were good, but not AS good. So, here’s my secret: I go into our local Olive Garden and buy a bottle of dressing. ???? It’s $5.49 with tax (and I never know whether or not to tip when it’s just a quick no packaging carry-out item, so sometimes a do and sometimes I don’t). It may be slightly more expensive than other dressings, but you can make 3 salads with one bottle. And it tastes perfect every time AND you don’t have to make dressing every time you make the salad. I heard it’s available at Sam’s Club now. I wonder if it’s the real thing. Does anyone know? I just might have to get some there and do a taste test.

Olive Garden Salad ingredient list came from studying my salad one time at the restaurant, quantities are my personal preference

1 bunch Romaine Lettuce
2 Roma Tomatoes, seeded and each cut into 8 chunks
1/2 cup sliced Black olives, or a 2.25 oz can, drained
15 mild Pepperoncini
1 heaping cup shredded Mozzarella Cheese
1 heaping cup Croutons
3/4 cup Olive Garden Dressing

olive garden salad ingredients kitchen scrapbook

I always drain the olives, pepperoncini, and tomatoes on paper towel for awhile before putting them in the salad.

Wash lettuce. Dry and rip into large bowl. (A lettuce spinner has been on my wish list for about 5 years, but every time I have some extra spending money to blow on kitchen stuff, I decide drying lettuce leaves with paper towel will be fine after all, and end up getting more “toys” for cake decorating instead.) Edited Dec 2014: I am now the proud owner of a Pampered Chef Salad Spinner! I. love. it!!! :)

Put all ingredients into a large bowl and toss.

olive garden salad1 kitchen scrapbook

Dump into serving bowl and serve.
For how many this serves:
If using as a side salad, I make a half batch for our family of 5 (and the girls eat about as much as an adult would, even the 3-yr-old).
If using as a main dish with grilled chicken on top, I make a whole batch (as a main dish, the girls don’t eat quite as much as an adult would).
In both cases, there’s usually a serving or two left over.
For company, I make one batch for every 10-12 people.

olive garden salad kitchen scrapbook

We had this for lunch yesterday and there was a serving of leftovers. Because this salad keeps better than some dressing-mixed-in salads, I put the leftovers in the fridge. I ate it for supper (5 hours later) and the lettuce was still crisp and crunchy. I think it might keep better because it’s a low sugar dressing and doesn’t make the lettuce soft.

Speaking of lunch yesterday, here is a variation for serving this salad. It’s commonly thought of as a side salad, but once in awhile, we like to switch things up from our regular chicken breast salad and use Olive Garden salad for the salad part instead. (By the way, our regular chicken breast salad is featured here almost 3 years ago, but we still do it exactly the same, and still make it often, especially in the summer.) Anyway, we switched it up yesterday and used Olive Garden salad… simply fill a plate with the salad and put a sliced perfectly-seasoned-and-grilled-by-Shannon chicken breast on top.
olive garden salad with chicken kitchen scrapbook

Comments

5 Responses to “Olive Garden Salad”

  1. Shannon on April 14th, 2014 1:08 pm

    Love this salad too. To save you a stop, I buy this dressing at Walmart. :)

  2. Kay on April 14th, 2014 2:03 pm

    Are you serious, Shannon? I do most of my shopping at Meijer and so seldom go to Walmart, which is probably why I haven’t seen it.
    And is it the exact same thing? For some reason, I’m kind of skeptical about it… maybe because I can’t believe that they’d sell the real thing to stores. I’m going to get some at Walmart the next time I go to town and do a taste test, and then edit this post to add my opinion of how it compares. ????
    Thanks for the info… because as I wrote that in the post about Sam’s Club, I wondered if my card was still in date.

  3. Rosalyn on April 14th, 2014 3:26 pm

    Yum! :) Makes me wish I’d have all of this on hand for easy fixing tonight!

  4. Freida on April 14th, 2014 3:44 pm

    Yeah, Walmart has the dressing. I’m pretty sure its the real thing-the bottle looks exactly the same. And now view am hungry rir this salad!! Yum!

  5. Jan on April 14th, 2014 4:40 pm

    I’ve tried to make some of the Copy Cat dressings, too, and they’re not the same. They’re good, but not the same. Olive Garden salad is absolutely the best to be found anywhere.

American Girl Doll Birthday Cake

Posted on April 11, 2014
Filed Under Birthday cakes, Cakes

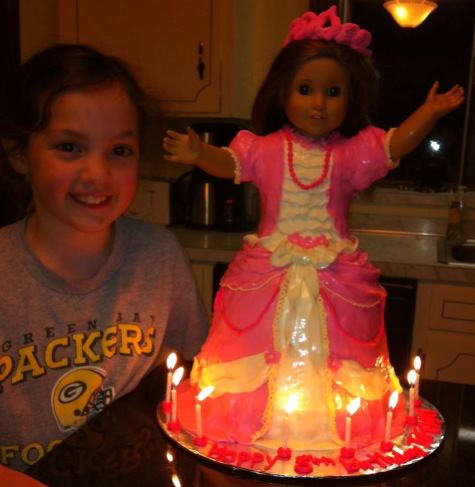
Tiffany turned 8 last week. Usually, the girls pick what they want for a cake, but this year Tiffany said, “I don’t want to pick my cake this year, I want you to surprise me. My only thing is I’d like something that has to do with princess-y”.

So, the morning of her birthday, Tiffany left for school and I got busy baking.

This is what was waiting for her when she got home.

american girl doll cake4

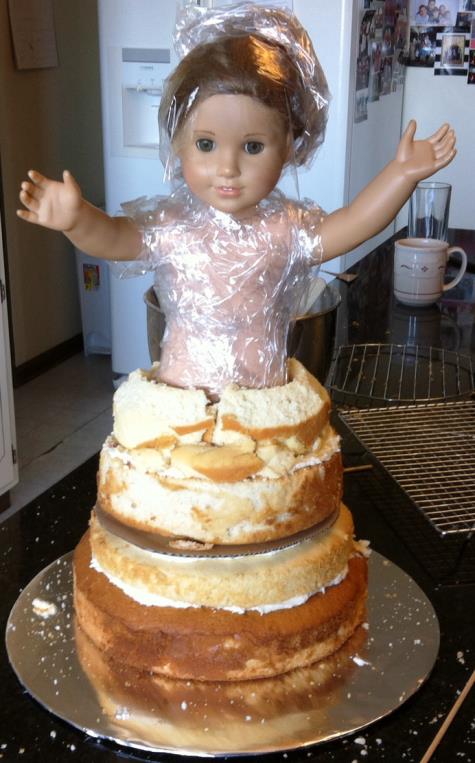
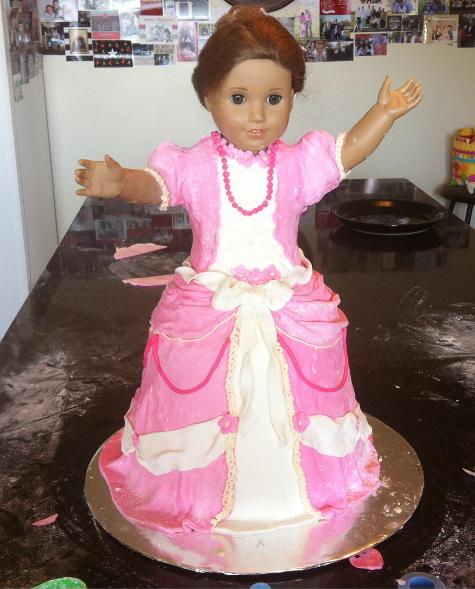
Yes, I did put her American Girl doll Rebecca inside a cake. Yes, I know, it was a little crazy.
In all of Pinterest-searching for princess cakes, I never saw an American Girl doll in one… Barbie seems to be pretty much monopolizing the whole doll-in-cake thing. If you’re wondering how Rebecca’s cloth body fared, it was totally unharmed. Before putting her in the cake, I wrapped her in plastic wrap up to her chin and down her arms a bit. I did have to wash her hair afterwards, though, because it was against the back of her dress and the fondant tiara was sitting on it.

Tiffany loved the cake extra much because it wasn’t some random new doll… it was a doll she’d had for over a year and already knew and loved. Ok, that sounds weird talking like that about a doll, but if you were once a little girl with a favorite doll, you might understand how that can feel accurate. ???? I don’t know how many times Tiffany said, “I just feel like I have to pick her up and hug her!” and then sometimes adding the obvious “but I know it would get fondant and cake all over me”.

So, for the details, here is how I did it (not to be confused with the professional way to do it, ha). You’ll notice some winging it and some improvising and some lack of planning ahead and some details that didn’t get very good. But so what, my 8-year-old was speechless ….and yours would be too if you’d up n wing a cake like this for her. :)

First is baking the cakes…

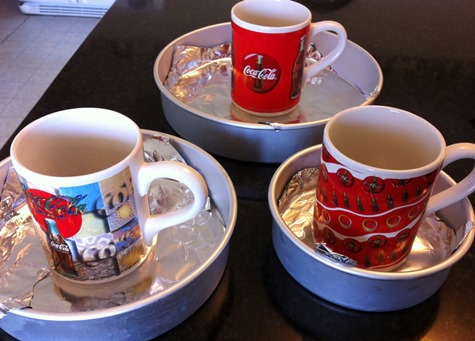
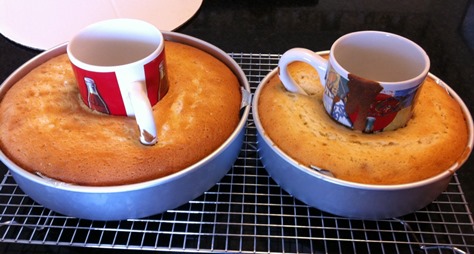
The cake part is white cake baked in 4 pans… a 10″, 9″, 8″, and 6″ pan. I needed a hole in the middle to put the doll down thro’, so I thought why not save on cake instead of cutting out the middles, so I put a coffee cup in the center of each pan and dumped the batter in around it. Can you say “wing it”? Worked great, though! The handles were kind of a pain to work around, but my drinking glasses aren’t big enough for how big I wanted the hole.
cake baking1

cake baking2

Next step was to layer the cakes, put Rebecca in, and cover the skirt with frosting. I did no skirt carving to make an even slant, except for the very top layer so it wouldn’t be quite as big of a jutting out. And yes, the top layer did sort of break in the trimming process, in case you notice it looks a bit pieced together. For the other layers, instead of trimming, I just put more frosting where needed to fill in the gaps. As you’ll see in the picture below, I put a cardboard between layers 2 and 3, and there are skewers going down thro layers 1 & 2 under the cardboard, just in case the cake and frosting would want to settle down into each other from the weight.
american girl doll cake1

american girl doll cake2

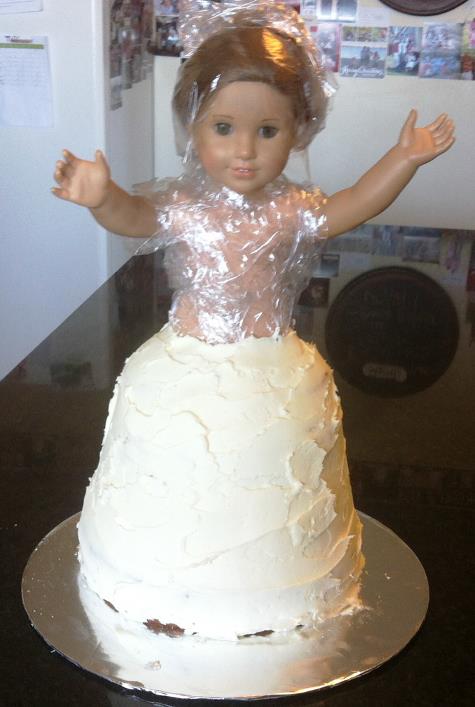
Now the fun part… fondant. For the first time ever, I MADE fondant. I got the recipe from Around My Family Table. It was more stretchy than store-bought (which can be good or bad, depending what you’re doing), otherwise it was pretty much the same. And it tastes a lot better, so I’m kind of thinking homemade from here on out. Not sure if it would work as well for figurines though, will have to experiment. For this cake, I made a double recipe of fondant and used almost all of it.

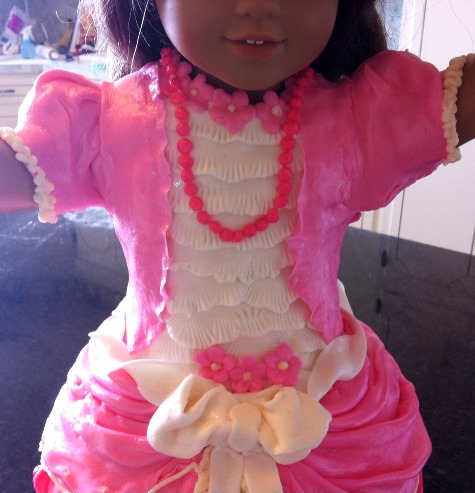
I did not have the dress visualized before making it, so it kind of just happened as it went… deciding it needed some white to break up all the pink and just kinda messing with and adding things here and there. I need to get better at folds in fabric, like at the top of the skirt. The flowers around the neck were to hide the plastic wrap sticking up, so the other flowers on the dress were to tie in with that. Btw, I have a flower cutter set that makes those so easy, my 3-yr-old can even make them. She was making some along with me here and we kept stealing cutters and presses from each other. I think she ate all the flowers she made, though.

american girl doll cake3

After this picture, I put some water in a spray bottle that sprays a very fine mist and misted the dress to give it the look of shiny fabric. Plus, it was an easy way to get rid of the extra powdered sugar on the dress (which is on there from rolling it out because you need powdered sugar to keep it from sticking to the counter and rolling pin).
Tip: If you want to get rid of the powdered sugar without getting the shine, carefully wipe it off with a barely damp paper towel or cloth.

The lack of progress pictures is partially because I forgot, partially because my hands were always powdered-sugary, and partially because you can pretty much see everything in the done picture. For the sleeve puff, I put a chunk of fondant on each shoulder, then gathered fondant and shaped it for a sleeve. There is no cake on the top half of her… that is fondant directly on top of the plastic wrap that she’s wrapped in. The necklace is simply piped dots of frosting.

american girl doll cake5

Just a few tidbits:
— Her arms got in that position when I was wrapping her in plastic. When I was done, I was about to put them down, but instead let them up in the air like that because it looked more festive or something rather than hands boringly at her sides.
— The tiara was a bit of an afterthought. She was done and I thought “oh dear, a princess needs a tiara! I should’ve made one 2 days ago so it could be dry and hard now!” I had to go with a chunky one because a delicate one couldn’t have stood up because there was no time for the fondant to harden. So I made a ‘snake’, looped it a few times, pinched the middle loop into a point, sprinkled it with granulated sugar, and put it on her head.
— The candles… we were ready to light candles and sing Happy Birthday to You, but I hadn’t put any on! We couldn’t think of a good place to poke them in (I mean, really, who wants their dress on fire?!). Just then a light bulb moment hit and I ended up piping 8 little piles of frosting on the cake board, and stuck the candles in. Worked great! You can kind of see it on the very last picture of this post.

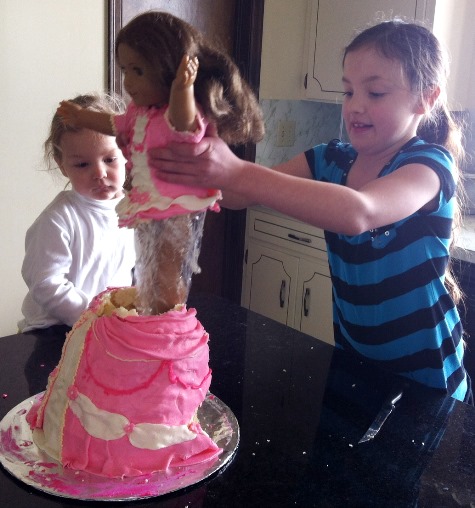
I’ll just add a couple pictures yet of a cut view so you can see how Rebecca was in there.

american girl doll cake cutaway

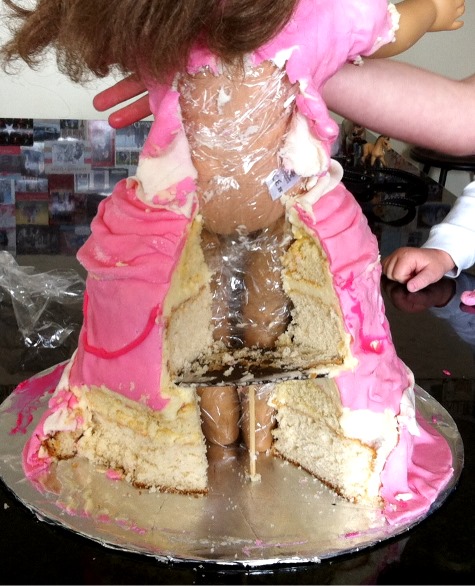
Rescuing the princess from the tower, er, oops, I mean, cake…
american girl doll cake disassembling

Happy birthday, Tiffany. Only 8 years ago, you looked like this:
tiff baby

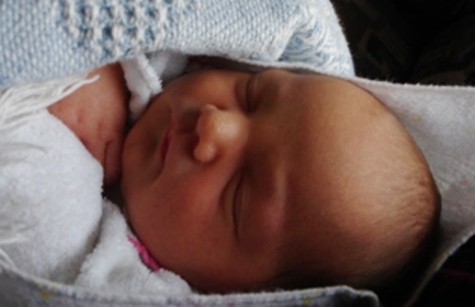
How did you get to this already?!:
american girl doll cake rebecca tiffany

Comments

9 Responses to “American Girl Doll Birthday Cake”

  1. Rosanne on April 11th, 2014 9:12 am

    Great job, absolutely impressive!
    Did you every work with modeling chocolate? That might be what you need for figurines.

  2. Rosalyn on April 11th, 2014 9:47 am

    Beautiful cake! :) This must be a young girl’s dream cake!
    My girls are oohing and ahhing. “She is the BEST at making cakes!”

  3. Kay on April 11th, 2014 11:35 am

    Rosanne, thanks, esp coming from you, my cake-decorating hero! :) Yeah, I’ve worked with modeling chocolate and I should more! I like how you can join parts together and rub out the seam where it’s joined.

    Rosalyn, I know you have some American Girl Dolls around there… *hint hint*… you oughta try it! I know you could do it!

  4. Jo on April 12th, 2014 8:44 am

    Kay, I can’t believe this cake! Looks great.
    I met your aunt Ruthie and Uncle Dan in Haiti. They were at church with us Sunday morning.

  5. Shannon on April 14th, 2014 2:05 pm

    Wow, you are amazing. My girls couldn’t get over this. :)

  6. Kim on May 8th, 2014 11:30 am

    You ARE AMAZING! “Tiffany left for school. I got busy baking. This is what was waiting for her when she got home.” WOW! You make it sound so easy. And the 3 yr old ‘helping’ makes it even more remarkable. My 2 yr old would be the demolition crew all in one. Kristen and Shaina both have just like you AG dolls, and they would love it. Maybe til Aug I can work up my courage. :) Hey, its’ great to see you here again. It’s been awhile since I browsed. Miss you!

  7. maxine on November 3rd, 2014 1:15 am

    This is totally incredible. I am send in to American Girl Stores Manger in Houston and one in Chicago. You are the best!!!!! God bless. I did want to find someone I can trust to do this for my daughter on her 5th Birthday.

  8. Sandra on November 13th, 2014 12:32 pm

    That is incredible. I won’t even show it to Kiana because she would demand one just like it and I don’t have the talent for cake decorating

  9. stephine on August 8th, 2015 11:57 am

    thats adorable thats a really good idea good job

Quick School Morning Breakfast Ideas, including Baked Oatmeal

There was a time when the term “school morning” was a negative thought in my mind, mostly it was rushing sleepy kids through their morning routine. What changed was simple. I started getting them up 45 minutes earlier. Now, we have all the time in the world and it’s so relaxing and peaceful. And here’s another thing I love about that. Instead of deleting those 45 minutes out of their night, we tacked it on the other end. I love that hour or two at night when I still have kids, but am basically off duty. :)

Back to those extra 45 morning minutes… I don’t use the extra time to feed them a full course breakfast. We do quick breakfasts. I’m going to make a list of what a common school morning breakfast would be around here, from most frequent to seldom.

— Toasted bagel with cinnamon sugar
— Toast, either with cinnamon sugar, honey, or jam on it
— Cold cereal with milk
— Banana with peanut butter
— Cuties oranges
— Baked oatmeal
— Yogurt
— Regular oatmeal with brown sugar & cinnamon
— Cinnamon rolls
— Pancakes thawed from the freezer
— Pop tarts
— Toaster strudels
— Cookies with milk

Now that I think of it, eggs & toast would be a quick breakfast too, but that’s pretty much just a weekend thing for some reason for us. I mostly don’t make their breakfasts, they usually get it themselves. I made it this morning though… Baked Oatmeal. They love baked oatmeal. I posted baked oatmeal back in 2008 and someone said in the comments that she microwaves it for a quicker breakfast. I tried it and it doesn’t have the crunch, but tastes just as good. And it cuts 30 – 40 minutes down to 7 or 8 minutes. And that’s why it made the “quick breakfasts” list.

I just switched to using the recipe below instead of the one from 2008 because I like this one better. They’re very close, the only differences are that this one has cinnamon and a different salt quantity.

oatmeal1

Baked Oatmealrecipe from the Simply Wonderful cookbook

3 cups quick oats
1 cup brown sugar
2 tsp. baking powder
1 tsp. cinnamon
1 tsp. salt
1 cup milk
1/2 cup butter, melted
2 eggs, beaten

In a mixing bowl, combine all the ingredients. Spoon into a greased 9″ square baking pan. Bake at 350 for 40 – 45 minutes. Or microwave 7 – 8 minutes, stirring every 3 minutes. Serve warm with milk. Yield: 6 – 8 servings. You can also add fruit to it… apples are my favorite.

oatmeal2

What do you serve for breakfasts? Do you have quick ideas that I missed up there?
And if you usually cook full course breakfasts, I’m impressed! I remember one time in my teen years, I stayed with my friends Sheila and Heidi overnight. Her mom cooked a big breakfast and then they had cold cereal as dessert… they didn’t call it dessert, she just served it like you would dessert (cleared some main dishes and plates away and put cereal and bowls on the table). I still vividly remember how floored I was when the cold cereal appeared. I was so stuffed after that meal! My friend said that was a normal breakfast, but breakfast was the biggest meal of the day at their house. They were farmers.

Comments

2 Responses to “Quick School Morning Breakfast Ideas, including Baked Oatmeal”

  1. Karen B on April 9th, 2014 12:09 pm

    PW has a recipe for Make Ahead Muffin Melts my girls love. Very easy to just plop the egg stuff on english muffins in the morning and shove in the oven. We started earlier mornings here too.Not for big breakfasts but to move slower. =) Our 13 yr old is often up making coffee when I get to the kitchen!

  2. Kay on April 9th, 2014 9:28 pm

    Hey, thanks, Karen, I’ll have to try those muffin melts! We could use a change up around here… plus, something with eggs (thinking more protein) on a more regular basis would be good. The “moving slower” at our house usually includes wrapping in a cozy blankets on the couch for a bit. :)

Pepperoni Pizza Puffs

Pepperoni Pizza Puffs

Posted on April 3, 2014 
Filed Under Snacks

I hope this post will make sense. Right now, my computer screen is split, with me writing this post on half of it and my 3-yr-old Megan watching Dora on the other half (currently, Dora is singing a song about Winter turning to Spring and as she’s singing, all the snow around her is melting and the grass is greening up and flowers are starting to bloom… I wish finding Spring in real life would be that easy, sing a song and there it is, especially this year). Anyway, I’ll try not to accidentally drop little Spanish phrases here and there as I’m writing this.

Pepperoni Pizza Puffs. I discovered this recipe a couple years ago on Lick the Bowl Good and have made it SO many times! You can go from walking into the kitchen to serving in 30 minutes. They are great for snacks or lunches. They freeze well too… which means you can go from walking into the kitchen to serving in 5 minutes instead of 30! :)

I have been asked for the recipe multiple times after serving them. In fact, one time someone who had never had them asked for it. I was cleaning school with a group when I got a phone call from someone calling to get this recipe. I make it so often that I know it by heart, so I gave it over the phone while wiping down a desk. When I got off of the phone, one of the other cleaners said “I was listening and that recipe sounds good and easy. Could you write it down for me?”

I don’t make them exactly like Monica does on Lick the Bowl Good, but very close. I’ll post them here how I make them, which is basically with a little less kick because my kids prefer them that way.

pepperoni pizza puffs
Hmmm, looks like I need to take a better picture next time I make them.

Pepperoni Pizza Puffs …adapted from Lick the Bowl Good

3/4 cup flour
3/4 tsp. baking powder
1/2 Tbsp. Italian seasoning
Pinch of salt
3/4 cup whole milk (I like to use whole, but it works great with any milk)
1 egg
1 heaping cup shredded mozzarella cheese
1 cup chopped pepperoni (if I don’t have pepperoni on hand, I skip it. They love em without it too. Tiffany actually prefers them without it, so sometimes when I’m making them with pepperoni, I fill a few muffin cups for her before adding the pepperoni to the batter)
Pizza sauce for dipping

Whisk everything together, except the cheese and pepperoni. Then, stir them in. Divide the batter evenly between 24 greased mini muffin cups. Bake at 375 for 20 minutes. Warm the pizza sauce in the microwave and serve with the puffs for dipping.

I tried these one time in regular muffin cups instead of mini… aaaaaaaaand then went back to always making them mini. :) They seemed to not be quite as fluffy, and well, they lost some of their charm by being big.

I just heard something on Megan’s movie that was said in an annoying voice and I copied it in an exaggeratedly annoying voice and she said, “Mom, stop. You’re embarrassing me!”

If you pack lunches for your school kids, here’s an idea for you with these pizza puffs. Make a bunch of them, buy little 6″ paper plates and small condiment cups with lids. Package them in a sandwich bag like this and stack them in the freezer.
pepperoni pizza puffs lunch box
It’s so handy to whip them out and throw them into lunch boxes. If the kids have access to a microwave at school, they can take the lid off of the pizza sauce, and microwave the plateful for 30 seconds.

I hope you like these as much as we do! Have a good day.

Comments

2 Responses to “Pepperoni Pizza Puffs”

  1. Shannon on April 4th, 2014 7:22 am

    I am always on the look out for good lunch food. Sounds like one I need to try!

  2. Jan on May 26th, 2014 10:32 am

    For some reason I didn’t see this post until just now. My girls love stuff with pepperoni and anything made in a mini muffin pan is automatically a hit, so I think I’ll be making these very soon, like, for-
    today’s-lunch soon.

Snickerdoodle Bars

Snickerdoodle Bars

Posted on March 12, 2014 
Filed Under Cookies and bars

In the world of baking, here is what I bake the most. Snickerdoodle Bars.

snickerdoodle bars comparing

Out of the 5 people in this house, 4 of us are crazy about them. I won’t let out any secrets how long (or should I say how short) a pan of these lasts around here. I’ll give you a hint though… you might not want to blink or you could miss them. Ok, not quite.

In case you’re wondering who’s the one not crazy about them, it’s me. I really like them, but they don’t have chocolate in them. Give me monster cookies instead. That’s my all-time favorite ever.  Monster cookies is the second most common thing that gets baked in my kitchen. Why is it that I often think of my sister-in-law Liz when I write baking posts? Our friendship does go deeper than food, honestly! But I thought of her again when I wrote about monster cookies… she loves them, too. And one time, when they were here and we were going shopping, she asked me if I’d please make some monster cookies if she buys the ingredients. That was such a huge compliment and I’ll never forget it. But anyway, this post isn’t about monster cookies, it’s supposed to be about snickerdoodle bars! For a monster cookies post, go here.

One nice thing about these snickerdoodle bars is that they take only staple ingredients. So 95% of the time, they can be made at a moment’s notice. They take a whole Tablespoon of cinnamon, so another nice thing about them is that they have a bold cinnamon flavor.

Snickerdoodle Barsrecipe from my friend Shannon, and then she also put it in the Simple & Satisfying cookbook

3/4 cup butter, softened
1 1/4 cups sugar
1/2 cup brown sugar
3 eggs
1 tsp. vanilla
2 1/3 cups flour
1 1/4 tsp. baking powder
1/2 tsp. salt

1 Tbsp. cinnamon
1 Tbsp. sugar

Glaze:
1 cup powdered sugar
1-2 Tbsp. milk (1 1/2 Tbsp is perfect)
1/4 tsp. vanilla

Cream together butter and sugars. Add eggs and vanilla. Mix well.
snickerdoodle bars mixing

Add dry ingredients. Pour 3/4 of the batter into a greased 9×13 pan. (It doesn’t actually pour, more like scoop it into the pan and then spread it out.)
snickerdoodle bars layer 1

Mix Tbsp of cinnamon and sugar together and sprinkle over layer. Put remaining batter on top.
snickerdoodle bars layer 2

snickerdoodle bars layer 3

Bake at 350 for 25 min. (The recipe actually says 30 min, but we think they’re softer and better at 25 min.)
snickerdoodle bars glazed

Cool slightly. Drizzle with glaze.
snickerdoodle bars glaze

Now. A variation.

Lexi (11) makes these bars, but she kind of has a hard time with spreading the remaining dough on the cinnamon layer. And it is hard… the dough is sticky and firm and the cinnamon layer offers no traction. It even takes me 4-5 minutes just to spread that layer on. So, we tried something and it worked! We mixed the Tbsp of cinnamon right into the dough. The 2 bars taste the same and it’s so much easier to spread all the dough in the pan and pop it into the oven instead of the 3 layers.

The bars look different, though.
snickerdoodle bars

I like the looks of the 3-layered ones better, so I might do those for social occasions, but here at home, the all-in-one bars win most of the time. Especially if Lexi is baking.

And since we’re talking variations, if you prefer cookie form, here is our favorite recipe for Snickerdoodles.

So, there you have it. The most popular baked goods at our house. What do you bake the most?

Comments

4 Responses to “Snickerdoodle Bars”

  1. Liz on March 12th, 2014 3:05 pm

    (I finally subscribed to your posts so now I get notified right away. How slow can I be? It’s not like this page hasn’t been around for years.) I know this post isn’t supposed to be about Monster Cookies (but you brought it up first) I have tasted your recipe made by different people and I’m amazed at the different variations of it. I think you still do it the best. Although with how many I eat of others they still passed with flying colors. I guess there was prob difference in how long they beat it, baked it, etc.
    I’m guessing I would be on the same page as you with these bars. I think I did try them one time, but like you said – no chocolate. :( 
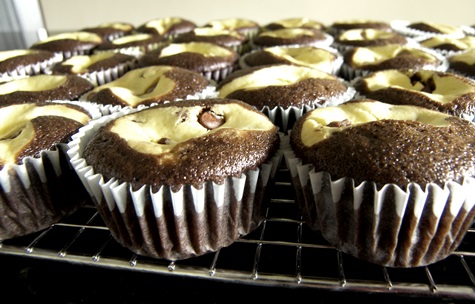
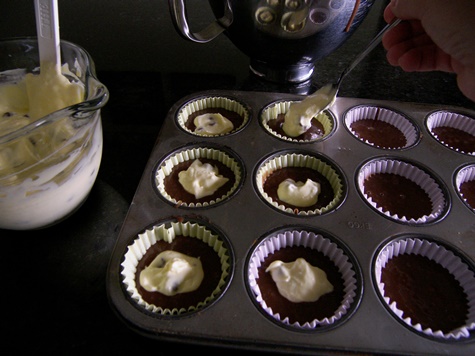
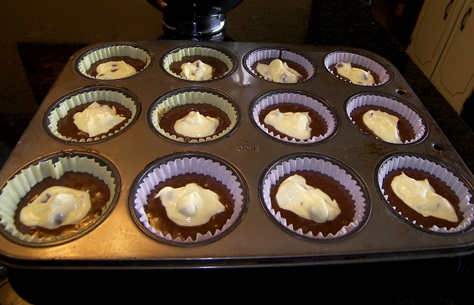
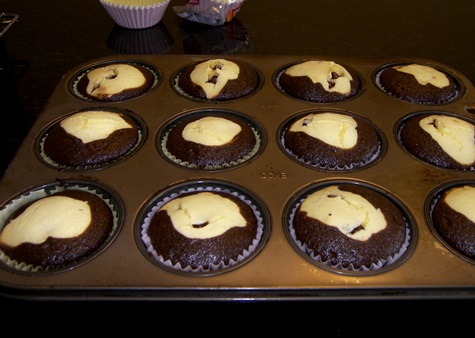
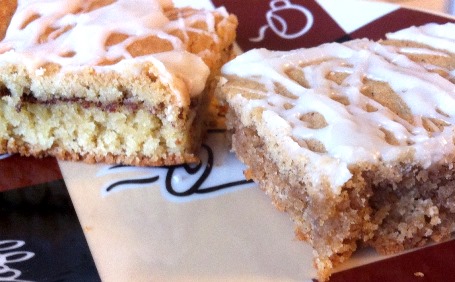
I make Mom’s Finnish Cake, but it’s for the children and Elvie. I don’t eat much because it’s not my thing. Apparently, the grands must have inherited the love of cinnamon.

  2. Karen B on March 13th, 2014 9:12 am

    4 of the 5 people in our house love these bars! R prefers monster cookies or something chocolate! =)

  3. Shannon on March 17th, 2014 8:18 pm

    Ohhh yummy. Haven’t made them for a long time. I know what I’m gonna do tomorrow. :)

  4. Arla on March 20th, 2014 7:00 pm

    So I made these for supper with a difference. I used oatmeal flour and all purpose gluten free flour instead of regular flour. And I tripled the cinnamon and sugar part and served it hot with plenty of glaze and ice cream. Yummy! Thanks Kay, for the recipe. Elv doesn’t like chocolate so he enjoyed this, too.

Wooden Baskets with Daisies Cake

Wooden Baskets with Daisies Cake

Posted on March 7, 2014 
Filed Under Cakes

I’m in the mood to feature a cake. I have a bunch that I’ve never put on here. Sometime, I’m going to make a separate cake section on this site. I think at some point, it could merit its own section because that’s what I picture doing in 5 years or so… cakes. Between now and then, I plan to have fun doing a few hit n miss and taking classes and tripling my cake-decorating tools/gadgets/pans supply. I want to take classes so I can prevent mistakes instead of learn from my mistakes. ???? Right now cake-making is pretty much a “wing it” deal, and while that’s worked out pretty well so far, there’s also been a lot of wincing-then-sighs-of-relief involved too. And well, yeah, some wincing-then-starting-over moments, too.

This particular cake was quite an honor. It was the FIRST wedding cake I’ve ever done. The bride-to-be knew I’m not a pro, but she trusted me anyway… uhhhh, in case you wonder, that spells p-r-e-s-s-u-r-e!!! :)

wooden basket daisy cake

You know that whole “wing it” thing I was talking about earlier? Well, I had never done wood grain before. Nor had I ever made a cake this big (the biggest pan size I owned up to this point was a 12″ and I had to go get a 16″ pan for this cake). The bottom layer is 16″, middle layer is 12″, top layer is 8″, and each layer is roughly 6″ tall.

I didn’t take very many step-by-step pictures because I was in the cake-decorating zone and well, simply forgot. But in case you’re interested, here is the construction, then I’ll get to the fun part… the wood and flowers. ????

The bottom layer is a 3″ chocolate cake with chocolate buttercream and a 3″ vanilla cake with vanilla buttercream, each split with frosting between. When they were frosted, I put the chocolate layer on the cake board and put four 3″ dowels in it so the weight of the rest of the cake wouldn’t be on it, then set the white layer (which was on cardboard) on top. Here is a (very bad) picture of that, quickly taken before all the fondant was on.
bottom layer basket cake

Then I put four 3″ dowels thro’ the white cake and one sharpened 6″ dowel down thro’ both cakes and the cardboard layer between them.

The middle basket is all chocolate with chocolate buttercream and is on cardboard. No cardboard between the layers, but the cake does have dowels in it for holding the weight of the top basket.

The top basket is all vanilla with vanilla buttercream and is on cardboard. No cardboard between layers and no dowels.

ready for stacking and flowers

Now for the fun part! :)

First is the wood grain. The slats may look like individual pieces, but it’s actually larger sections with multiple slats per sections. I started with white fondant and mixed in some cocoa powder to make it a light tan. In hindsight, I don’t think I would’ve had to do that step though because the “stain” would’ve covered it fine without leaving white spots when wiping it off.

Roll out fondant. Cut it to a rectangle… length doesn’t matter, but try to get the height as close to correct as possible. Take something about 1/8″ wide and indent lines from top to bottom, these are the slats. I said “take something 1/8″ wide” so you know you can make wood grain without a well-I-don’t-have-a-decorating-tool-set excuse. ???? You can use the handle end of a small paintbrush or whatever. Next, beat it up. Give it some character. Make dents, make lines, make knots. And yes, there is powdered sugar all over the place… it keeps the fondant from sticking to the counter.
wood grain fondant 1

Then, mix vodka with brown food coloring paste to make “stain” to stain the wood. If you’re concerned about the alcoholic aspect, the alcohol evaporates. Plus, you don’t use much at all, so the teeny bit that would be on one piece of cake wouldn’t affect anyone if it wouldn’t evaporate. (Do NOT use water or you’ll have a mess on your hands because water becomes like glue when it touches fondant.) Get a clean paintbrush and brush the stain on. Wipe it off immediately with a clean cloth. And THAT is when the magic happens. It doesn’t look like much up to that point, in fact it looks like quite a mess. But as soon as you wipe the excess stain away, a beautiful realistic-looking-wood piece of fondant appears!
fondant wood grain 2

If the icing on the cake is a crusting kind, run a knife or something over it to un-crust it so the fondant will stick to it. Carefully pick up the fondant and place it around the cake. If you wait several minutes until the alcohol has evaporated, it doesn’t stick to your hands while you’re placing it on the cake and you can also loosely roll it up without it sticking together to transfer it to the cake.

After all the wood was on, I made the bands. This beautiful blue was one of the wedding colors, which is why the bands were this color… if I’m making a basket case for just anyhow, I’d probably make the bands tan. This was simply coloring the fondant, rolling it out, cutting it into strips, wetting the back of the strips with water, and placing them around the cake. After putting each band on the cake, I did the staples. If I’d have waited to do the staples until all the bands on all the cakes were done, it wouldn’t have worked as well because the fondant on the first bands would’ve started drying out and it wouldn’t have been as easy to make an indentation. After making the indentations, I took a tiny paintbrush and painted brown food coloring inside them. Some of them got a little messy and I was sighing about it to Shannon and he said, “No, it’s great. It makes them just look rusty.” Ah, way to make lemonaide out of a lemon.

Next, I covered the visible part of the cake board with white fondant and put a white ribbon around the edge. Then, I crumbled up some leftover chocolate cake for the “dirt” and put it around the rims of the 2 lower baskets and over the top of the top basket. It looked good, but next time, I’d use Oreo crumbs… I think they’d look more like dirt, but I didn’t think of it at the time.
fondant wood flower baskets cake

Then, it was time to add COLOR. Fondant daisies. Hot pink was the other wedding color, so that’s what the daisies were. Here are some of the daisies and leaves drying ahead of time. I put them on crumpled tin foil so they wouldn’t dry flat and boring.

fondant daisies

In case these look hard, they’re not. I have a flower/leaf cutter and impression set that I used… one of my happy purchases from Michaels with a 40% off coupon. I also added a bit of petal dust for a more realist look.

So, there you have it, a wooden basket daisy cake. It was challenging and a whole lot of FUN!

stacked wooden basket daisy cake

Comments

3 Responses to “Wooden Baskets with Daisies Cake”

  1. Shana on March 7th, 2014 6:28 pm

    Those flowers are gorgeous! I thought they were real.:) Amazing job!!!

  2. Liz on March 9th, 2014 12:07 am

    It was good reading about the process of it! You have a talent. I hope that your dream of decorating cakes on a normal basis becomes a reality.

  3. Jan on March 25th, 2014 2:02 pm

    Wow! That is just gorgeous!

It’s Valentines Day!

Posted on February 14, 2014
Filed Under For special occassions, Garnishing, Holiday cooking

Happy Valentines Day!

I’m actually not sure yet what I’m going to do for our meal tonight. Can you say “last minute”? I like to at least acknowledge Valentines Day each year with a meal, but for tonight I’m kind of thinking regular food with Valentine décor and dishes. I’m really in the mood for Parmesan Chicken and I don’t know how to make that heart-shaped without being too corny and chicken-wasting with a large cookie cutter and chicken breasts.

I’m not even sure why I said the corny part… that ship already sailed. Half of the stuff at Valentines is corny because we use our imaginations and anything goes as long as it involves hearts and red and love and “awwww”. I think you’ll see what I mean if you keep reading this post. ????

Today I’m posting a meal that I made on a previous Valentines Day. So, if you’re looking for some last minute ideas for tonight, here you go.

valentines meal

The menu was:
-Meatloaf
-Amish noodles
-Salad
-Biscuits
-Red velvet cake

Meatloaf
I used this recipe because it’s THE *personal opinion alert* best meatloaf ever!! And I baked it in a heart-shaped pan. My mom used to always do that with meatloaf on Valentines Day.
valentines meatloaf

Amish Noodles
I made regular noodles and cooked a couple pieces of lasagna in with them. After it was cooked, I took a heart cutter and cut hearts out of the lasagna pieces and threw them back in with the noodles. When I dished it up, I pulled some of the hearts up to the top.
Here is the recipe for the noodles in case you’d like it:
1/4 c. butter
1 1/4qt. chicken broth
1 Tbsp. chicken base
1/2 tsp. Lawry’s
8oz. homemade egg noodles
1/3 of a can of cream of chicken soup
Brown the butter. Add the broth and seasonings. Bring to a boil. Add the noodles and cook for 10 minutes. Add the cream of chicken soup, stir, put on lid, and turn off the burner, and let set 20 minutes.
valentines noodles

Salad
Another one from my childhood that Mom did… it’s simply lettuce salad with little heart-shaped cheese tossed in it.
valentines salad

Biscuits with jam
I made regular biscuit and cut them out with a heart-shaped cookie cutter, and then just for extra color, piped a heart shape of jam on top before baking them (we ate more jam and butter with them at mealtime). The jam kind of got messed up in the baking process, but you could still tell what I was trying for.
valentines biscuits

Red Velvet Cake with cream cheese frosting
I used this recipe, made only a 1/2 recipe and 1 layer, and made it heart-shaped instead of round. The rose is red and green candy melts. The rose tutorial is here and then I just sorta winged it with the stem and leaves.
valentines rose cake

For the décor:
We put red ribbon around on the table and the girls used a heart punch to cut out hearts to sprinkle around.
We used goblets, dipped the tops into colored sugar, and tied red ribbon around the stems.
We had a red centerpiece (you can see the base of it on the first picture up there) that looked more or less like an explosion of spikes and hearts. Festive, but we didn’t end up using it because the table was too full.
Lexi sneakily made Valentines for each of us and put it on our plates.

I really wish I’d have seen this Valentine note that I made to myself earlier because now it’s too late because I don’t plan to (or feel like) going anywhere today, but here is an idea I had tucked away for this Valentines Day and just found a bit ago. I’ll put it on here though, because we’re in the Valentine mode.
Remember what I said up there about corny? Well, here’s a huge *corny alert*!
The idea was to put these on each plate:
For my husband: chocolate candy from our local bulk foods store that looks exactly like rocks, along with a note that says “You ROCK my world”
For Lexi (11): Starbursts and “I’m BURSTing with happiness that you’re my girl”
For Tiffany (7): Gummy bears with “I love you BEARy much”
For Megan: (3): Suckers or smarties or anything sweet with “You’re my little SWEETie”

Wishing all of you a wonderful Valentines Day, and thank God for all the ones you love!

valentines rose

Comments

3 Responses to “It’s Valentines Day!”

  1. Shannon on February 14th, 2014 10:29 pm

    You were created to be in the kitchen! This looks great.
    If I made a meal that looked like this my family would probably fall over. :)

  2. Jan on February 15th, 2014 5:48 pm

    We had good ol’ meatloaf, scalloped potatoes, and salad last night for supper. Nicoleta thought we should cut the lettuce out heart shaped, but I quickly vetoed that idea. Of course, the candles flickered and died partway through the meal, but the girls strongly resisted the idea of turning the lights on. We finally compromised with lights on in adjoining rooms and the oil lamp kept burning, so we made it through.

  3. Kay on February 18th, 2014 11:29 am

    Ha, Jan, I love the candle story… brings back memories of the guys lighting up their cell phone screens and propping them by their plates when we wouldn’t allow the lights on. :)

    Shannon, you are good in the kitchen too… 2 of our family fav recipes are from you (Raspberry Cream Cheese Cinn Rolls and Snickerdoodle Bars). Seriously, you’d fall over if you knew how often I make them… esp snickerdoodle bars!! Can’t believe I never featured them! Must. soon.

Chipotle in a Bowl

Posted on January 24, 2014 
Filed Under Chicken and Turkey, Main dishes

chipotle in a bowl serving

This is one of my favorite foods at the moment. I’m not even sure why I like it so good. I mean, it’s basically just rice, beans, and chicken, which doesn’t sound all that exciting. But man, it is so GOOD!!! It must be the cumin. Or cilantro. I don’t know, but I just had it yesterday and I’m craving it again. I wonder how many days in a row I could eat it before I’d get tired of it.

So, please make it.

Don’t let the list of spices, herbs and steps make it look daunting.

I’ll be honest, it is kind of time-consuming to make. But all casseroles and soups are. ……..When I say that sentence in a conversation, it’s like I want to ask myself “Did I yell that? Or why did everyone perk up and half the people are wildly talking over each other disagreeing with me?” Every time I say that, people come up for air defending it because “casseroles are so quick” and “just throw together a soup”. It will forever be a mystery to me why I seem to always be standing alone on the casseroles-and-soups-are-more-time-consuming island. I just realized that I’m off on a bunny trail here, but I’ll follow it a bit more and tell you why I feel the way I do… in case you’re coming up for air too. ????
There are so many steps to all-in-one dishes… you fry the meat, you cook the noodles, you chop the veggies, you sauté them, you make and thicken sauce. You mix it together, add more things, and then you still have to bake it, stir it, or cook it.
When it’s all separate, you bake/fry/cook it, and then it’s done and ready to put on the table.
Maybe I’m a bit biased because I prefer to cook the “separate” way, partly because that’s how I grew up, partly because Shannon often grills the meat if it’s separate, partly because I’m always stumped about what to put on for side dishes because all the food groups are in the main dish, and partly because you can taste each food better. Ok, let’s bring this bunny trail back over to the main trail again.

I’m just sitting here wondering why I’m putting a plug in for “meat & potatoes” meals when what I’m posting is an all-in-one meal! Ha.

Yesterday when I made Chipotle in a Bowl, it seemed to go extra fast because… 4 of my friends were sitting on bar stools around my island (the one in my kitchen, not the opinion one up there that I stand alone on :) ) and we were all chatting the morning away with cups of coffee. I wish they’d come sit around my island every time I’m cooking. It takes something already enjoyable… cooking … and makes it even more enjoyable… cooking with friends and coffee! ????

Chipotle in a Bowl …from the cookbook Simple & Satisfying

CHICKEN:
1 1/2 lbs chicken breast, cut into bite-sized pieces
2 Tbsp. lemon juice
1 1/2 tsp. seasoned salt
1 1/2 tsp. oregano
1 1/2 tsp. cumin
1 tsp. garlic salt
1/2 tsp. chili powder
1/2 tsp. paprika
Marinade chicken in seasonings for at least 4 hours. Fry in oil until done.
chipotle chicken

RICE:
2 Tbsp. oil
2 cups rice
1 c. chopped onion ( I go a little easy on this.)
1/2 tsp. pepper
1 tsp. salt
1 Tbsp. plus 1 tsp. chicken soup base
1 tsp. cumin
1 tsp. oregano
1 tsp. garlic powder
1 – 2 Tbsp. cilantro, fresh is best
4 cups water
Fry rice and onion in oil, then add remaining ingredients. Simmer until rice is soft. I’ve never timed this, I’d say it’s about 1/2 hour. I just go by when the water is gone.
chipotle rice

BEANS:
2 cups cooked black beans (I use canned. A couple of my friends say dry ones that you soak yourself are better. I want to try that next time.)
1/2 tsp. cumin
1/2 Tbsp. chili powder
3/4 tsp. lemon pepper
1/2 tsp. salt
1 – 2 Tbsp. cilantro
Simmer bean ingredients together for 10 minutes.
chipotle beans

TOPPINGS:
2 cups sour cream
2 cups shredded cheddar cheese (I use Mexican blend.)
Lettuce
Tomatoes or salsa
Ranch dressing

Put rice in a greased casserole dish, then top with black beans and chicken. Spread sour cream over chicken and top with cheese. Bake at 350 for 30 minutes. Serve with remaining toppings.
chipotle ready to layer

chipotle layering

chipotle layer cheese

chipotle in a bowl dish

This recipe is great as is. The only thing I’m going to try changing sometime is using only half the rice. I think it’s a bit of an overkill for how little chicken is in the recipe, even though I really like rice.

We all love this. It’s just bursting with flavor and it’s not too spicy for the kids.


Comments

8 Responses to “Chipotle in a Bowl”

  1. Arla on January 24th, 2014 7:28 pm

    I’m with you, Kay. Casseroles are complicated and time consuming…I mean unless you get your kicks out of food prep. What is easier than plain old meat and taters?

  2. Charlotte Graber on January 24th, 2014 10:44 pm

    Yes, casseroles are time consuming. This recipe looks easy though. I’m on the lookout for new recipes and gonna try this one.

  3. Kay on January 25th, 2014 10:29 am

    Ahhhh, I guess I’m not alone on the island after all!

  4. Sharon on January 25th, 2014 10:51 am

    The thing about casseroles is they can be mostly done ahead of time–all the prep work is beforehand, instead of juggling several things at the last minute. Maybe that tricks some people into thinking they are fast? :-) This recipe looks so good! We do a similar thing with taco meat instead of chicken & just plain cooked rice, but these spices and seasonings with chicken sound amazing. On the list to try. (when I have time :-) )

  5. Liz on January 30th, 2014 11:55 pm

    It sounds good. This does have more things to make before you put it together. I like make ahead things sometimes so that it’s not so much at the last minute. But meatballs and some kind of cut up potatoes work for doing ahead too. Plus loads of other recipes.

  6. Jo Hershey on February 3rd, 2014 7:01 pm

    This looks like something that could become a favorite around here! I like soups & casseroles if they can be made ahead of time but I agree, a lot of work. And dishes. :(

  7. Sheila on February 10th, 2014 6:00 pm

    I’m with you on casseroles and soups not being a quick meal. And, like Jo said, they make alot of dishes! Of course, the dirty dishes aren’t as much of an issue now that I have a dishwasher. :-) This looks like a recipe I would love! I’m going to have to try it sometime.

  8. Shannon on February 14th, 2014 10:26 pm

    Oh that yumminess again. :) I’ll come sit and sip anytime you want to cook! :)

Puppy Chow, Monkey Munch, Muddy Buddies

Puppy Chow, Monkey Munch, Muddy Buddies

Posted on January 18, 2014 
Filed Under Holiday cooking, Snacks

It’s all the same thing… which do you call it? When I was a kid, we called it puppy chow. So, it will always be puppy chow to me. My kids seem to have heard it called monkey munch somewhere, in addition to me calling it puppy chow, because they call it monkey chow. Sometimes I wonder how foods get their names. This fun make-in-15-minutes-or-less snack has nothing to do with monkeys or puppies. Or buddies.

I’m going to post the regular recipe, but I’m also going to post a variation. It all ends up tasting pretty much the same. I tried it one time when we needed a puppy chow fix and we were out of chocolate chips. And it worked! Improvising when you need a chocolate fix and you’re out of chocolate chips reminds me of no bake cookies. Been there done that. I have a confession to make… I often don’t keep chocolate chips on hand for the sole purpose of not having to exercise as much self control. If it wouldn’t be for chocolate in my life, I fully believe I wouldn’t struggle with weight. Milk chocolate, that is. Why did they ever have to invent milk chocolate anyway? *she said, secretly thankful that they did because of the amazingness it has added to her life*. Dark or semi-sweet is about as tempting to me as, say, apples or something. Liz, I just now thought of you, my dark-chocolate-lovin’ sister-in-law. So anyway, having milk chocolate chips in my cupboard are as tempting as having a stash of candy bars in there. I’ve tried to switch to baking with dark chocolate chips, but my girls happen to not like dark chocolate very well. Hmmm, I wonder why.

puppy chow

Puppy Chow

9 cups Chex cereal
1 cup chocolate chips (variation: melt 6 T butter and stir in 1/2 cup cocoa powder and 1/2 cup sugar)
1/2 cup peanut butter
1/4 cup butter
1 tsp. vanilla
1 1/2 cups powdered sugar

Put chocolate chips, peanut butter, and butter in a bowl and microwave for 1 minute. Stir. If it’s not all melted, put it back in the microwave for 30 seconds until it can be stirred smooth. Stir in vanilla.

puppy chow chocolate

Dump Chex in and stir until coated.

puppy chow mix

puppy chow mixed

Pour into large ziplock bag, add powdered sugar, and shake to coat.

puppy chow coated

Spread on waxed paper to cool.

puppy chow cool

At this point, the puppy chow is dangerously vulnerable to kids, who magically appear in the kitchen while it’s cooling.

puppy chow eat

Liz and I were talking about puppy chow over the holidays because I was going to make it when she and a bunch of other family were here (but then didn’t because there were SO many snacks already sitting around) and she said she stores it in the freezer because it gives it extra crunch. Crunch is a good thing. So now I store mine in the freezer too.

If it makes it to the freezer, that is. (Refer to cooling picture above.)

Comments

9 Responses to “Puppy Chow, Monkey Munch, Muddy Buddies”

  1. Ali on January 19th, 2014 5:41 pm

    Kay – Somehow I lost your blog probably a year or two ago ? And just the other day I was thinking of it and I realized I needed to find it again. It was driving me crazy, every time I was checking out blogs I had it in the back of my mind that I needed to remember the name of yours! This afternoon I visited a blog that had a recipe I needed to make and I saw your blog listed on her blogroll and I yelled THAT’S IT! Hah :) Glad to have found you again! I hope you and the family are doing really well.

  2. Ali on January 19th, 2014 5:44 pm

    oh and we always called it Puppy Chow too. The last time I made it I kept it in the fridge and it is so much better chilled :)

  3. Kay on January 19th, 2014 11:31 pm

    Ali! Thanks for coming back. Your comment was like a breath of fresh air. :) And I’m glad there’s someone else who calls it puppy chow. Must go visit your blog now…

  4. Liz on January 24th, 2014 3:26 pm

    So you are training your girls wrong, huh? :) Well, that leaves more dark chocolate for the ones that like it in the family. I think one of the other SIL’s like it too, but I can’t remember if it’s Kara or JoAnn. We always call it Puppy Chow and my kids love it. The bag usually just stays open in the freezer. And it’s conveniently located right by the washer. So that’s my little highlight when doing laundry. :) But it’s gone now. :(
    And nice to know the variation. I wouldn’t have thought of doing that. I did substitute some chocolate baking squares one time. I had bought some over the holidays and still have a couple to use up.

  5. Jan on January 24th, 2014 11:20 pm

    I’ll eat your dark chocolate for you, Kay. I need to make this sometime soon. There are a few people in this house who would be delighted!

  6. Kay on January 25th, 2014 10:27 am

    Ha, Liz, training them wrong. :) Jan, I did not know you like dark! My own sister! Just shows that we must get together more often! So, do you mean you like it equally as good or prefer it?

  7. Viona Rieden on February 12th, 2014 4:49 pm

    Loved these recipes..I’m on ‘vacation’ ..have no cookbooks…they do lots of ‘pot lucks’ here @ this retirement village…dying for more ideas…can you help me out Kay? I don’t have a ‘supply’ of items as I would on hand IF I were @ home..so..maybe keep that in mind…
    Hope to hear from you personally!
    Thanks so much!!

    Where do you live? I know the feeling of being ‘mom’..with 3 little ones…doing a good job there gal!

    Viona Rieden

  8. Shannon on February 14th, 2014 10:23 pm

    Mom always made puppy chow when we were kids. I haven’t had it for a very long time. I have some chex right now that we aren’t using. I’m sure the kids would appreciate this. :) It’s a wee bit too much chocolate for me tho. :)

  9. Ronnica, Striving Stewardess on July 6th, 2015 8:43 pm

    Thank you! I had a desire for puppy chow, but no chocolate chips. I’m not buying anything this month that’s absolutely essential…I don’t think chocolate chips make the cut!

Happy New Year!

Happy New Year!

Posted on January 1, 2014 
Filed Under Cakes

How can it be 2014 already?! It doesn’t seem that long ago that we brought in the 2000s on the beach in FL. This year was brought in by tucking my girls and their cousins in bed and the cutest conversation in which their grandma (Shannon’s mom) was explaining what new year’s resolutions are and helping them make one. I was glad she vetoed and explained to my 11-yr-old how “Getting Mom and Dad to buy me an iPhone” is not a valid new year’s resolution. :) And the funniest one was when Chad (5) made one for his toddler sister… “I know what Tianna would say. She’d say to make the whole world into nippys”.

So, I started the year out laughing… here’s to a good one! And wishing you and yours a good year too! May you have plenty of cake.

chocolate raspberry cake

Comments

3 Responses to “Happy New Year!”

  1. Liz on January 7th, 2014 12:38 am

    Made me laugh reading that! But how did you find time to update in the midst of all that was going on.?! I guess there was numerous times when electronic devices came out so it could have been any one of those times. Ha!

  2. Kay on January 7th, 2014 10:03 am

    You got it, Liz… posted with people around. :) First post ever that I did on my phone.

  3. Jo Hershey on January 9th, 2014 4:55 pm

    I’m really happy you’re posting recipes again! :) I tried the baked potatoes ( and ate the kids’ skins :) ) & the meatballs look good too.