Recipes and Cooking Ideas for Homemakers and Amateur Cooks
 

Woof! Woof! It’s Tiffany’s birthday cake…

Posted on March 31, 2008
Filed Under Birthday cakes

Before I had any children, I decided that I want to make them special birthday cakes. Some people look at it as a waste of time. I look at it as FUN! Fun without costing alot of money.

Tiffany just turned 2. I made her a doghouse birthday cake. I used a house-shaped pan that I bought at our local Michaels store. I use the term ‘local’ loosely… the closest Michaels is an hour and a half away. It’s good I live that far away from it, I’d spend alot of time (and money) there. I’ll bet I could spend all day there (if I didn’t have kids in tow, that is).

I started with a cake mix. Pillsbury Moist Supreme pudding-in-the-mix.
birthday2-1.jpg

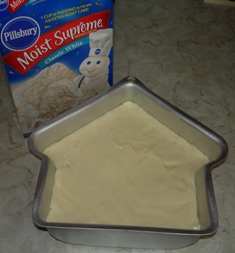
I always use this kind of cake mix for birthday cakes and it always gets rave reviews. So, I figure why make a cake from scratch?! I really don’t remember when the last time was that I made a cake from scratch. Oh, probably a red velvet cake last year sometime. I always make red velvet from scratch. But that’s the only kind I make from scratch.

birthday2-2.jpg

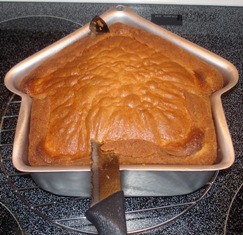
When baked, the cake fills the pan up perfectly. Cut the rounded part off the top with a long-bladed knife.

Now comes the apprehensive part of flipping it out of the pan… will part of the cake stay with the pan? Will I have to dig around at it with a knife? Will it be so bad that I have to start over and go to the store for another cake mix? Before dumping the batter in, I sprayed the pan with PAM cooking spray. Here’s how it came out! Perfect!
birthday2-3.jpg

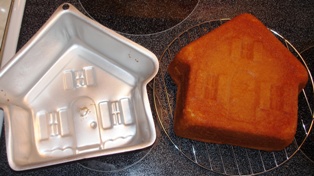
I did not wipe any cake remnants out of the pan before taking this picture. I’d definitely recommend PAM if you ever make something that needs to be baked then flipped out of the pan!

We’ve got siding on the first side now.
birthday2-4.jpg

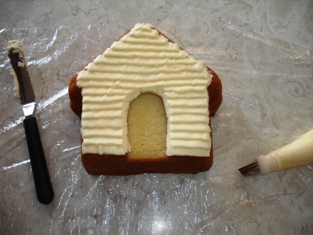
I spread frosting on the cake first to make it flat because it had impressions on there for the windows for a regular house. Um, I don’t think I’ll have to wade thro’ calls from construction companies asking me to join their siding crew! It is pretty much seamless though, so that’s good.

bday2-5.jpg

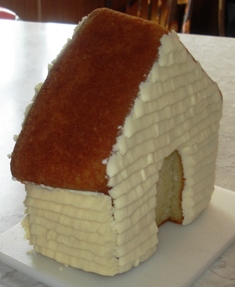
Now all the siding is on, although you can’t really tell it.
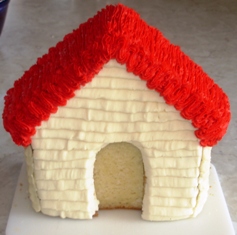
bday2-6.jpg And we have a roof.

bday2-7.jpg

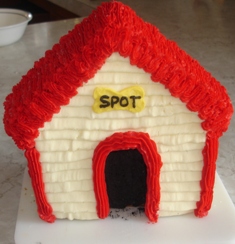
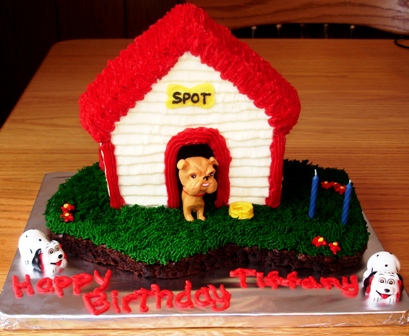
A bit more trim and a name for the dog… SPOT, yeah, I know, so original. But, any other dog name (like Maxwell, which is what Lexi wants to name her first dog) would’ve been too long to write. Rex would’ve fit good, too. My first puppy was named Rusty. He was  a pure-bred Collie. Ok, he wasn’t actually MY puppy… we had a pair of pure-bred Collies, (beautiful dogs!) and they had pups and so each of us children claimed one and named it. We had them until someone bought them. I had mine the longest and I was tickled when it was my uncle who got Rusty because I could still see him now and then. You don’t know how wonderful that was unless you know how nostalgic I am. My uncle named him Rex, so I really like that name for a dog, except he, of course, was always still Rusty to me.

birthday2-8.jpg

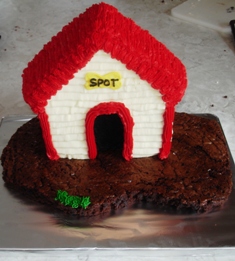
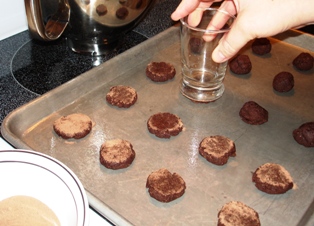
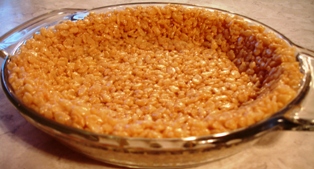
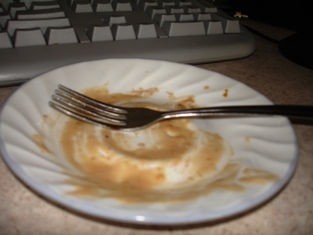
That’s brownies under the cake (made with brownie mix, of course). I’m not a cake fan, but brownies I can’t leave alone, so that layer is for me. I realized I’m in the minority because the cake was pretty much licked clean and most of the brownie layer was left. Those brownies were just a 9×13 pan, then I cut irregular borders to add a casual look to the cake. The ‘cake board’ is my cutting board covered with tin foil and taped on the bottom. I just wrapped it up like you would a gift.

birthday2grass.jpg

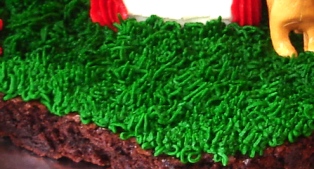
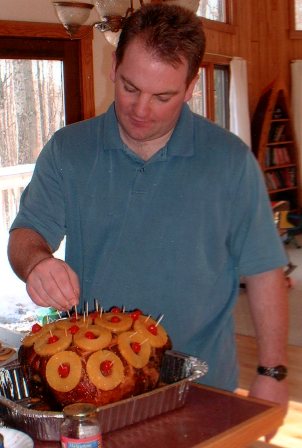
Here is a close-up of the grass. This was time-comsuming. And my hand got sore. But it looked pretty neat on there… made me anxious for Spring! It is, by the way, snowing outside right now. The grass alone took about a half hour. The entire cake took just under 3 hours.

birthday2-decorating-tips.jpg
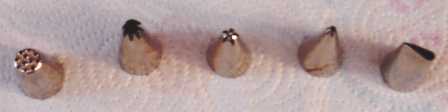
Here are the tips I used. Started from the left: the tip for the grass, for the trim, for the little flowers in the yard which you’ll see on the finished cake below, for the roof, and the one for the siding. For the stuff that you’d think I used a round tip for, my round tip fell on the floor and got stepped on and smashed awhile ago, so instead of getting another one, I just put frosting in a sandwich bag and snip off a bit of the corner. Works great! And no tip to clean!

Here’s the finished cake…
birthday2cake.jpg

bday2back.jpg

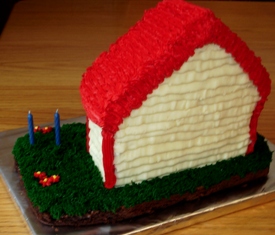
Here’s the back of it…

bday2tiff.jpg 
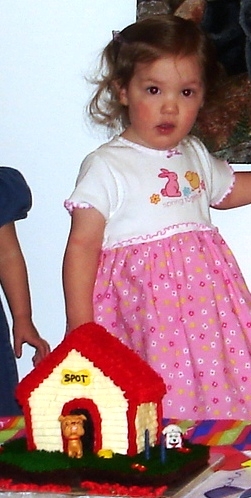
And here’s the birthday girl!

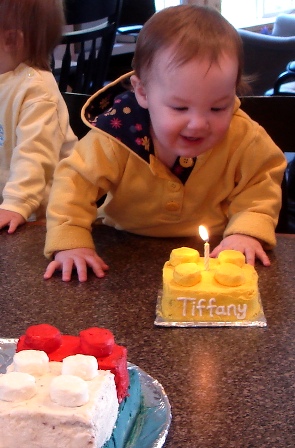
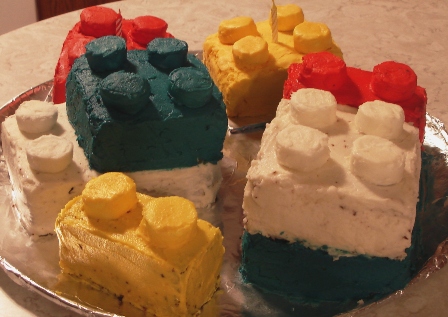
This is Tiffany’s second birthday. For her first birthday cake, I made her Lego blocks, pictured below.
bday1tiff.jpg
bday1cake.jpg

The house pan I used for Tiffany’s doghouse is the same pan I used for the house for Lexi’s 4th birthday, except for hers I put 2 together to make it a more realistic-shaped house. To see Lexi’s cakes: birthdays 1 – 4 and birthday 5.

If you ask any questions in the comments, please check back because I’ll reply in the comments. I’d also love to hear from you what birthday cakes you’ve made. And if you have some pictured on your blog, feel free to leave a link so we can go see it!

Comments

17 Responses to “Woof! Woof! It’s Tiffany’s birthday cake…”

  1. Shannon on March 31st, 2008 12:26 pm

    Very, very cool. I think you could start a business! :) My girls are spazzing out. :) “Can you make me a cake like that? How do you make a cake like that? When can we have a cake like that???” My answer. “Um, probably never, your mom can’t do that.” :)

  2. Liz on March 31st, 2008 12:30 pm

    I think you have a knack for that kind of thing. I would probably have to read directions for what kind of tip to use for what. Even though I did take a basic cake decorating class. Maybe I just need a fancier decorting kit.

  3. Heidi on March 31st, 2008 12:36 pm

    soo cool you did a great job on it! how did you get it to stand up tho?

  4. barb on March 31st, 2008 12:39 pm

    How did you get that doghouse to stand up? It looks so narrow to stand up on its own.

    That is a really cute cake. I have never even seen a tip like the one you used for the grass. I am going to have to get one of those. That grass was really neat.

  5. Kay on March 31st, 2008 12:58 pm

    To get the cake to stand up, when it was laying down (like the 1st siding picture), I cut the bottom at a 90 degree angle. I didn’t measure, I just cut till it looked straight. We were a bit worried about it though. But it survived carrying it out to the vehicle, driving 15 miles (slow around corners!) and carrying it into the house and then some moving it around in the house too. It’s made to be proportioned right to stand on its own, but yeah, still made me nervous!!!

  6. Freida on March 31st, 2008 1:50 pm

    Like usual, you flip me out. What can I say? You are a wonder woman! :-) Cee–uute cake!!

  7. Angela on March 31st, 2008 1:51 pm

    I agree on your philosophy for making birthday cakes. Birthdays are something I want to make special every year as a way to celebrate not only the day, but the child as well! For the 2nd year cake, I’ve made it a tradition to make a cake of the child’s first real word. Since Julia’s first word was “hop”, she got a bunny cake, and since Elise’s was “woof”, she’ll be getting a dog cake (but that’s not until May, so I haven’t figured out details yet). I’ve also done a butterfly cake, Larry the Cucumber, and a small fish for a 1st birthday.

  8. Denise on March 31st, 2008 8:44 pm

    Wow!! I love that one. Wish I was as good as u r at decorating cakes. Our little guy loves our dog so it would be so neat to make a cake like that for him for his birthday.
    Well done!!

  9. Marilyn on April 1st, 2008 5:49 am

    Wow!very cool cake! Great job, love all the ideas you come up with for birthday cakes. I always make cakes for my children’s birthdays too, it’s something special for them and it is fun :-)

  10. Twila on April 1st, 2008 5:52 am

    That cake is really cute!
    I always made my kid’s special cakes for their birthdays too. I still make them although now that they’re older the girls get cakes with flowers. I made Tyler a cake with Garfield on it his last birthday. One year I was just to busy to make a cake for one of the girls so I decided I have to buy one. I thought it would be special, since they never had boughten birthday cakes, but oh my, that little girl was not happy. She wanted mom to make it!

  11. barb on April 1st, 2008 7:58 am

    I guess I am just plain stupid, but I still don’t understand how you got that thing to stand up. (You should have posted pictures of that:) If you can explain it any better I would love to know, because I might try making one for my son. Thanks, Barb

  12. Kay on April 1st, 2008 8:22 am

    Standing the doghouse up (better explanation): First of all, the dimensions are 3″ deep x 8″ wide x 8″ tall. The 5th picture (with all the siding on) shows the width better than any of the other pictures.

    I baked the cake in the pan, then flipped it out, let it cool, then when I was ready to stand it up, I thought it looked slightly slanted on the bottom, so I trimmed off a little wedge to make to bottom look totally flat. Then (while it was still laying down, as in picture #4), I took a ‘pancake turner’ and put it under the top part of the house and lifted it (the top) up till it was in an upright position (as in picture #5). The worst part was getting it off of that little cutting board onto the brownie layer… I couldn’t touch the top or sides at all because it was all decorated, so I got 2 ‘pancake turners’ and put one under each side and lifted it over onto the brownie. Mine isn’t anchored to the brownie layer with any toothpicks or anything. We moved it around (carefully) quite a bit and it didn’t fall over.

    You’re right, I should’ve had pictures of standing it up… nothing like a picture to help explain something. :) Let me know if you need more details or anything. Yeah you oughta try it! It was fun to make! :)

  13. Regina on April 1st, 2008 9:26 am

    Wow, way to go on the cakes! You do quite an impressive job! I made a castle cake for my daughters 3rd birthday, and there are a few pics of it on my weblog…nothing that great, but thought you might like to check it out beings you’re interested in them. I always love to see new designs and get new ideas! http://weblog.xanga.com/valleygirlatheart

  14. Sharla on April 1st, 2008 1:37 pm

    hey i was wondering where you get ideas for 1st birthday cakes…my daughter is turning 1 later on this month and i don’t know where to start looking..

  15. Kay on April 1st, 2008 3:32 pm

    I’d Google it, Sharla, and see if you come up with anything. For the 2 I made, the building blocks one was original, the Lego blocks one was one that my SIL saw online and told me about.

  16. Sharla on April 2nd, 2008 12:20 pm

    thanks!! i found http://www.cakecentral.com that has LOTS of ideas…ppl posting pics of cakes they have made..

  17. Judi on April 4th, 2008 2:47 pm

    I always made special cakes for my kids when they were little too. At that time I’d taken a Wilton decorating class and bought a few of their pans. They had four mini pans that took one cake mix. I think there is a bear, train, dolly and don’t you know the last one is escaping me at this very moment. I had them all then when dolly came into mind it typed that and the other one left. lol. I used the train a few times because we have a train in our backyard (for real). Also did BigBird one time. That too took a lot of time making all the feather looking things. Fun Fun

Oreo Cookies – Why Buy ’em when you can Make ’em?

Posted on March 29, 2008
Filed Under Cookies and bars

Are you wondering if I’m serious? You’ll find out at the end.

I was paging through a cookbook one day last week while I was laid up with my sprained ankle. It was the same day and the same cookbook that I saw the Fudge Sundae pie in a few posts ago. Anyway, I saw a recipe titled ‘Oreo Cookies’. I read the directions and they do get flattened and I wondered if someone had actually figured out how to make them with that taste that only Oreos have and with the crunch, too. I had to try them. So, from the Cooking with the Horse and Buggy People cookbook…

Oreo Cookies

1 cake mix, white or chocolate (I used chocolate)
2 eggs
2 Tbsp. water
2 Tbsp. cooking oil
1/2 cup cocoa

Let stand 20 minutes. That’s the first directions given, but I took it to mean after everything was mixed together! Do not refrigerate.
oreo1.jpg
Shape into balls. Flatten with bottom of glass greased once and dipped into Nestles Quik (I think it’s actually called ‘Nesquik’) for each cookie. Bake at 300 for 8 minutes.
oreo2.jpg 

Here are the cookies right out of the oven. Yeah, they pretty much look the same as when they went in. Maybe slightly fatter.

I think I went a bit overboard on the Nesquik with a few of them. Oh well. That might not be a bad thing.

Filling:
1 envelope Knox geletin
1/4 cup cold water
1 Tbsp. plus 1 cup powdered sugar (not sure why the 1 Tbsp!)
1 tsp. vanilla
1/2 cup Crisco

And that’s where the recipe ends, folks. No directions. This cookbook is kinda interesting that way. Sometime, I’m gonna scan in a recipe from it and see if you can help me figure it out. Usually, I can kinda go from past experience and know what to do, but there’s one recipe that sounds very yummy that has me clueless. Anyway, I mixed the filling up and spread it between 2 cookies.
oreo3.jpg
I actually ended up making the filling twice. All I have is butter-flavored Crisco, which is yellow. It makes the filling a light yellow, which I didn’t think looked too good, so I made it again and used butter instead. It turned out fine. This recipe made 25 1/2 complete sandwich cookies (51 halves).
oreo4.jpg

Now, our take on them: When my taste-testers (aka: my husband and girls) tested them, here were their responses: Husband, “They look like mini whoopie pies” then after tasting one, “They’re better than Oreos.” Lexi (5), “Oh, they’re so cute!” then a little later, “Mom, can I have another one?” and Tiffany (2), she didn’t say anything, she just pulled it apart, licked the frosting off, refused to eat the cookie part, and begged for another one.

They ARE cute. They were the size of Oreos, except fatter. And  they sorta had the same taste. But they didn’t have the crunch, they were soft like regular cookies, which if you ask me, when it comes to cookies, ‘soft’ is better than ‘crunch’. Some things aren’t like that though. Like chips. These cookies were a bit time-consuming to make though, for no more than food than it ended up being. Maybe if I’d make them bigger it would help.

I doubt I’ll get the urge to make them again. Like I said, “Why make ’em when you can buy ’em?”

Or isn’t that what I said?

—————————————————-

Coming up next… the making of Tiffany’s birthday cake. So check back on Monday! It’ll be along the same lines as the other birthday cakes in the ‘Birthday Cake” category in the ‘categories’ section, so you can go look at those awhile if you want to.

Comments

7 Responses to “Oreo Cookies – Why Buy ’em when you can Make ’em?”

  1. Shannon on March 29th, 2008 10:59 am

    My sentiments exactly. Why make them when you can buy them. :) Can’t wait to see the cake.

  2. barb on March 29th, 2008 11:09 am

    The filling recipe I have for homemade oreo cookies has marshmallow cream in it. If you would like it, comment back.

  3. Salvatore on March 29th, 2008 11:15 am

    What a goodness!!

  4. Liz on March 30th, 2008 7:47 am

    I loved Tiffany’s take on the cookies. Sounds like a regular 2 year old.=) I really should go get ready for church instead of reading your site though.

  5. Charlene on March 30th, 2008 10:55 am

    Did you ever have the soft oreo cookies?? My children love them ,these look almost the same.

  6. Charlei Miller on June 27th, 2008 5:51 pm

    Could not agee with you more..

  7. Nathan on March 13th, 2011 11:55 pm

    I did a similar recipe to the one you did. Came out the same way. The only difference between the two; I used a stamp pad (don’t worry it was never used with ink prior to or afte making the cookies) to make a design on them.

13 shortcuts in the kitchen, Thursday Thirteen #1

Posted on March 26, 2008
Filed Under Thursday Thirteens

This is my 1st Thursday Thirteen. Since this is a cooking blog, my Thirteens will mostly be about things that have to do with my kitchen. Yeah, I thought that made sense too. So, here we go…

I hope I can think of 13 good things so I don’t have to put things in like ‘Sweep the dirt under the rug instead of bothering to get out the dust pan’. Because we know that that actually doesn’t save time. And we know that it’s not a good enough excuse that your company is walking in the front door. Plus, we’d never think of doing that anyway. We just know people who do it.

1. Breakfast in a snap… mix up a big batch of pancakes and fry them all. When everyone is done eating, put the rest in serving sizes (2 or 3 pancakes)in Ziploc sandwich bags in the freezer. When you get them out of the freezer, put them in the microwave until they’re steaming and soft. They taste as good as they did the morning you fried them!

2. Twice the food, without twice the work… next time you make a casserole, like lasagna, make 2 pans instead of one. You’re frying hamburger and cooking noodles anyway, might as well throw more in. Put one pan in the oven for dinner, cover the other pan tightly and put it in the freezer. You’ll be SO glad for it next week on one of those harried days… you know the days I’m talking about.

3. Quick bread crumbs… the secret is they’re not actually bread crumbs. Keep Club crackers on hand and when a recipe calls for bread crumbs, simply crush the crackers. They taste better too, especially when tossed with melted butter and browned on top of a baked dish.

4. Fresh warm cookies every day… without baking them! Whether you get them out of the cookie jar or out of the freezer, throw them in the microwave for 10 or 20 seconds and you’ll have a warm cookie that tastes like it’s just out of the oven. Now, I want a cookie. And I do have some in the freezer…

5. Quick measuring… keep a measuring cup in the flour and sugar canisters. You don’t have to dirty a cup every time you measure and you don’t have the extra step of getting one out of the drawer.

6. Clean-up time… after a meal, do you always have scraps (fat cut off of chicken, food chunks or barbeque sauce left on plates, oil to scrape out of the skillet after frying, etc.)? Get a piece of tin foil and scrape everything onto it, then fold it all up and throw the whole works away. I like tin foil because if something is juicy, I can fold up the sides and it holds it all in.

7. Easy croutons… sprinkle Italian seasoning on bread, then butter it. Do it on both sides and put it in the toaster. Pop it up as soon as it browns. Cut the toast in squares with a pizza cutter. They taste great and they’re soft enough to poke with a fork.

8. Especially for kids… get a water dispenser (if you don’t have one in the door of your fridge). You can get them at Walmart or wherever. It’s a jug with a spout on it. Put it on a low shelf and the kids can get their own drinks. No heavy jug or pitcher to pour.

9. Bread in a hurry… want the bread dough to rise quicker? Warm a towel in the microwave, then wrap it around the bowl that the dough is in. You may have to re-warm it a few times till the bread finishes rising.

10. Bread in even more of a hurry… ah, these are my meal-savers! If you’ve been reading this site for awhile, you know I’m a fan of these… popable cans of crescent rolls, French bread, and dinner rolls. We have hot bread or rolls at almost every meal and this is just the fastest and easiest way to go! You think they don’t taste as good? Well, then you haven’t tasted my from-scratch yeast bread. I still have much to learn in that dept.

11. Cinnamon sugar… take an empty cinnamon bottle/can/container (whatever you call it?!) and fill it 1/4 of the way with cinnamon, then the rest of the way with sugar. Shake it and flip it till blended, and you’ve got a handy topping for toast or unsweetened applesauce. Oh, and take a marker and write ’sugar’ on the front beside ’cinnamon’.

12. Cut it up all at once… when you buy a head of broccoli or cauliflower for fresh eating, cut them up into florets and put them in plastic bags in the fridge. You’ll be more apt to eat them that way. And you don’t have to get a knife out every time you want some.

13. The shopping list… as you’re working in the kitchen and you see the shortening or dishsoap or whatever is getting low, write it on the shopping list (which is magnetic and stuck to your fridge). Your list is ready to go shopping when you are and fewer things are forgotten. Just remember the list! Does anyone else forget the list? Or is it just scatter-brained me? Too often, I find myself roaming the aisles, trying to picture my list and what was on it… while the girls are begging for Hi-C box drinks and throwing colored marshmallows in the cart.

Now, I want to learn from you… what shortcuts do you do in the kitchen?

Comments

13 Responses to “13 shortcuts in the kitchen, Thursday Thirteen #1”

  1. Pretty Life Online on March 27th, 2008 2:25 am

    great lists! Happy TT! I have an awards waiting for you in my site, hope you get time to visit.

  2. K. on March 27th, 2008 3:35 am

    I have to tell you, I am NOT much of a cook at all, so I was surprised to find that I do a lot of these already! My Mom will be SO proud! I still learned a few things from your list of great tips, though, so thanks!

  3. Jan on March 27th, 2008 6:53 am

    #1 I love to make a big batch of pancakes, in the evenings I get out the toaster and then the children pop them in there in the mornings when i’m busy w. the babies. #7 I am going to try the easy croutons sounds much quicker than the oven. #8 make sure the little spouty thing doesn’t get pressed by a fridge shelf when the door closes! not fun

  4. Shannon on March 27th, 2008 8:19 am

    I do a few of these things too, esp the pancakes. The girls love them and I love NOT making them. :) I like the clean up one. Gonna have to use that!

  5. lisa on March 27th, 2008 9:29 am

    if you use instant yeast, your dough only has to rise once. so you can mix, knead, and shape your bread,rolls, etc and THEN let them raise once. the first time i tried it since i heard that was last sunday morning with cinnamon rolls, and i couldn’t tell any difference.

  6. Nicholas on March 27th, 2008 1:58 pm

    Welcome to TT!

  7. MAmaArcher on March 27th, 2008 2:24 pm

    Great list of ideas! Personally, I love my crockpot! Especially on Sundays. I can put our meal in before we head out the door to worship and it is ready when we get home. It cuts back on the urge to go out to dinner and spend money we really could use better elsewhere.

  8. Grandmother Wren on March 27th, 2008 3:18 pm

    This is a great list of tips – especially the one about the warm cookies, anytime. Thank you!

  9. Joyce T. on March 27th, 2008 5:50 pm

    You are the first Mennonite blogger I have met! And, I’m pleased to meet you.

    One of our family’s favorite cook books is the Mennonite cook book, More With Less, which I have used for 25 years.

    Also, when our children were little, I used the Mennonite curriculum, Rod and Staff, to teach them, though we are reformed presbyterian Christians, not Mennonite.

  10. Audrey on March 28th, 2008 7:07 am

    Hey, I really enjoyed these tips. Some of them I already do and some of them would be good to get started with. I can’t think of any tips right off hand of my own, but I enjoyed reading yours. Thanks for all the work you put into this site…I’m a regular visitor.

  11. Esther on March 28th, 2008 7:40 am

    My husband LOVES cookies. Something I like to do is freeze cookie dough that I’ve shaped into balls. When he wants fresh cookies, he can pull out a dozen, thaw them, and bake! It’s great for when I’m at work.

  12. Surpina on March 28th, 2008 3:11 pm

    Thank you so much for stopping by and checking out my blog and my recipe blog. I think I should have become a chef I like to cook and bake so much….

    I have to agree with the above blogger about the crock pot/slow cooker. I use mine YEAR round. Love it.

    I don’t like to clean up a lot of dishes and with 4 kids we go through a lot of plate. So I use paper plates instead.

    You have a wonderful blog and I am going to be adding you to my blog Roll!

  13. Andy Lawrenson on March 29th, 2008 7:31 am

    Hi,

    I discovered your blog through my nephew’s blog (cfhusband.com) and I love to eat so naturally I ended up popping over to check out your blog. I’ll be back. I do 95% of the cooking in our home and really enjoy cooking.
    Your tips were fantastic! I always end up dumping out half of my pancake batter once everyone is full. Thanks!

    Andy

I Scream, You Scream, We all Scream for Ice Cream

Posted on March 25, 2008
Filed Under Desserts

Ah, we used to chant that alot. Things were funnier back then.

I’m not screaming for ice cream, but I do feel like screaming, I especially felt like it last night! We were having what looked like a good ol’ fashioned WI blizzard out there… that’s when big snowflakes are flying horizontally past the window instead of falling vertically. I’ll bet the snowflakes going past our windows didn’t land till they got to Tims, a mile away. Thankfully, the snow didn’t amount to much, but really, it’s the end of March! And we just got dumped with snow last week.
snow1.jpg
And we still have plenty left.
snow4.jpg

And it’s snowing at the moment!

Anyway, what does that have to do with ice cream? Like the saying “When life gives you lemons, make lemonaide”, well, we got snow in March, we want to make snow ice cream.
snow2.jpg snow3.jpg

Snow is one ingredient and I think milk of some sort too. But, I haven’t been able to find a recipe for it, so I’m wondering if any of you can help us out. I know, seems like kind of a funny recipe to have in a cookbook, but it seemed less weird all the time as I was finding recipes for suet balls for birds, playdough, laundry detergent, and dandelion gravy! I never did find a recipe for snow ice cream though.

So, do any of you have a recipe for snow ice cream? If so, and you have the time, you can leave it in a comment. Thank you! :)

Comments

14 Responses to “I Scream, You Scream, We all Scream for Ice Cream”

  1. Fwren on March 25th, 2008 9:52 am

    This is the recipe we used when our boys were little:

    1 c. milk
    1/2 c. sugar
    1 beaten egg
    1 tsp. vanilla
    CLEAN snow to thicken.

    Flavor to taste with chocolate, strawberries, etc.
    If using a raw egg bothers you, leave it out. You could use richer milk too, if you like.

  2. Jo on March 25th, 2008 10:17 am

    My MIL used to make this for the grandchildren, but I don’t remember what all she put in it…I know that vanilla extract & sugar were 2 of the ingredients, and I think sometimes she used other extract flavors, too.

  3. JoAnn on March 25th, 2008 10:25 am

    Here’s a website I found with a couple of Snow Cream recipes:

    http://www.chathamjournal.com/weekly/living/food/snow-cream-recipes.shtml

  4. Shannon on March 25th, 2008 11:20 am

    Seems like something my girls would like too. Might have to try it, NEXT year!!! :)

  5. Jessica on March 25th, 2008 12:00 pm

    We never had a recipe. Just sugar and milk with snow to thicken and a bit of vanilla or hersheys syrup or strawberry syrup or nuts or sprinkles or whatever you liked. I think I need some ice cream…

  6. Sharon on March 25th, 2008 12:01 pm

    We used to enjoy snow ice cream too when we were little. There are alot of recipes for it if you google….Snow Ice Cream. Enjoy!

  7. Twila on March 25th, 2008 12:14 pm

    Here is one I cut out of “The Budget” a couple of weeks ago.

    Snow Cream
    4 quarts snow, lightly packed
    12 oz. can evaporated milk or 1 1/2 cup cream
    1 cup sugar
    1 1/2 cup powdered milk
    1 package instant vanilla pudding
    1 t. vanilla
    dash salt

    Place all ingredients in a large bowl and beat on high speed until fluffy. May be stored several months in the freezer. After freezing soften slightly and beat until fluffy before serving. It may crumble some but keep beating. Can also use different flavors of pudding for variation of flavors.

    I’m anxious to try it as we always just used sugar, milk and vanilla before. But I shall have to wait until next year, I suppose…

  8. barb on March 25th, 2008 12:18 pm

    Something I tried this winter was snow cones, (in a glass). I used a packet of Kool-Aid, 1 cup of sugar, and approx. 2-3 cups of water. Pour this syrup over clean snow and enjoy. My boys liked it better than the snow ice cream we made.

  9. Angela on March 25th, 2008 1:01 pm

    I know the feeling! During our blizzard a few weeks ago here in Ohio, we made snow cream too. My husband’s recipe says:
    2 cups milk
    1/2 cup sugar
    1/2 cup cream
    1 egg, beaten
    1 teaspoon vanilla
    1/8 teaspoon salt
    Mix together; chill. Add snow to desired consistency. Chocolate or strawberries may be added for flavor.

    The snow cream is a family tradition on his side, on mine, when we get snow, we make “Wax on Snow”. Ever heard of that? It’s simply pure maple syrup boiled, then drizzled over snow. Dip a fork into the sticky drizzles and eat. (Comes from growing up in northern NY!)

  10. Kelly on March 25th, 2008 2:05 pm

    Snow Ice Cream

    8 cups snow, or shaved ice
    1 (14-ounce) can sweetened condensed milk
    1 teaspoon vanilla extract

    Place snow or shaved ice into a large bowl. Pour condensed milk over and add vanilla. Mix to combine. Serve immediately in bowls.

  11. Nancy on March 25th, 2008 3:25 pm

    We make alot of snow ice cream. I had used this recipe for years. VERY GOOD!!

    Snow Cream
    1 cup rich milk
    3/4 cup sugar
    1 1/2 tsp. vanilla
    2 qts. fresh clean snow
    Combine milk, sugar and vanilla thoroughly.
    Pour over fresh clean snow. Mix quickly.
    Eat at once. ENJOY!!

  12. Kay on March 27th, 2008 12:35 am

    Thank you all for the recipes! Now to decide which one to try! Kelly’s looks the easiest. ????

  13. Ruth on March 29th, 2008 5:59 pm

    The recipe from the “Budget” was sent in by my sister-in-law who passed away over 3 years ago. We did a double take when we saw her name in the current paper. Evidently she had sent it in and it laid around for several years before they used it … either that, or they reused it because of all the snow they have been having this year. I like to use sweetened condensed milk in my ice cream recipes. It seems to give a smoother texture. You can reduce the amount of sugar in the recipe since the milk is sweetened. I hope your foot is healing.

  14. Ali on April 18th, 2008 1:46 pm

    I second the sweetened condensed milk and vanilla. I saw that on Paula Deen and it looked pretty cool. :)

Desserts just don’t get much better than this…

Posted on March 23, 2008
Filed Under Desserts, Pies

I’m featuring a fudge sundae pie today that is just tops. One glance at the ingredients and you’ll see why you can’t go wrong here. There are not alot of recipes that each separate ingredient would be good by itself. I am, in fact, eating a piece right now. I’ll be taking a bite every couple sentences. I don’t usually eat at the computer, but I make exceptions now and then.

I remember Mom making this when I was still at home. And I’ve seen this recipe now and then in different cookbooks. The cookbook I used for it this time is Cooking with the Horse and Buggy People. It says the recipes were shared by Amish ladies from Holmes County and Wayne County. So, you readers from there, here you go, a recipe from your neck of the woods…

Fudge Sundae Pie

1/4 cup corn syrup
2 Tbsp. brown sugar
3 Tbsp. oleo (oops, what I said about each ingredient tasting good by itself, I take that back here, forgot about the butter when I said that!)
2 1/2 cups Rice Krispies

Combine syrup, sugar, and oleo and cook over low heat until mixture begins to boil. *Another bite* Man, this stuff is good!!!
fudgepie1.jpg
Remove from heat and add Rice Krispies. Press evenly in greased pie pan.
Mix:
1/4 cup peanut butter
1/4 cup fudge sauce
3 Tbsp. light Karo (I used the same stuff as the corn syrup above)

fudgepie9.jpg I actually didn’t know what they meant by fudge sauce, but I thought I couldn’t go wrong with this, so this is what I used.

fudgepie2.jpg
Spread half of mixture over crust.
fudgepie3.jpg
Spread 1 quart vanilla ice cream over mixture. Ok, I usually try to follow recipes exactly so I can feature them accurately, but once in awhile, I just can’t help but substitute, like now… Caramel Collision ice cream won over boring vanilla ice cream here.
Freeze. Before serving, warm remaining sauce and drizzle over the top.
fudgepie4.jpg It didn’t exactly drizzle (and I warmed it till it was bubbling), so I put it into a baggie and snipped the corner off and piped it on. Maybe I used the wrong ‘fudge sauce’.

fudgepie5.jpg

fudgepie6.jpg

fudgepie7.jpg

All I can say is YUM!!!
fudgepie8.jpg

Comments

8 Responses to “Desserts just don’t get much better than this…”

  1. Shannon on March 23rd, 2008 7:07 pm

    I think I might try it and leave out half the chocolate. :) I know, call me crazy! :)

  2. Sharon on March 23rd, 2008 9:29 pm

    “and I’ll take a bite every couple sentences…” Do you have insurance to cover all the ruined keyboards from the drool? !! I even felt like licking the screen–don’t tempt me like that! ????

  3. Christy on March 24th, 2008 8:38 am

    Yum, I love ice cream pie! I have one recipe that has a little peanut butter in the crust and in the fudge sauce. My mom sometimes makes it w/ out the chocolate and tops it w/ fruit. I prefer the chocolate, though.

  4. Carol on March 24th, 2008 10:25 am

    So perfect to have the empty plate by the keyboard at the end of the post!!!

  5. Heidi on March 24th, 2008 9:15 pm

    yumm this looks so good! where do you find oleo? is that with like the shortenings and stuff? can you get it at walmart?

  6. Kay Martin on March 24th, 2008 9:20 pm

    I actually substituted butter for the oleo. I should look and see if I can find oleo at the store. Hmmm, wonder what the difference is. Research project for me… :)

  7. Marilyn Martin on March 27th, 2008 7:06 pm

    That looks wonderful! Can’t wait to make it!

  8. Andy Lawrenson on March 29th, 2008 7:27 am

    Hey,

    I’m making this one very very soon! Looks great!!

Making a ham for Easter? Try this one!

Posted on March 21, 2008
Filed Under Pork and ham

Up until a few years ago, we had a thing where we’d have my husband Shannon’s family over for Easter Sunday lunch. Shannon would make a ham that got rave reviews. I’m not sure what happened, but we don’t do that anymore. I guess we probably missed a year and the ‘too-new’ tradition was lost. Anyway, here is his recipe. He’s done it for Christmas, too. He hasn’t made it lately, and I only have 2 pictures of it… the last time he made it was before the days that I automatically put ‘food’ and ‘camera’ in the same boat, like I do now… these days, food and camera go together “like pancakes and blueberry syrup” (that was a line in a story tape we had in our growing up years and we still kick it around).

Twice-Smoked Ham

1 (12-15 lb) smoked bone-in ham
Whole cloves
Pineapple slices
Marachino cherries
1 cup frozen tangerine juice concentrate
1 cup Polander apricot preserves
1/2 cup French Pommery mustard
1/2 cup Grey Poupon Dijon mustard
1 cup packed light brown sugar
1 tsp. ground cloves
1/2 tsp. course ground black pepper
1/2 tsp. cayenne

To make this ham, use the indirect method of slow-cooking as described on page 13. (You don’t need to own a smoker for this. Let’s go to page 13… it says: Using a chimney starter, get 15 briquettes red hot. Place coals on one end of grill and place 1 pound of green hickory around coals. Use water-soaked hickory chunks if you can’t get fresh-cut hickory. (Shannon buys and soaks the hickory chunks.) Keep the internal temperature of the grill at 200 – 225 degrees. Add more charcoal and hickory chunks every hour as needed. Don’t put meat directly over hot coals. Shannon has a rotisserie that he always put the ham on.) Now, back to the recipe: Score the ham in a cross diamond pattern. Stud the ham with whole cloves at each intersection.
ham1.jpg
Smoke at 225 degrees for 3 hours (‘pg 13′ directions above). Remove the ham and place on sheet pan. Secure the pineapple slices and the cherries to the ham with toothpicks.
ham2.jpg
To make the glaze, combine the tangerine juice concentrate, preserves, mustards, brown sugar, ground cloves, and peppers in a bowl and mix well. Generously slather the ham with glaze and bake in a 350-degree oven for 1 1/2 hours. Brush the ham with glaze every 20 minutes. Remove from the oven and let rest for 30 min before carving. Yield: 10 – 12 servings.

Now, if you’re church-going and have thought of the conflict of glazing every 20 minutes while you’re sitting in church, what Shannon did was glazed it every 20 min while it was smoking, then before we left for church, he poured a bunch of glaze over it and with the cherries and pineapples on there, it stuck pretty good. Then, he glazed it again when we got home.

A lot of work goes into this ham, but it is SO good. The outside is candied and the inside is moist and delicious! Next time we make it, I’ll get decent pictures and update with them! We haven’t even talked about it yet if we’re going to make it this Easter, but it seems like with a ham like that, we should have company, and well, my ankle still feels better being propped up instead of flying around cleaning the house and making food!

This recipe comes from the Famous Daves Backroads and Sidestreets cookbook. I need to feature more recipes out of that cookbook. They have lots of ingredients, which equals lots of flavor! The next one I want to try is a wild rice soup that has 22 ingredients. I’ve had it at the restaurant several times and it is to die for.

Have any of you ever been to a Famous Daves restaurant? What did you think of it? Have you ever been to the original one in Hayward, WI? Here’s a picture of it… I scanned it in from my cookbook. It’s actually a 2-page spread and that white line is where the pages meet.
famous-daves.jpg

Happy Easter!

Comments

4 Responses to “Making a ham for Easter? Try this one!”

  1. Shannon on March 21st, 2008 2:38 pm

    Oh I love love love ham. Make me one sometime will you? :) We’ll come over. :p

  2. Sharon on March 22nd, 2008 3:26 pm

    LOVE Famous Daves. And I feel almost as proud as you about the original being in Hayward (even tho’ I wasn’t bred and born there)!! Where’d you get the cookbook? At the restaurant?

  3. Kay Martin on March 23rd, 2008 12:21 pm

    Yeah, we got it at the restaurant. They have a little gift shop.

  4. Katie Mast on March 24th, 2008 10:48 am

    I love famous Daves, didnt know you can buy a cookbook. WOW!!! I will need to get one next time we go.

Peas… not just for lunch anymore

Posted on March 19, 2008
Filed Under Tidbits

ankle.jpg

This is my foot, and that would be my ankle under those peas. I sprained it. :(

Comments

One Response to “Peas… not just for lunch anymore”

  1. Sharon on March 19th, 2008 7:40 pm

    oh, the memories this picture evokes! When I broke my nose a month before we were married, I held peas to my FACE. Now, I must say, it somehow looks better on the ankle. :-) So sorry for the ankle, though, or I should say, You! Hope it’s all better soon. Try a character bandaid–that would probably help!

Pizza Steak Bake

Posted on March 13, 2008
Filed Under Beef

This was the first time that I’ve ever bought cube steaks. Maybe I’m kind of a creature of habit, but I don’t really venture away from my ‘norm’ too much. In fact, I didn’t even realize until I found this recipe that cube steaks were just thinner steaks run thro’ a tenderizer… at least that’s what they look like.

I should know these things because I used to work at a butcher shop with a meat case/deli out front. But, that was 13 years ago, 2 or 3 days a week, for 4 months, in MS. We ran stuff thro’ the tenderizer, but I don’t remember calling anything cube steaks. Anyway, what still makes my toes curl is thinking about that meat slicer and how we cleaned it. I don’t know how you’re supposed to clean the meat slicer blade, but we’d take a bucket of hot soapy water and a rag, turn it on, and hold the rag against it as it’s spinning around. First on one side, then the other. Any little slip and you’d have had a finger chopped off. I hated cleaning the thing and cringed every time I did. And to this day, 13 years later, I still shivver when I think of it. Oh, we had LOTS of fun working there though… assembly lines of packing meat, getting good at knowing how much burger a pound is, frying thick bacon in the microwave, and Leroy keeping things lively and fun. Ah, good memories! And I still know that when I’m holding raw hamburger, 1 pound is when both hands are around it, but the fingers of the one hand can’t quite touch the other hand.

Pizza Steak Bake …taken from an Easy to Bake, Easy to Make recipe card

1/2 cup flour
1/4 tsp. salt
4 beef cube steaks (4-6 oz each)
2 Tbsp. vegetable oil
2 cups (6 oz) sliced fresh mushrooms
1 cup sliced onion (1 medium)
1 can (15 oz) pizza sauce
1 cup shredded mozzarella cheese (I used pizza cheese because I didn’t have mozzarella on hand)

Preheat oven to 350. Combine flour and salt in a shallow dish.
steak1.jpg 
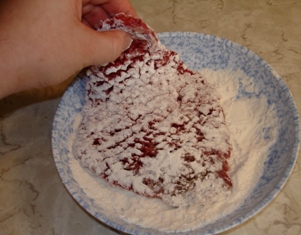
Dip cube steaks into flour mixture, coating well. Heat oil in a 12″ skillet over med-high heat until hot.
steak2.jpg 
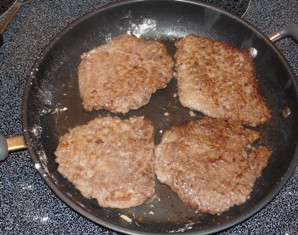
Add cube steaks, reduce heat to medium. Cook until browned on both sides, 4-6 minutes.
steak3.jpg 
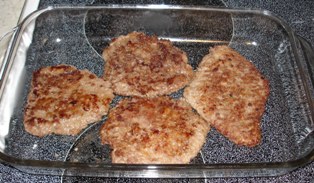
Place browned cube steaks in a 3-qt baking dish (9×13 pan worked great).
steak4.jpg 
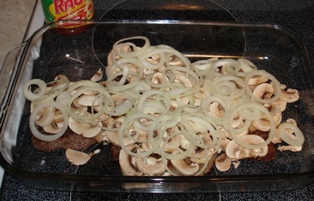
Top with mushrooms and onion.
steak5.jpg 
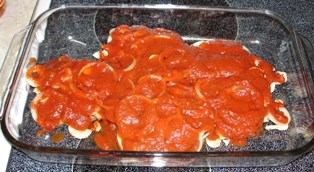
Spoon pizza sauce over top.
steak6.jpg 
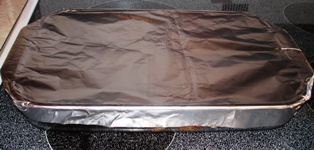
Cover tightly with aluminum foil. Bake steaks 30 min.
steak7.jpg 
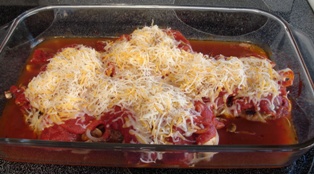
Uncover; sprinkle with cheese. Continue baking, uncovered, until steaks are fork-tender and sauce thickens, about 30 min. Yield: 4 servings.
steak8.jpg

These were tender, we didn’t need knives to cut it. They were really good and I’ll probably make them again, but next time, I’d add some seasoning in with the flour mixture. Not sure what, maybe some Chef Paul Prudhomme’s Meat Magic.

Comments

7 Responses to “Pizza Steak Bake”

  1. Shannon on March 13th, 2008 12:29 pm

    Hey, I used to work at a butcher shop too. Didn’t know you did. :) I remember doing all those things you talked about… and yeh, I can still tell how much a lb of HB is. :) Steaks looks good. I like anything to do with pizza.

  2. Kay on March 13th, 2008 12:48 pm

    You worked at Sunset Meats??? With Leroy Murray (sp?)?? I worked there in it’s opening days! (Quite a number of years ago!:-))

  3. Kay Martin on March 13th, 2008 1:07 pm

    Replying to Kay: That’s right… Leroy Murray, and I think it was Sunbelt Meats when I worked there. Phillip K. owned it. I don’t know when it opened, but Leroy must’ve been there a long time. Maybe he still is! :) So, we have the same name. They talked about a Kay down there, relation to Phillip. Maybe that’s you.????

  4. Freida on March 13th, 2008 1:19 pm

    I didn’t know there is a difference between cube steaks and regular steaks. :-) They look good. Might have to try them. I do know the slicer cleaning method you talked about. I cleaned one all the time at a restaurant I used to work at. Scary indeed!

  5. Berneice on March 13th, 2008 7:51 pm

    Thanks for the recipe. We have cubed steaks occasionally, but are not real fond of them. i will have to try this and see if we like them better.
    Did Phillip Knepp own the butcher shop where you worked? Just nosy. I know Phillips.

  6. Ruth on March 13th, 2008 10:07 pm

    Cubed steak is my husbands favorite meat. He’ll take it over any other kind of steak. I’m glad for the recipe. It gives me a new way to fix an old stand by.

  7. barb on March 17th, 2008 9:27 pm

    I made the “Pizza steaks” tonight, but made a few changes. In the flour I added garlic powder, seasoned salt, and black pepper. Also instead of pizza sauce, I used a can of cream of mushroom soup and 1/2 cup water. They were fantastic. I would definitely make them again. Thanks for the great recipe. Barb

It’s a beehive… honey and all!

Posted on March 5, 2008
Filed Under Breads Biscuits and Rolls, Side dishes

beehive1.jpg

These buns have tempted me for awhile now and this afternoon, I finally gave in and made them. And it was just as fun as I thought it would be, they turned out just as cute as I expected they would be, and they tasted just as good as I hoped they would be! Things don’t always go that well in my kitchen! With things that have no chocolate involved anyway.

I just realized that I LOVE honey. Almost every evening for supper, we have hot fresh rolls or bread of some sort and it’s always good ol’ strawberry jam that goes on the table. Well, these rolls are loaded with honey inside and out and they were so good! We may just deviate from the jam now and then. That reminds me of apple butter. We love apple butter too, my husband especially does. I’d like to find a good recipe and make it sometime, but I’m afraid it just couldn’t measure up to the stuff we had at Der Dutchman’s in Sarasota, FL. That’s what I always think of when I think of apple butter. Actually, I also remember my mom making it when I was young, I should ask her for her recipe.

Anyway, why am I talking about apple butter?! Back to the beehives…

Beehive Buns …taken from an Easy to Bake Easy to Make recipe card

1 envelope (.25 oz) active dry yeast
1/4 cup warm water (105F – 115F)
2/3 cup warm milk (105F – 115F)
1/2 cup honey, divided
1/4 cup (1/2 stick) plus 2 Tbsp butter, softened, divided
1/2 tsp. salt
3 1/2 -3 3/4 cups flour (I ended up using only about 3 cups because the dough seemed plenty stiff)

Dissolve yeast in warm water in a large bowl; let stand 5 min. Stir in milk, 1/4 cup honey, and 1/4 cup butter. Stir in salt and enough flour to form a soft dough. Knead dough on lightly floured surface until smooth and elastic, 6-8 min. Place dough in greased bowl, turning to grease top. Cover; let rise in a warm place until almost double in size, about 1 hour. Lightly grease baking sheets. Punch dough down; divide in half. Roll each half into a 6″x12″ rectangle. Cut 1″ strips from long edge of each rectangle.

beehive2.jpg
Curl each strip into beehive shape with a wide base and narrow top onto prepared baking sheet.
beehive3.jpg
Cover lightly; let rise until almost double in size, about 15 min. Preheat oven to 375. Bake buns until golden, 15-20 min.
beehive5.jpg
Combine remaining honey and butter in a small saucepan. Heat until butter melts. Brush warm glaze over buns. Remove from baking sheet; place on wire racks. Yield: 1 dozen.
beehive4.jpg

These seriously are SO good! And it was nice to have a variation in shape and taste.

The rest of our meal was a rotisserie chicken (done at the local grocery store), carrots and dip, and oven-crisp potato wedges. The potatoes were also a new recipe, so I’ll add them here too.

Oven-Crisp Potato Wedges …from a misc recipe card in my stash of loose recipes

1 1/2 lbs small red potatoes
1 Tbsp olive oil
4 tsp. finely minced garlic
3/4 tsp. coarse salt
1/2 tsp. paprika
1/4 tsp. freshly ground pepper

Preheat oven to 525. Quarter potatoes and place in large bowl.Drizzle olive oil over potatoes and toss. Sprinkle seasonings over potatoes; toss to coat well. Line a baking sheet with foil and lightly spray with vegetable cooking spray. Arrange potatoes on prepared baking sheet.
potatoes1.jpg
Roast for 20 min, stirring once or twice during cooking. Raise heat to broil. Broil potatoes until crisp, watching closely not to over-brown, about 1-2 min. Serves 4.
potatoes2.jpg

I made a half batch and I also baked them at a different temp because I needed the oven for the beehive buns too. I baked them at 375 for about 40 min, then broiled them while glazing the buns. Worked great.

We liked these potatoes ok, but they were nothing special. We ate them with ketchup. I’ll probably make them again sometime, but they won’t be on the ‘definitely make again’ list like the glazed meatloaf is… that meatloaf is probably the new recipe on this site that I make the most often. It is hands down the BEST meatloaf I have ever had… without the carrots, that is!

Comments

11 Responses to “It’s a beehive… honey and all!”

  1. Carol on March 5th, 2008 11:12 pm

    Those Beehive Buns look absolutely delicious! I’m gonna have to try them sometime-I think my kids would love them.

  2. Freida on March 6th, 2008 8:14 am

    They look wonderful! Anything honey related is good in my opinion. WE are bread lovers too, so I really think we would all like them.

  3. Christy on March 6th, 2008 8:17 am

    Ummmm, I love honey butter. The buns look delicious!!! I usually bomb anything made with yeast, but I’m still tempted to try these.

  4. Shannon on March 6th, 2008 9:06 am

    The buns look very yummy, might have to try them. Eric really likes honey so I think he’d like them. -It looks funny to see people’s real names on the comments instead of their xanga name. :)

  5. Jo on March 6th, 2008 10:11 am

    Agreed with you on the meatloaf recipe–that’s my stand-by, too. Only I’ve tweaked the glaze to make it more of a sweet-n-sour flavor. One of the highest compliments I’ve ever gotten from my husband was that my meatloaf beats his Mom’s hands-down. ????
    The rolls look yummy and sound better!
    And one more thing—I have a recipe for Parmesan Potato Wedges that are DELISH. Want to try it?

  6. Kay Martin on March 6th, 2008 1:11 pm

    Yeah, Jo! I’d love to try them! We like potatoes as a side dish better than pasta or rice, so I’m always looking for new things to do with them so it’s not the same old thing every time… which is why I tried those up there. :)

  7. Heidi on March 6th, 2008 1:15 pm

    the beehives are so cute. i will have to try those sometime as well as the potatoes. they looked yummy, and potatoes are our fav side dish as well. love the new site. =)

  8. Gina on March 6th, 2008 3:24 pm

    You did a great job on those be hives, their very cute and look delicious. Apple butter, I love the apple butter made from zuchine. But prefer it because it is not as strong of a flavor as real apple butter, so depends what you like.

  9. Sharon on March 12th, 2008 2:57 pm

    These look delicious, you reminded me that I should dig out the honey more often. Strawberry jam is our main staple, as well as apple butter. The best apple butter (according to me) is my grandmother’s cooked-over-an-outdoor-kettle variety, and my uncle still makes and sells it. This past fall I wanted to try to make some, and found this method,
    http://quiltofgrace.blogspot.com/2007/10/apple-butter.html
    tried it, and it turned out great! There’s always the faster make-it-in-the-oven method with applesauce, but I don’t like that stuff as good…

  10. Sharon on March 12th, 2008 3:08 pm

    Okay, now I’m stuck on apple butter: This recipe
    http://allrecipes.com/Recipe/All-Day-Apple-Butter/Detail.aspx
    looks about the same and gives more details on amounts of ingredients.

  11. Cheryl on March 12th, 2008 8:02 pm

    I made those rolls. Oh delicious. I tripled the batch and only glazed one pan. My children are fussy about sticky hands. I will keep that recipe.

400 ham sandwiches, a beautiful bride, and a wild-eyed cook

Posted on March 3, 2008
Filed Under Tidbits

Have any of you ever been in charge of the kitchen at a wedding? We were for the first time last Friday evening. My cousin Lisl got married. It was actually an easy meal for amateurs like us to start out on… hot ham and cheese sandwiches were the only menu item that needed to be hot. The other things on the menu were: veggies and dip, chips, fruit and chocolate fountain, and of course cake and ice cream.
lisl2.jpg

lisl3.jpg

I’ll start with Thurs. That’s the day that the veggies and fruit got cut up and the sandwiches made…

We put the cut up veggies in either buckets with water or a sealed plastic bag. The apples were dipped in pineapple juice, put in sealed plastic bags and still looked great at serving time the next evening. We washed and separated the grapes in clusters. We didn’t do anything to the bananas on Thurs. They had to be done last minute (as in during the wedding).

For the sandwiches, we buttered the buns, put 2 1/2 oz of shaved ham on and a piece of cheese, then wrapped them in pre-cut foil squares, and put them in the fridge. On Friday, we got them out of the fridge a couple hours ahead of time, then put some in roasters at 250 for 45 min. and some in the oven at 225 for 1/2 hour. We actually turned the heat up a bit part-way thro’ because it sounded like the preacher was winding down early, so they actually got done before the time we were planning.

The way the wedding was set up, the guests dismissed from their seats at the ceremony, went thro’ the receiving line, then thro’ the food line, then sat down with their food where they had been for the ceremony. So, the food had to be ready at Amen! We actually didn’t see the couple get married, but I’m assuming they did. :) Here’s how the wedding was set up:
lisl1.jpg
The chairs on one side of the table were turned around so all chairs were facing the front. Then when the guests came back with food, the servers had turned their chairs around to face the table to eat.

The kitchen staff was my husband and I and my brother and his wife. I was the one with all the info from the bride and the mother-of-the-bride, and what a wild couple of hours it was! It actually went good, but man, talk about intense! And I’m not an intense person! Anyway, needless to say, my camera was the least thing on my mind (didn’t even get a picture of the bride and groom!). BUT, there was about a 30-second lull between the time when we were totally ready till we expected the first guests to come thro’ the door, so I snapped a couple pictures of the buffet table (they’re the ones close to the top of this post).

I know they say a picture is worth 1000 words, but I’m seriously lacking pictures, so I’ll have to do snapshots with words…

*Click* In this picture:
Directed at me: “We’re running out of cups for the punch table. Where are some more?”
Me, scanning the countertops in the kitchen: “I lost track of them. I don’t see them in here anymore. Go check around or under the punch table.”
He goes out of the kitchen as I’m still frantically looking for cups, then sigh as I hear, “We found them.”

*Click*
“Hey, the dip is getting low in the veggie tray.”
“There’s no more left.”
“Are you sure?! Did you look behind everything in the fridge?”
“There. is. no. dip. left! How long is the line yet?”
“It goes back to the arch and that’s it then.”
“Good. I think what’s on the table should reach then.”

*Click*
One of the servers: “We have guests at our table who want to leave and they want their cake and ice cream now.”
Me: “Not all the guests even got thro’ the line for the main course, we’re not serving cake and ice cream yet.”
Him: “Well, shall I tell them they have to wait?”
Me: “Nah, go ahead and give them some.”

*Click*
“Oh no! Look at the chocolate fountain! It’s overflowing and not augering up anymore.”
“Get some paper towel!”
“What do you think is wrong? Do we need to add some more oil?”
“No, I think it looks thin enough.”
A young boy was kinda hanging around it and he said, “Well, I know a banana fell in there.”
“Ah, thanks, kiddo. That may be the info we need!”
After digging around in the base with a spoon, my SIL said, “I dug a banana AND an apple slice out of there!”
Once again, the chocolate fountain is flowing smoothly.

*Click*
Things are wild. 3 people talking to me at once and I hear someone calling “Kaaaay” behind me. Meanwhile, the photographer is milling around in the kitchen snapping photos and video clips. I was spooning dip and felt like throwing the whole spoonful at his camera! I know he was just doing his job, but there are sometimes when, job or not, you just are NOT in the mood for some things!!!!

*Click*
The lady in charge of the facilities asked, “Who is the mother of the bride? Has she been back here in the kitchen?”
Me, in a daze, plus trying to think how to describe Arla, “Um, I don’t know. She has a blue dress on.”
Pause.
Her: “Honey, 75% of the women around here have a blue dress on!” (Blue was the wedding color.)
Outburst of laughter from everyone in the kitchen.

It actually went good, I guess at any wedding over serving time, the kitchen is probably hectic with getting all the food ready at once and keeping 9 sets of servers going.

3 tips that I have from this whole deal is:

1. Plan for the food to get done earlier than you think it should be done by.

2. If you’re in the kitchen, bring other shoes along to change into at cleanup time. Being on your feet that much, the change would’ve felt wonderful!

3. If you’re planning your wedding, assign the cooks (if it’s not catered), and also assign several more people to come in with fresh energy at cleanup time. When everyone was served and there were a couple extra plates of cake and melting ice cream, I felt this big sigh of relief. But yet I felt like crying… I’d been on my feet for 5 hours and everything was sore and I was drained! And it was cleanup time. Two and a half hours later, we had the kitchen shining, the dishes washed, and the floor mopped. God bless those servers who stuck around to wash dishes and that guest who breezed in with the picture of energy and said, “I’d love to help here. Just put me to work!” There were definitely some people who were wearing halos till everything was over. I won’t mention names, but some of them were the helpful people I just mentioned.

Have you ever been at a restaurant where everything just flowed perfectly? The drinks and waitress came as soon as you were seated, the perfectly grilled steak came just as you were sitting back after eating the appetizer, refills came when there was still 2″ left of your Diet Coke, the staff was relaxed and everything seemed to work like a well-oiled machine. One day though, that restaurant had its opening night… the staff wasn’t very comfortable, some food was dropped in the kitchen, the appetizer came with the meal, and things seemed a little choppy.

I think every wedding is like opening night at a restaurant… the cooks aren’t familiar with the kitchen, the servers don’t even know each other, the cooks have never had to have 400 sandwiches ready to go at one time before, the servers look tentative, and some kid drops a banana and an apple in the chocolate fountain.

Comments

9 Responses to “400 ham sandwiches, a beautiful bride, and a wild-eyed cook”

  1. Jessica on March 4th, 2008 10:12 am

    The first thing that caught my attention is that Lisl got married. ok. Over that.

    My servers and cooks and un-coordinators is the one thing I would redo in my wedding. I had it planned but the coordinators didn’t get it too well and the cooks had to do more than they were supposed to. Sad. Yes, I think it was very much an opening night kind of deal.

  2. stephanie on March 4th, 2008 12:01 pm

    O how neat! It’s similar to my nieces wedding I coordianted in’06. We had fruit trays and veggie trays and meat and cheese trays and different breads for the sandwiches. I LOVE the hot ham idea! Looked gorgeous!

  3. Audrey on March 4th, 2008 1:18 pm

    Wow! That sounds like SO much work. I think people often take the cooks at a wedding for granted, cuz it is a HUGE job. Bravo to you guys for taking on the job! The food looks wonderful! Made me hungry, but that’s no surprise.

  4. Shannon on March 4th, 2008 2:50 pm

    Loved reading this story!!! :) I’m sure it seemed much more calm to everyone else and if you’d ask the bride she’d say it was pefect! -The choc fountain thing made me laugh! ????

  5. Esther on March 5th, 2008 1:34 pm

    Interesting. This was exactly our wedding menu. Right down to the chocolate fountain. A tip for fountains: use condiment cups to serve the chocolate. Guests doing their own dipping ALWAYS leaves a huge mess which ALWAYS includes drowned fruit. We also served the fruit on kabobs which helped the line go more smoothly.

  6. Anna on March 5th, 2008 4:56 pm

    Hi,
    You do not know me, but I just found your blog through a comment you left on Cofessions of a cf husband. I saw that you had a head covering on and it caught my eye because I wear one too!
    Anyway I love your blog!!! I love to cook, I love to bake, and I love new recipes; although I am not as creative as you are. It’s so neat to see that you let your girls help you in the kitchen. I have 3 children. 2 boys: ages 6&7 and a girl turning 1 tomorrow. My boys love to help me in the kitchen and I let them, but I know other mom’s that won’t let their children help them.
    Anyways, I think I am going to try your recipe of parmesan potatoes tonight for supper. They look woderful.
    Probably one reason I was so attracted to all your recipes is because I am trying to lose weight and all I can think about is eating and making something to eat.
    Well I didn’t mean to write a book, I just felt like I had something in common with you.
    Thanks for all the great recipes and fun pictures.
    I’ll let you know how the potatoes turn out.
    -Anna

  7. Berneice on March 7th, 2008 10:35 pm

    Glad you survived the wedding. We have been cooks several times, altho not head cooks. i know it is a HUGE job and can be very stressful.

  8. Elvida Yoder on March 20th, 2008 11:10 am

    Interesting! I have often said when involved in any kind of dinner/fundraiser/etc. please, please, please get a whole seperate group to come in and do clean-up!! It helps tremendously!!! I just happened upon this website and I’m glad I did…

  9. sydney kitchen design on October 7th, 2008 3:53 am

    I was worried about the overflowing chocolate fountain, I am amazed you managed that. If I were in your situation, I might shiver in tense. lol.