Posted on December 17, 2010
Filed Under Candy, Holiday cooking
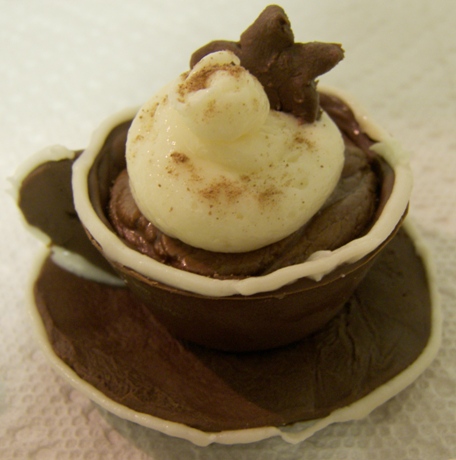
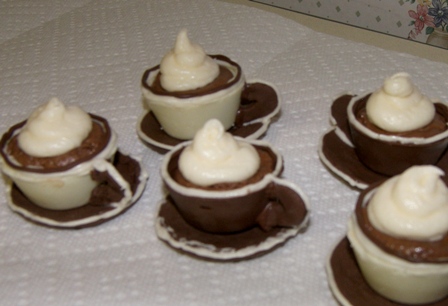
My sister-in-law Sheila had a birthday last month and her mom got her some teacup truffles from a local bakery. She was showing them off …notice I said SHOWING, not SHARING! ????
Here is a picture of them…
Aren’t they adorable? As soon as I saw them, they went into my oughta-try-them-sometime cooking folder in my OneNote. By the way, Sheila took that picture. One of my Kitchen Scrapbook New Years Resolutions is to research food photography (lighting/props/angles/how to make it look good/etc) and practice and get to know my camera and aperture and focus and settings on it to up the photo quality a bit on here. I was planning to go online for that education, but it looks like I don’t need to go any farther than our family gathering over the holidays to get tips… I love this picture! Looks like it came out of a magazine. Of course, the truffles look like they came out of a magazine, too!
I was at a cookie exchange today and I took a plate of candy instead of a dozen cookies. WAY more fun to make and nobody seemed to mind.  I decided this was my chance to try the teacups, thought it would be a cute touch to a candy plate.
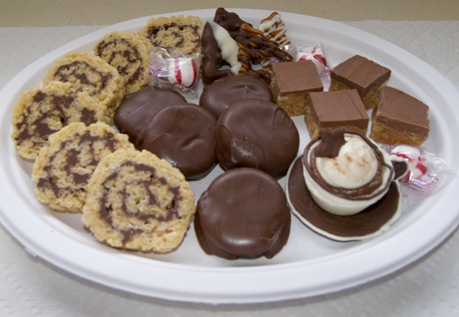
On the candy plate is:
— Rice crispy rolls
— Chocolate-covered Ritz crackers filled with peanut butter (to be featured tomorrow)
— Misc chocolate-coated/drizzled tree-shaped pretzels
— O’Henry bars
— Chocolate teacup
— Store-bought peppermint candies
These teacups are not as hard and time-consuming as they may look. I want to make some more and next time, I’m not gonna go as crazy with piping trim on! Actually, I think I’ll skip the piping altogether. I wanted them all coordinating with white and brown chocolate and I think it ended up looking too busy or messy or something. I think next time, I’d make the cup and saucer both the same monotone color. So, minus all that piping, these teacups were done in 7 steps, mostly easy steps:
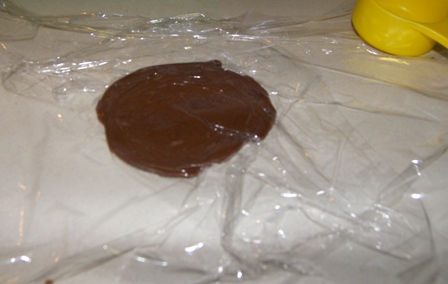
1. Line the cups of a mini muffin pan with white or dark or milk chocolate to form the cup part.
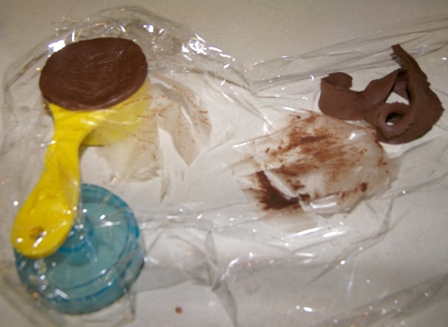
2. Make a saucer out of partially hardened chocolate.
3. Form a handle out of partially hardened chocolate and ‘glue’ it on with melted chocolate.
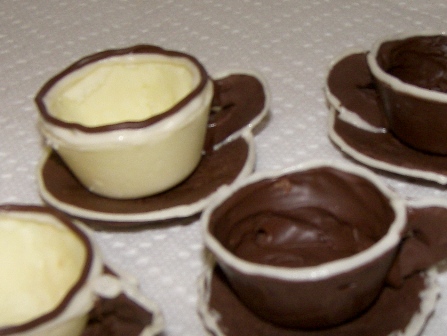
4. Fill the cup with fudge (that’s what I did here) or truffles or mousse or whatever.
5. Pipe white frosting on top to look like whipped cream (remember that cup of frosting I had left over from the red velvet sandwich cookies? It came in handy here! ???? )
6. Sprinkle the whipped cream with a bit of Nestles Quik powder.
7. Form a little decoration out of partially hardened chocolate or make a chocolate curl or use some other decoration for garnish.
Here are pictures and “What I learned” tips with each step…
Step #1.
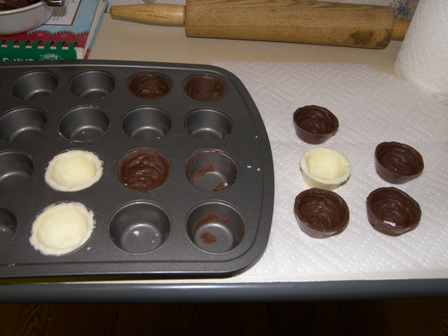
What I learned:
Grease the cups WELL.
The thicker the chocolate, the better… if it’s too thin, the cups might break as you get them out (see the one in the front right has a hole in the bottom).
Chill before getting them out.
Best way to get them out is to push against the inside of the cup and turn it, when it comes loose, pull it out.
Step #2:
What I learned:
Use utensils/Saran wrap to do the work… using fingers melts the chocolate and creates a sticky mess.
Cut a perfect circle by using a round cutter… a drinking glass works great.
Lay the saucer on a measuring cup… it will sink down just a little in the middle to create a ‘saucer’ look.
The fridge was my friend. Chocolate hardens faster in the fridge. ????
Step #3:
What I learned:
If the cups are chilled before putting the handles on, they adhere faster.
You need to hold the handle against the cup until the melted chocolate between them has hardened… otherwise the handle might fall off when you set it down. *rolleyes*
The rest of the steps don’t have ‘what I learned’ tips because there were no issues/problems/lessons learned. That’s a good thing.
Step #4:
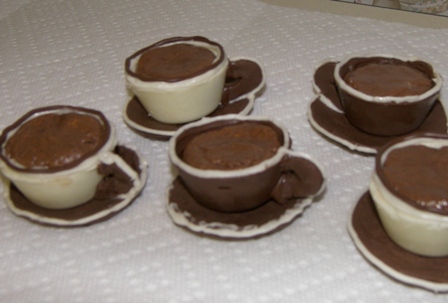
Step #5:
Steps #6 & 7:
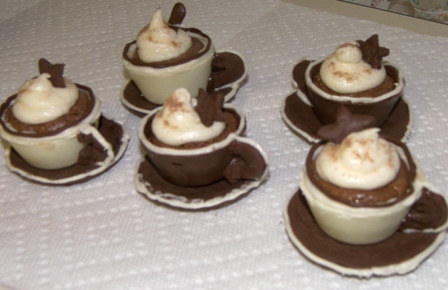
I made stars because, you know, Christmas. I thought stars would be easier than holly or trees or a wreath or a gift or a manger scene. ???? I just made a ball, then flattened it, then pinched it in 5 places, then perfected the points. Haha, perfected the points? Then why aren’t they perfect?! :p I guess I should’ve said I just made a ball, then flattened it, then pinched it in 5 places, then messed around with it till it looked more or less like a star. Oh, and the one doesn’t have a star, in case anyone noticed. It was the last one and REFUSED to turn out, so I ate it and just stuck in a random dripping from where I had drizzled the pretzels.
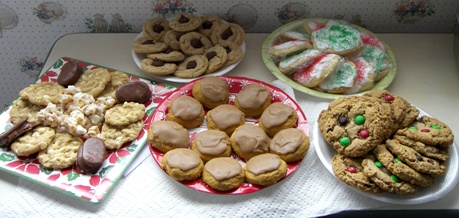
Oh, and here are the 5 plates of cookies that I came home with… Peanut Butter Kiss cookies from Rosalyn, Frosted Sugar cookies from Beth, Monster cookies from Sherri, Pumpkin cookies with caramel frosting from Rita, and White Chocolate Chip cookies and some coated party mix and chocolate-covered peanut butter crackers from Mary Esther. I love love love cookie exchanges!!! When else can you mass produce one thing and end up with a fun variety?!
Comments
14 Responses to “Mini Teacup-shaped Chocolates”
These little things are so cute. Waaay to much work for me tho!
A very interesting project, and well done! I have one question on an ingredient. On the candy plate you mentioned ‘tree shaped pretzels.’ Years ago, that was one of the ingredients in my party mix, but I can’t find them anymore. Where do you get them? I like them because they are so dainty and thinner than most pretzels. They go well in a Christmas mix.
Ruth, yeah, I agree, they’d be perfect for Christmas party mix! I got the pretzels at our local bulk foods store. I don’t know if you have any in your area, but I’d check there. Good luck!
I’m in Indiana wishing that I’d have my yummy cookies along instead of at home in my freezer. Can’t wait to inhale them!!
Today was so fun!! I vote for you to make candy every year. Those things are so cute & I still didn’t eat mine…just waiting for the perfect moment. Also wanted to say I’m excited that you are doing this daily post!!
Cute!
Oh can’t wait to try these little teacups!!What a perfect idea for a little girls Birthday party!!!
Wow Kay! I should have known you would try these truffles. They look good! Ha, don’t expect to learn many photo tips from me. I love taking pics of food, but so often am not happy with them. Getting the right lighting has been my main source of frustration. I’ve always wondered how much difference having a better camera would make. Well, Jared got a new camera recently, and then rented one of those huge zooms for a week to shoot pics at a wedding. We were at their place a couple of times while he had it and I had so much fun “playing” with it. I just walked around the kitchen taking pics of food preparations, and I couldn’t believe the difference! Honestly, they almost looked better on the camera than they did in real life.
  Now, that was fun! So, the fact that a good camera really does make a difference could be encouraging or discouraging, if you know what I mean. :-/ BTW, I’ve seen some really nice food pics on this particular site, so don’t be too hard on yourself.
I am trying to make some of these for a Christmas present. How did you line the muffin tin with chocolate? I can’t get the things out no matter how much cooking spray I use or how chilled the stuff is.
Problem solved! I lined the cups with foil and then when the chocolate was hardened, I lifted them out and peeled off the foil. Worked perfectly!
You amaze me. I buy the chocolate cups from my daughter Maybe it’s my age, but it’s just too much chocolate for me. Quick, someone call the DR. The chocolate mousse mix that she sells is also to die for. Usually by the time I’ve eaten the whipped topping and chocolate mousse I just am on sugar overload without even eating the cup. I do save it for later though
oops, now I remember what I was going to say. For the stars that you were trying to make… do you have any chocolate candy molds? I have some small molds that have lots of different shapes… even a star. You just mold the chocolate and pop it out… perfect every time.
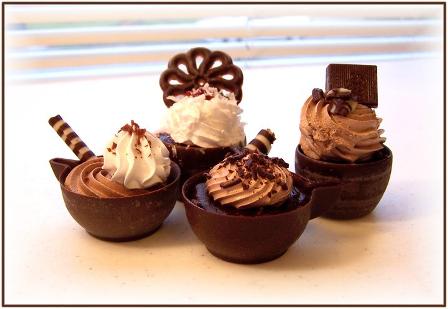
Where did you find the teacups with the halow handle, in the second picture? Please respond to mbrajak@hotmail.com Thank you. Margarita.
Margarita, those little teacup truffles were being sold at a small bakery in WI.
Judi, using candy molds… great idea! Thanks!