Kitchen Scrapbook

Recipes and Cooking Ideas for Homemakers and Amateur Cooks
 

Ice Cream Cone Cake Pops

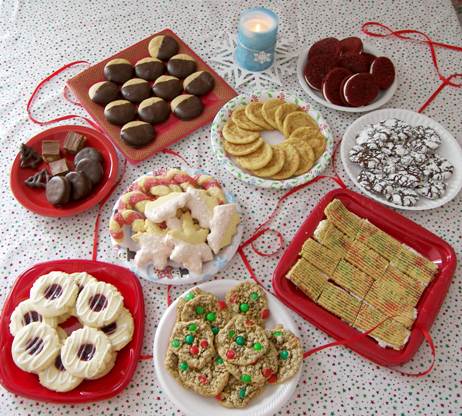
There. I did 2 posts with meat in, so let’s get back to the fun stuff! ;) No, really, I am planning to keep it a little more balanced… I think anyway. Sometimes I think I should’ve named this site something like ”Chocolate Dipped Tidbits” or “Living for Chocolate, Dying for Some More” and do sweets only, what with that being my passion and all.

Speaking of which, I totally get Tiffany (my 5-yr-old) in this little conversation that happened one day last week:
Her: “May I have an ice cream cone?”
Me: “No, you already had one today.”
Her: “Pleeeeeeeeeeeeease? I REALLY need one.”
Me, feeling sorry for her, but sticking to my guns: “No.”
Her, pulling out the trump card in desperation: “I’ll give you all my money if you let me have one.”

If we run out of cones and ice cream around here, my girls think it’s a real crisis. Currently, we have sugar cones (the pointy ones that sorta look like waffle cones) and regular cones in 2 sizes (the ones that are flat on the bottom and taste like newspaper just plain). These cone cake pops use the mini size of the regular cones.

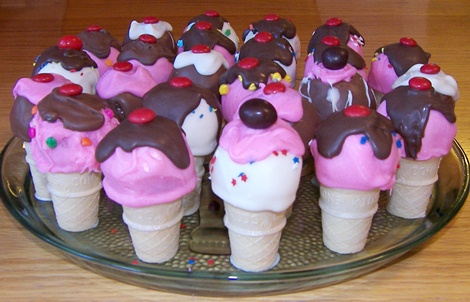
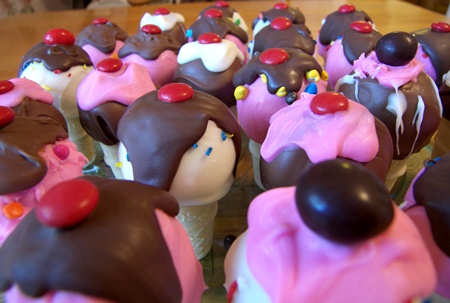
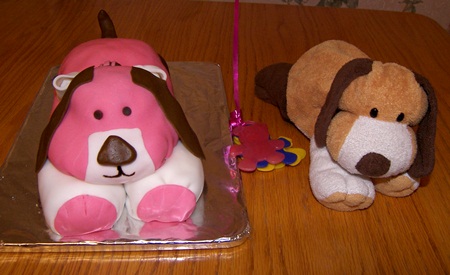
Awwww, aren’t they adorable?

ice-cream-cone-cake-pops.jpg

You really do need to see these in real life. The cuteness factor doubles from a picture to real life.

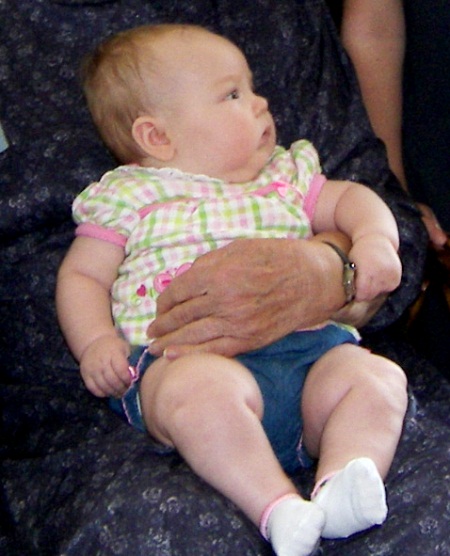
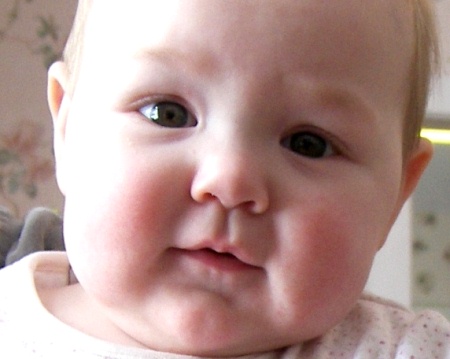
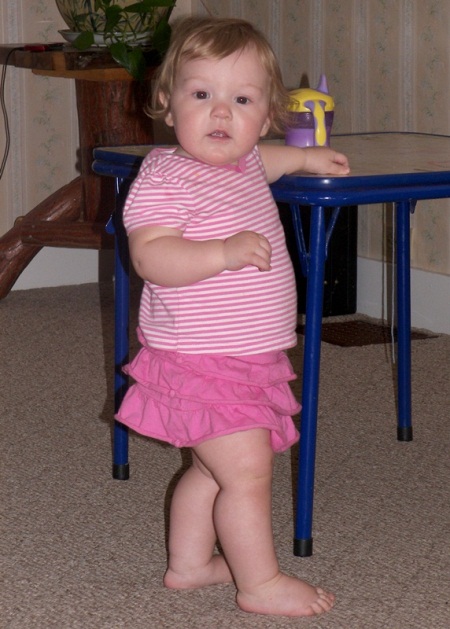
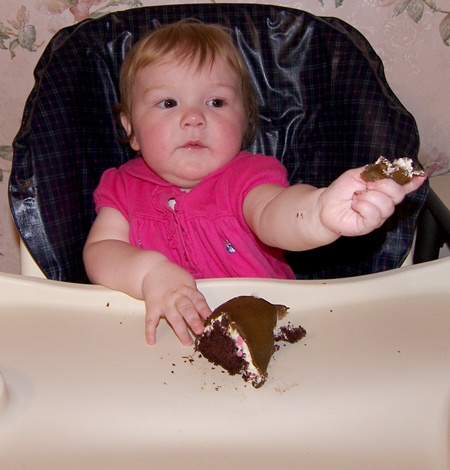
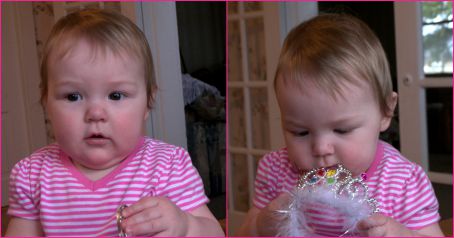
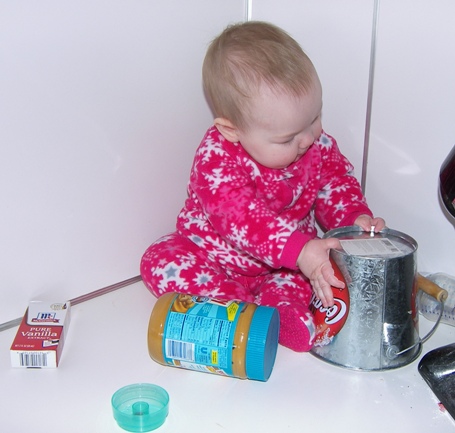
I know you can’t really tell the exact size because there’s nothing to compare it to. So, here’s one in a 13-month-old pudgy hand, if you know what size they are in real life. This is a real ice cream cone, but the same size cone.
ice-cream-cone-megan.jpg

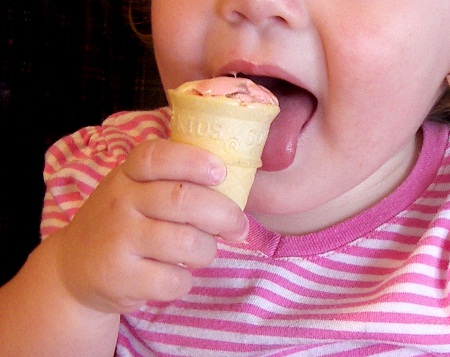
Yeah, we’re getting Megan hooked on ice cream cones already. This size is so perfect for her because she’s done eating it by the time it starts melting and dripping.

I got this Ice Cream Cone Cake Pops idea from Bakerella’s website and her Cake Pops cookbook (which my friend Ruthie gave to me for my birthday last year… it was on my wish list, and I never told her, how cool is that?!) Bakerella used sawed-off sugar cones, but I decided to just use mini regular cones so I wouldn’t have to do all that cutting.

ice-cream-cone-cake-pops-done.jpg

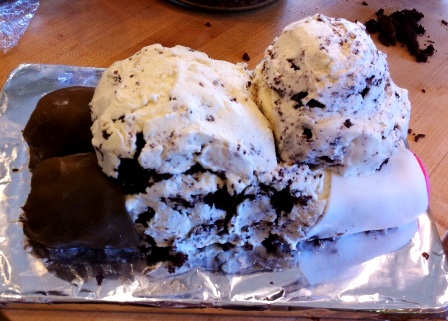
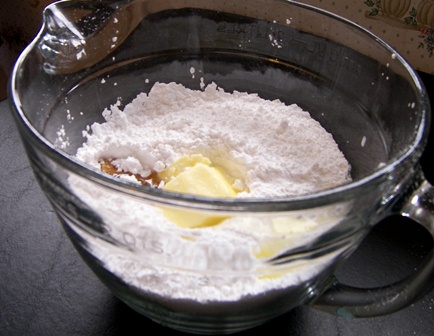
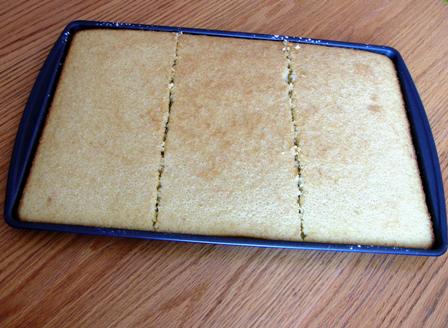
So here’s what you do. Take a baked cake and crumble it up and add a bought can of frosting and mix it together.

Or…

Get the leftover cake out of the freezer from a graduation cake you made earlier, thaw it, crumble it, mix up some frosting and mix a few dollops into the cake crumbs. That’s what I did. So, these cake pops were white cake mixed with cinnamon cake.

By the way, next time you’re buying cake mixes and you’re undecided on the kind, please buy a cinnamon one. This is the first time I tried it and it was SO good! You’d think I would’ve already thought to try that, what with having married into a we-love-cinnamon family. I want to make one sometime with cream cheese frosting. Mmmm mmmm mmm!!! You can use cream cheese frosting in these cake pops, but then you should refrigerate them, which is why I used regular frosting.

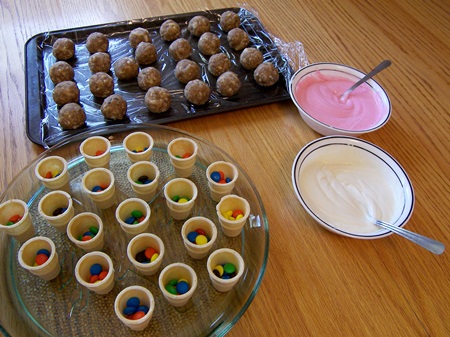
Here are the cake crumbs and dollops of frosting. I forgot to take a picture after it was mixed…
ice-cream-cone-cake-pops-crumbs.jpg

Roll the cake mixture into balls about the size of a golf ball, maybe a little smaller. Don’t make all those little dents in it like a golf ball has, though. Put the cake balls in the freezer for 15 minutes, then transfer them to the fridge if you’re not ready to dip yet. They should be chilled, but not frozen.

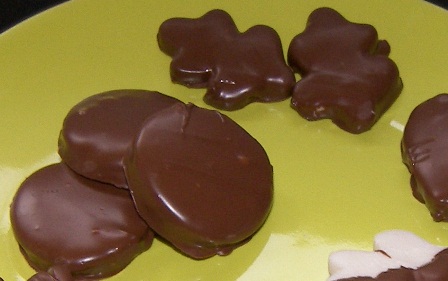
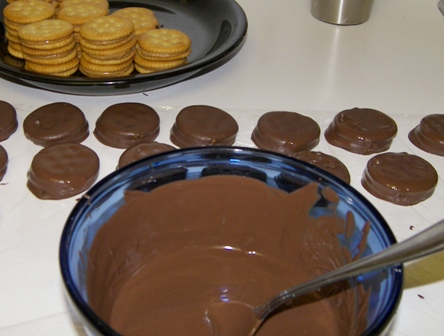
Here is when I was just ready to start. Those bowls are both melted white chocolate, but the one has pink food coloring in it. The melted milk chocolate is missed on the picture. I put some M&Ms in the bottom of the cones just for a fun surprise.

ice-cream-cone-cake-pops-starting.jpg

Dip a skewer in the melted chocolate, then into a cake ball. You can take a spoon and spoon some chocolate over to get it fully covered if the chocolate isn’t deep enough to fully immerse the cake ball, but don’t spin or stir or twist it around in the chocolate because crumbs may fall off or it might come apart. Then, put the drippy chocolate covered cake ball on one of these mini cones and pull the skewer out. It will kind of start to drip over the sides to make a melty look. That is a good thing.

This is after the process is underway…
ice-cream-cone-cake-pops-making.jpg

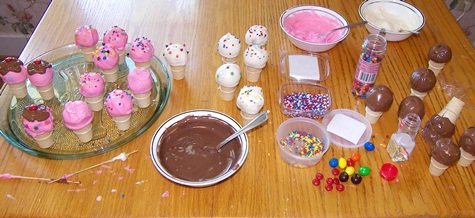
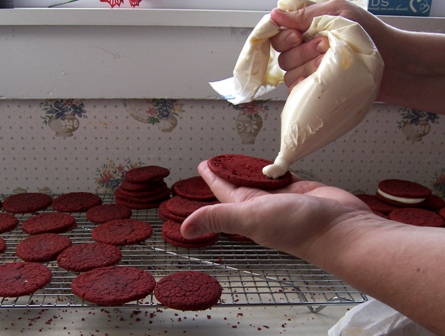
After the cake pops are dipped and put on the cones, take another color of melted chocolate and put on top, letting it start going down the sides a bit. Put on sprinkles if you want to. Put a red M&M or peanut M&M on top for a cherry.

ice-cream-cone-cake-pops-top.jpg

To make tipped over ones, put the cake ball on a flat surface instead of on a cone, then put the cone slanted on top of it. Bakerella calls this a “happy accident on purpose”. I love that term! 🙂

Now, we leave Bakerella and go on to an extra tip and idea for these from me:

1. These little things are top-heavy. So if you’re taking them somewhere, put a little bit of melted white chocolate on the bottom of the cone, then set it on the plate. In no time, it is hardened and you can move the plate around at will… without ice cream cones landing on the floor.

2. Pipe thick chocolate letters on plastic wrap or wax paper, put them in the fridge till they’re hard, and stick them to the top with a dollop or two of melted chocolate… and you’ve just personalized your cake pops to the season/event/occasion!

ice-cream-cone-cake-pops-summer.jpg

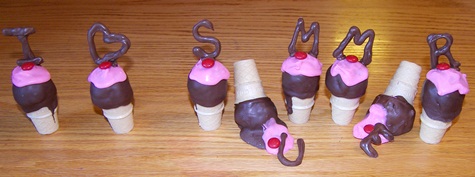
Here are some specific ideas:
– Write “Welcome Home” on them and put them on the counter, ready for someone coming home. That’s actually the very thing that made me think of putting letters on top of these… around the time I was making these for a church picnic, some friends of ours were coming home from a trip and I had intentions of doing that with the extra ones, but with a combo of a change of plans in my day and procrastination, they got home before I got it done. But at least I’m glad for the idea now, to use in other ways.

– Use them for the cake at a birthday party and write “Happy Birthday (insert birthday person’s name)” 

– Write your kids’ names.

– Make the entire alphabet, with extra A’s, E’s, T’s, M’s, S’s, and whatever other letters are used more often. Then, let your kids play with them, writing words and phrases or even complete sentences.

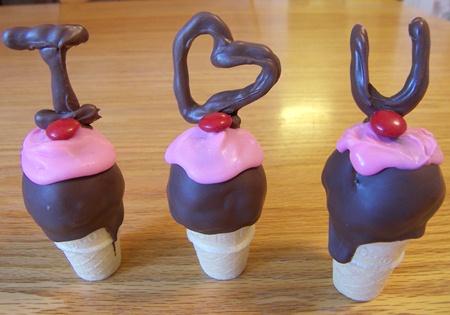
And last but not least, if you love someone, do this…
ice-cream-cone-cake-pops-love.jpg

Comments

8 Responses to “Ice Cream Cone Cake Pops”

  1. Shannon on July 21st, 2011 2:41 pm

    These are so cute!! Any birthday girl would love them. I love the Megan picture! She looks so adorable with the tongue hanging out for a lick! :)

  2. Beth on July 21st, 2011 2:59 pm

    Cuteness! Wish I could have one about now. I got a kick out of the phrase “Don’t make all those little dents in it like a golf ball has, though.” You are goofy! :)

  3. Jan on July 21st, 2011 3:51 pm

    That picture of Megan would win a prize! I think the cute cones could, too. I have leftover birthday cake in my freezer that I’ll probably end up throwing out to the wild animals in the woods after a few months. Maybe I should do this instead!

  4. Renita on July 22nd, 2011 3:03 pm

    love Megan’s pic! Cute! Jordan wants these…right now. :-)

  5. Janice on July 25th, 2011 11:48 am

    Oh dear, I made the mistake of looking at these with three little people. Now, they all want some! I’ll have to put cones on my shopping list.

  6. amber on September 5th, 2011 8:27 pm

    KAY!!! i was trying to think of something cute and fun for emma’s bday next week and i think i just might have found it.. now, if only YOU’D come make them for me??? ;) not sure mine will turn out as well, but i think i’ll give it a shot.

    you’re inspiring~

  7. Christy on September 8th, 2011 7:36 pm

    Hey, just wondering if you’ve ever seen any cute dinosaur cakes. Cute and dinosaur in the same sentence? I’m really not into them, but Zachary is VERY MUCH all about anything dinosaurs, especially triceratops, and anything green. I found a triceratops cake I can make i need to. I was really hoping to do more of a scene kind of cake, so I can buy a pack of little dinos and pop them on top–not up to too much work right now. His birthday is the 18th, so I have a little time to figure it out.

  8. Janice on October 26th, 2011 9:34 pm

    Love the site

Grilled Chicken Breast Salad

Being a mom and having guilt go together like pancakes and syrup. It just goes with the turf. You wake up in the morning and right away you can think of things to feel guilty about. I should spend more time… I should not have gotten upset when…  I shouldn’t have let them… Maybe we should give them… I should be getting up, what with the baby yelling for me from her crib and all…

If you get that first paragraph, then you know what I mean when I say how it makes you feel when your children make good choices… despite all your mistakes, something is getting through.

Well, here’s my little triumph in the food dept… my girls count Grilled Chicken Breast Salad as one of their favorite meals. We have it at least every other week. It’s hard to get a healthier meal than this, really… fresh veggies, hard-boiled egg, lowfat mozzarella cheese, some croutons, and grilled (not breaded or deep-fried) chicken breast. In the tortured mental games that I sometimes put myself through, them liking salad seems like it, in some way, compensates for the times I say yes to ANOTHER piece of candy or that lazy Saturday when we had ice cream cones for breakfast (hypothetically speaking, of course, not like any responsible parent would ever actually allow that, or do it herself), or those times when I let the girls fend for themselves for lunch and it’s anything but a square meal, a triangle meal at best.

Chicken Breast Salad

chicken-breast-salad-closeup.jpg

I’ll show you how a meal that involves grilling is a joint effort for us… I’ll color code it just to humor myself.

Shannon’s 1st job: Starting the grill, either charcoal or gas. This particular time, he used gas because it gets ready faster.

My 1st job: Thawing the chicken breast. Here’s how I do it. It goes from freezer to thawed in 5 minutes… which is good news to any of you who don’t always plan ahead and don’t get the meat out the night before to begin thawing!  

Take this out of the freezer:
chicken-breast1.jpg

Put the frozen chicken pieces out on a dinner plate.
chicken-breast-frozen.jpg

Put the plate in the microwave on High for 1 minute. Flip the pieces, reposition them so what was on the outside is now on the inside, and if one was on top, don’t put it on top the next round… in general just move them around at random.

Repeat that step 4 more times. If we’re having rolls or breadsticks to go with it, during those minute intervals is when I’d be getting them in the oven. Trim off some fat and drain off the juice. Your plate of chicken breasts should look like this, thawed and ready to hand over to the master of the grill.
chicken-breast-thawed.jpg

He seasons them with Chef Paul Prudhomme’s Blackened Steak Magic seasoning. You can season more boldly when it’s going on a salad than if you’d be eating the meat by itself. If you notice the 2 small ones with little seasoning, those are the ones the girls will eat. Their tastebuds seem to not be mature enough yet to handle the extra kick, so theirs get only Lawry’s Seasoned Salt and I think Shannon might sprinkle some Lawry’s on ours too. And then he puts them on the grill.
chicken-breast-seasoned.jpg

Meanwhile, I’m making salads…
Lettuce
Tomatoes
Mushrooms
Hard-boiled eggs
Shredded cheese
Croutons
Whatever else you want or have on hand like Carrots, Bacon, Italian seasoning, whatever. And they don’t all need to be the same… personalize them to each person’s taste.
chicken-breast-salads-b4-chicken.jpg

Looks kinda refreshing on a hot day, huh?

chicken-breast-salad-b4-chicken-2.jpg

Meanwhile, the chicken is on the grill. I left my salad-making and followed Shannon out to the grill when he went out to flip them…
chicken-breast-for-salad.jpg

Those of you who want to make this salad, I hope you sorta know how to grill chicken breast because when I asked Shannon what he did and how and time on the grill and stuff, I got very sketchy details, but I also got some great tips.

For example, I asked how long they were on before he flipped them and he didn’t know. He said you need to be on the edge of your comfort zone with it, though, and not overdo it. He said alot of people freak out about making sure chicken is done and then end up with dry rubbery chicken. You want it so it’s just so done, not pink anymore, and juicy. So, of course, I asked how to know when that is and he said, “You just go by instinct.”

So, yeah, good luck with that.

You could use a meat fork thermometer. Shannon used to have one, but hasn’t for quite awhile because, uhhhh, one time yours truly immersed it in water because the handle was messy and, you know, of course one time of immersion wouldn’t matter… famous last words. Yet, grilled chicken breast around here always ends up being perfect… done, but still juicy.

My only job left is to get out the cutting board and the knife… HIS knife, I should say. Yeah, we each have our own knife this size and we each think our own is THE best. Sometime, I should put them both on here and take a poll. I’ll best mine would win because, if for no other reason… it has a case! ????
chicken-breast-cutting-board.jpg

Soon, he brings the chicken in, slices it,
chicken-breast-cutting.jpg

and places it on top of the salads.
chicken-breast-salads.jpg

Zig-zag some Ranch dressing over it…
chicken-breast-salad-with-ranch.jpg

And dig in!

You don’t think this salad is so healthy that it could actually take away those cavities caused by the extra pieces of candy, do you?

Comments

11 Responses to “Grilled Chicken Breast Salad”

  1. Amy Burkey on July 14th, 2011 3:32 pm

    I now know what I’m having for supper! Thank you!

  2. joe on July 14th, 2011 4:31 pm

    you need to coordinate ur posts to the days that i’m cooking!!!!

  3. Jolene on July 14th, 2011 4:54 pm

    Oh that looks GOOD!

  4. Rosalyn on July 14th, 2011 4:55 pm

    sounds wonderful. I’m sure it would be a hit in our household, too! :)

  5. Kay on July 14th, 2011 7:22 pm

    Amy and Jolene, you can’t go wrong with this, esp in the summer! ????

    Joe, sure, no problem, ha. :) I’m sure you wouldn’t need a post, though, for grilling days… you could probably add some tips to this one!

    Rosalyn, this just became a hit with my girls a year or so ago. Before when we’d make it, they’d just eat the chicken plain or with Ranch and then have a breadstick and piece of cheese on the side. Last summer sometime, they both decided to like salad. ????

  6. Twila on July 14th, 2011 10:35 pm

    Looks quite tasty! I grill alot of chicken breast and usually do it about 8 minutes per side. Of course that might depend on how hot the grill is, the thickness of the chicken etc. It usually turns out about right though. If I have a thicker piece I’ll cut it in half to make sure it’s done.

  7. Shannon on July 14th, 2011 10:41 pm

    I grilled chicken the other night and we had left overs. Tonight we had it in a salad. I love it and am so glad my girls eat it too! This looks delicious.

  8. Beth on July 15th, 2011 7:24 am

    How well I get your first post & the mommy guilt thing. And the eating ice cream for breakfast thing. Well, pretty much just everything you said in there! Love the mixture of humor & actual recipe in this post. :) Like the humoring yourself with color coding. cracks me up! :) And I also love the step-by-step process you went through, right down to getting the knife out. This salad looks to.die.for. YUMMY. Shannon gets a boo though for not telling me how long to grill chicken. lol I am an awful griller, because my instincts usually make grilled food turn out burned or pink. :( But I can just hear him say that’s not his problem. No, really. I doubt if he’d tell me, but I betcha he’d think it. Anyway, enjoyed the post (as if you didn’t know that already). I need better smile faces for this! ????

  9. Kay on July 15th, 2011 9:18 am

    Twila, thanks for the 8-minute tidbit. :) Shannon did say that too, about it always being different because of grill heat and thickness. Times like this is when I’m glad for the understanding at our house that I don’t touch the grill… grill = guessing games.

    Shannon, I often use our chicken salad leftovers for chicken and cheese quesadillas… so there’s an idea if you have leftover leftovers. ????

    Beth, glad you get me, ice cream thing and all. ???? Yeah, so Shannon would probably say that, so just read what Twila said, and cut one apart so you can see if it’s still pink or not. Or make Rod grill.

  10. Liz on July 16th, 2011 4:16 pm

    Ha, ice cream for breakfast? It’s all right as long as it’s a late breakfast and after 10. At least going by some people. Of course, some of those people also don’t like chocolate as much as we do either so maybe their advice shouldn’t be taken too seriously? :)
    I wish that you it would be easier to compensate for bad decisions. I think if I drink 2 glasses of water than that should cancel out the chocolate that ate. Or something easier like that.

  11. Michelle on July 16th, 2011 8:58 pm

    yumMY!

Pioneer Woman’s Sloppy Joes

Just recently, Shannon said, “You oughta put some meat on Kitchen Scrapbook again.” As I thought about it, it did seem like it had been awhile, so just for kicks, I checked… and was surprised… in the last 27 posts, the only thing with meat in it on here was Haystacks! And that’s not a dish where the meat is really monopolized on. So, here we go, something with meat… a main dish, for something different. I know it’s not a CHUNK of meat, but hey, there IS meat here.

One main dish in 27 posts shows you a bit where my interests lie. I don’t churn out full course meals as often as you might think. I like cooking meals, I really do. But you know what I LOVE? Baking, desserts, decorating cakes, and playing around with food. It’s hard to do fun stuff with main course dishes. And main course dishes are necessary… the sweet things aren’t… and we all know that somehow there’s always more fun and passion in unecessary things. I should add in a clause here about meat… I’ve heard and seen enough from the guys I’m around that I DO understand that there is fun and passion in smoking and grilling chunks of meat… but I don’t know a flippin’ thing about doing it, so I’m quite happy to stay on the eating end of it rather than on the fire end of it. :)

This is the first time I’m posting one of Pioneer Woman’s recipes on my site, even though I’ve made quite a few of them. One I still need to try is the cinnamon rolls. I just need to see for myself that it’s just as good or better to sprinkle on white sugar instead of brown sugar just before rolling them up. When I do try them, I think I’ll do some with white and some with brown… and compare. The best part of all that is that it entitles me to TWO cinnamon rolls. ;) Anyway… why am I talking about cinnamon rolls?! Back to the thing of posting a Pioneer Woman recipe on my site… It’s sorta like what’s the point because it’s already posted in much more finery and humor already on her site. It’s not that I feel threatened by her… because you can only feel threatened by people or things that are in your league. ;) So, here is the link to the recipe on her site: Pioneer Woman’s Sloppy Joes. And in case you don’t feel like clicking to go over there, I’ll post it here, too.

I actually just grabbed my cell phone to take pictures of these because, well, my camera battery needed charged. :roll: Also, I made a half batch, in case the quantity in the frying pan looks small to you… you know what I thought of right now, I should’ve made a full batch and put half of in it the freezer for another meal!

sloppy-joes-4.jpg

Pioneer Woman’s Sloppy Joes

2 Tbsp. butter
2 1/2 lbs ground beef
1/2 onion, diced
1 green bell pepper, diced
5 cloves garlic, minced
1 1/2 cups ketchup
1 cup water
2 Tbsp. brown sugar
2 tsp. chili powder (more to taste) I actually cut back on this because I wasn’t sure how much kick it would give it.
1 tsp. dry mustard
1/2 tsp. red pepper flakes (more to taste)
Worcestershire sauce, to taste
2 Tbsp. tomato paste (optional)
Tabasco sauce (optional; to taste)
Salt; to taste
Black pepper, to taste
Kaiser rolls
Butter

Add butter to a large skillet or dutch oven over medium high heat. Add ground beef and cook until brown. Drain most of the fat and discard. Add onions, green pepper, and garlic. Cook for a few minutes, or until vegetables begin to get soft. Add ketchup, brown sugar, chili pepper, dry mustard, and water. Stir to combine and simmer for 15 minutes, adding salt and pepper to taste.
sloppy-joes-1.jpg

Also add tomato paste, Worcestershire, and Tabasco if desired. Taste and adjust seasonings as needed. Spread rolls with butter and brown on a griddle or skillet. Spoon meat mixture over the rolls. And then I added a slice of provolone cheese and put it under the broiler for a few minutes.
sloppy-joes-2.jpg

sloppy-joes-3.jpg

These are hands down THE BEST sloppy joes I’ve ever made or eaten! Dancing with flavor. I backed up the spicyness a little and I think it was just right… in my world, sloppy joes aren’t supposed to be spicy. But a little zing was perfect. So, anyway, this will now be my sloppy joe recipe unless I find another one to kick it out of 1st place.

In other news, we’re grilling tonight. Not sure what we’ll grill, but I think I’ll feature it in the next post, whatever it ends up being. The meats we have on hand to choose from are: burger, chicken breast, fish, and a 1.14-lb sirloin steak. Oh, and when I say “we’re grilling”, I am, as usual, using the term ‘we’ very loosely.

What are you grilling tonight? And feel free to use the term ‘you’ very loosely. ;)

Comments

15 Responses to “Pioneer Woman’s Sloppy Joes”

  1. Lydia Jo Martin on July 7th, 2011 2:48 pm

    hmmm… I never made this recipe of PW either. Looks good. I do, however, make her cinnamon rolls all the time. They are like fail proof. But then, I was never very good at making the all yeast kind. The last time that I tried a new recipe for cinnamon rolls they got horrible and I threw the whole pan into the pasture. Wouldn’t you know we got company that evening and the guys were looking around and they saw the cinnamon rolls in the meadow. I died! How embarrassing. Now, I’m going to go see if you have a sweet roll recipe that I should try.

  2. Shannon on July 7th, 2011 2:53 pm

    Awww, Kay to the rescue for something for supper. :) Think I’ll give it a shot if you say it’s good.

    I did the very same thing with the cinnamon rolls. Could not stand to just use white sugar so I did some of both. Can’t quite remember but I think the white was almost better for some reason. Try it yourself and I’ll see what you think. :)

  3. Audrey on July 7th, 2011 3:03 pm

    We are having leftover grilled foods tonight. Chicken and red potatoes.

    We bought a wood pellet BBQ grill about 2 months ago and we are LOVING it. We grill so often. And I love it because it involves Jeremy and no kitchen clean up either!

    Those sloppy joes look awesome!

  4. Cheryl Weaver on July 7th, 2011 3:13 pm

    I just made sloppy joes for lunch and I’m waiting on the man to arrive so we can eat them. I love the idea to broil the cheese. Otherwise I’m quite happy with my recipe which comes from the Byers cookbook. Its worked for fifteen years now.

  5. Freida on July 7th, 2011 3:49 pm

    I can not wait to try these sloppy joes. I liked the recipe I had good enough, but these look better. I just might try them for supper.

    What are we grilling? Next up is tin foils or grilled pizza.

  6. carmen on July 7th, 2011 4:30 pm

    looks divine!! I’m h.u.n.g.r.y!!

  7. Kay on July 7th, 2011 5:32 pm

    Jo, I HOPE you found these raspberry cream cheese cinnamon rolls in your sweet roll search! I make them alot and always keep donut mix on hand just for them. Glad to here PW’s rolls are fail proof! :) LOL about the guys finding your rolls in the pasture! That just made my day!

    So, Shannon, white is better in those rolls?! Now I HAVE TO try them because that still blows me away. Oh yeah… I have an open mind about it… why would you ask? :lol:

    Aug, yep, anytime you can skip kitchen cleanup and get out of making part of the meal, it’s a good thing! Your wood pellet grill sounds like a plan… charcoal briquets are NOT cheap! Oh, maybe wood pellet aren’t either.??? ;)

    Cheryl, can’t beat a faithful-for-15-yrs recipe! But broiling the cheese will only make it better! :)

    Freida, I was just looking at some tin foils recipes this afternoon… we’ve done a little of that for veggies, but I want to do more. Grilled pizza is something we’ve never done. I don’t get how the toppings get hot without burning the crust.??? :eek:

    Carmen, I’m hungry too! And I still don’t know what we’re grilling… gonna decide when Shannon gets home. Obviously, nothing that needs marinated. :lol:

  8. Liz on July 7th, 2011 11:21 pm

    We (using the term loosely as you do) grilled fresh sausage tonight. Meat that came from Lancaster, PA. Or from somewhere in there.
    Sloppy joes look good. I should try them sometime. I have no favorite recipe – it’s called dumping in stuff till it tastes right.

  9. Beth on July 8th, 2011 8:19 am

    We’re having sloppy joes today, but I think there are only 6 ingredients in the recipe we use. This looks like a lot of work! Most people would probably think our Schlabach family is blah, because we (also used loosely) rarely cook with onions or peppers. :) All because our Dad didn’t like them.

  10. Michelle on July 8th, 2011 5:18 pm

    You always make me hungry! I always just dump stuff when I’m making sloppy joes. I should try a recipe sometime so they start turning out consistently. :) And we’re having hot dogs tonight. Because we were going to burn our brush pile. And now it rained. AGAIN.

  11. Sharon on July 8th, 2011 11:22 pm

    tonight we (and usually I use that term loosely, but I really did it, because Troy was tired and napping) grilled steak cubes, onions and mushrooms. I chunk the steak into kebab-size cubes and do the veggies the same, then marinate them a bit, throw them on our grill tray, and they are so good! I like steak that way cause it gets done faster and is much easier for the children to eat. I love adding zucchini to the above veggies, too, but didn’t have any today. Those sloppy joes sound great! Did you really add all that garlic? No wonder they were good. :-)

  12. Karen B on July 9th, 2011 12:39 am

    Made these tonight…YUMMY! I think toasting the buns made them wonderful. We quit eating sloppy joes cause they are so blah…..not these!

  13. Kay on July 9th, 2011 11:17 am

    Liz and Michelle, you guys just dump? My hat’s off to you! I do not do that in cooking! But I admire people who do! ;)

    Beth, if you use minced garlic and onions, it doesn’t take much extra work… the peppers still need to be diced, but it’s worth it cuz you know how I LOVE peppers! :lol:

    Sharon, I thought of doing that exact thing with that 1.14 lb sirloin! We made chicken breast salad then, but we’d have probably just brushed them with olive oil and seasoned them because there was no time for marinating… although it sounds like you didn’t marinate ‘em for very long. I love kabobs.

    Karen, you tried them! Ahhhh, love when people do that! :cool:

  14. Aurelia on July 9th, 2011 11:49 am

    Ok Kay, I read your post and had an instant craving for cinnamon rolls. (I bet you thought I was going to say sloppy joes!!) So, last night I mixed up 1/2 batch of PW’s cinnamon rolls, stuck them in the fridge overnight and rolled them out and baked them this morning. AHHH, what a tasteful experience!!!! Dave classified them as AMAZING!!!! They will definitely be a go to recipe, though they do take a bit of time to mix up til you let the dough rest a couple of times. I love reading your posts.

  15. Leah Anderson on August 29th, 2011 6:38 pm

    I made these tonight! I had all the ingredients except the provolone cheese – so I used shredded mozz. These are hands down the best Sloppy Joes Ive ever tasted! Manwich doesnt even come close! Love your blog!

    Thanks for sharing!

4th of July Fun with Brownies

It’s July. And it’s blitzin’ hot! Right now, mid-evening, the thermometer says 89 degrees. Perfect… it’s July.

The girls and I had some red, white, and blue fun today. This is when we were ready to start. Excitement was high. I had a few ideas, but I didn’t know what the end result would be… there was gonna be alot of experimenting going on…

4th-of-july-start.jpg

And here was the end result:

4th-of-july-food.jpg

It’s basically 4 different things… parfaits, berry shish-kabob decorations, fireworks, and randomly decorated brownies.

I made a big pan of brownies and then cut them out with star cookie cutters. I thought that would be faster because my star baking pan has only 6 wells and I’d have had to bake 3 or 4 batches. But, having it to do over, I’d use the star pan. You know how brownies kind of stick to the knife when you cut (unless you use a plastic knife)? Well, they stick to cookie cutters too. It wasn’t too bad, though, and worked fine, but next time, I’ll use my star pan.

Or, instead of brownies, it could be done just as easily on sugar cookies, cupcakes, or mini cupcakes.

The parfaits…
4th-of-july-parfait.jpg
The parfaits tasted awesome and were easy and could be made in a large pedestal bowl instead of individual parfaits. This one is a layer of brownies, then cream cheese filling, then raspberries, filling, blueberries, filling, brownies, and then you can either put Cool Whip or filling on top and garnish with a bit of fruit and sprinkles. You could make a pan of brownies and cut them up into little squares to make this, or you could do what I did and use the brownie scraps left over from cutting out star brownies. ???? The filling is: 8 oz cream cheese mixed with 1/4 cup powdered sugar, then that gets mixed with 8 oz Cool Whip.

The fruit shish-kabob decorations…
4th-of-july-fruit-kabob-fireworks.jpg
These shish-kabob things had serious issues… they kept falling over. We had to keep standing them up before each picture. We originally thought we’d try to make them look like fireworks, but we kept lowering our standards til our only requirement for them was to be red, white, and blue. We should’ve just skipped the sticks and made a mound of fruit on top. Oh well, the girls had fun stabbing the stuff on… and obsessing about making sure to get them in the right order of red-white-blue… but one time, one of them asked, “Mom, would blue-white-red be ok, as long as white is in the middle?” See? Obsessing. And you know what TOTALLY makes my day after all that fuss? I didn’t notice it before, but just now I see that on the one tall one, it’s red-white-blue-white-red-blue. ????

The fireworks…
4th-of-july-fireworks.jpg

Oh, what fun! Didn’t turn out quite like I had pictured, but that may be because the girls did most of it (also not what I had pictured) and I mostly just did damage control. We colored white chocolate blue and red and then piped the 3 colors on Saran wrap over a cutting board, then sprinkled on some colored sugar and star-shaped sprinkles, and put them in the fridge to harden.
4th-of-july-fireworks-parts.jpg

After 15 minutes or so, they were hardened and ready to assemble, which included jamming the sticks into the frosting on the brownies. Does ‘jamming’ sound a bit harsh for delicate little chocolate sticks? Yep. Harsh, but accurate. ???? I really should’ve taken a video clip of that process… it was hilarious to watch and listen. ????
4th-of-july-fireworks-assembly.jpg

So, did it end up looking like fireworks? I don’t know, but we at least have to give them credit for creating something that looks like some type of explosion…
4th-of-july-fireworks-3.jpg

4th-of-july-fireworks-2.jpg

The randomly decorated brownies…
4th-of-july-brownies.jpg

This was fun. I got an inspiration for this that I’ll do more in the future for any occassion. Make a page on the computer of writing or shapes or outlines or whatever. Then, print it out and put it on a cutting board under a piece of Saran wrap. Then, pipe over it with chocolate. It’ll make writing more even and shapes more accurate. Here is the Before/After…
4th-of-july-shapes.jpg

Then, put it in the fridge to harden. Peel off and garnish. The possibilities are endless with this print-out-and-pipe-chocolate thing! One tip is to make sure it’s pretty thick. Another tip is don’t hold it very long before putting it on because your warm fingers will start to soften it and it’ll weaken and break.

Here are a couple of close-ups. Next time, I’d make an extra little thing sticking down to go into the frosting because, like July 4 down there, the Y looks like a V and the 4 looks like a triangle.

4th-of-july-brownie-star.jpg

4th-of-july-usa-brownie.jpg

4th-of-july-close-up.jpg

And, last but not least, United States rice crispy bars. After cutting it out, I put all the scraps together and re-flattened it out and cut out stars, then, sprinkled colored sugar on top. The flag is M&Ms… I had the kids separate out all the blue and red ones from a package.
4th-of-july-usa-flag-rice-crispy.jpg
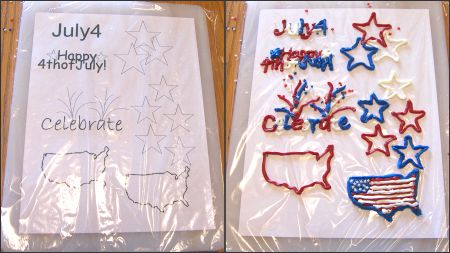
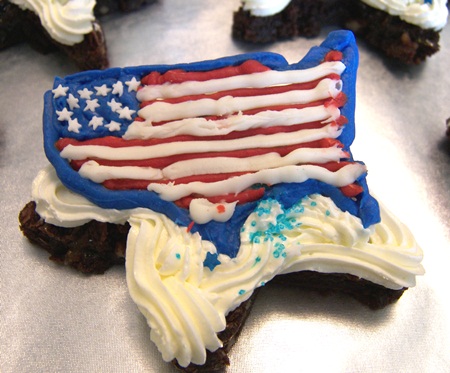
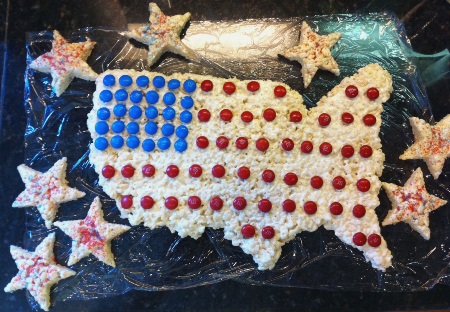
I used to have a plastic United States shaped mold. I had put it away for the year and when I went to get it out this year, something heavy was laying on it (a 15-lb dumbell, to be exact… yeah, don’t ask, I have questions myself!) and it was hopelessly smashed. So, I just cut this freehand. The top does look a little odd from Michigan to Maine, but hey, you can at least tell what shape it’s supposed to be, right?

Happy 4th of July from all of us! (even from Shannon, who was at work when we self-timered this picture)

4th-of-july-eat-dessert.jpg

Excuse us for eating in front of you, but we couldn’t help it when we saw that parfait sitting there. We’re going to kick back and relax this weekend, maybe grill a burger or two and watch some fireworks. See ya next week!

Comments

5 Responses to “4th of July Fun with Brownies”

  1. Sandra on July 1st, 2011 10:30 pm

    LOve it!!..me and jazz wanted to get all festive for the wkd.Love ur ideas!! maybe we can make a few:)

  2. Rosalyn on July 1st, 2011 11:21 pm

    Those are too cute! and way too much fun! ???? I know my girls would be begging to make some, too, if they’d get a glimpse… ???? Happy 4th! :)

  3. Jo on July 2nd, 2011 10:40 am

    This was so much fun to read! I hope I find an excuse to try something this weekend. Happy 4th!

  4. Renita on July 2nd, 2011 12:43 pm

    Wow. I love the computer print out idea beings I don’t do good free hand! This puts me in the mood to celebrate. :) Even my boys will wanna do some things in the kitchen after seeing this. Thx

  5. Shannon on July 3rd, 2011 9:11 pm

    Aww that looks like fun! When I saw the picture it made me realize how much I miss your skinny self. ???? Let’s get together soon.

Watermelon Cookies

Nothing says summer like watermelon cookies. Just kidding. I was only trying to sound cliche. There are probably 50 things that could go in this blank: Nothing says summer like ________ . Flip flops, burgers on the grill, buzz haircuts, sticky roasted marshmallows, sun-kissed cheeks, fresh strawberry pie, laying in the hammock, picnics, etc. etc. Oh! and watermelon. Watermelon anything.

Before we get to the cookies, I want to throw this in here. Watermelon cake. I made it a couple years ago, but you can make it this year! :)

watermelon-cake.jpg

watermelon-cake-eat-piece.jpg

And now, onto the cookies…

watermelon-cookies-close.jpg

What these cookies lacked in taste, they made up for in cuteness and fun. But, when it comes to eating sugar cookies, you can’t go by me because I’m not a sugar cookie fan. I like them ok if they’re loaded with frosting, and these cookies weren’t loaded with frosting. The girls liked them though, and that’s what counts, I guess. These particular cookies did have chocolate chips in them too, which is good, what with sugar cookies needing all the help they can get.

I didn’t know how I was going to get the cookie dough red, other than just using food coloring. So, I came up with a brilliant plan (sorta kidding about the brilliant part). I mixed up sugar cookie dough (this recipe) and cake mix cookie dough (this recipe, but I used a red velvet cake mix, and I skipped the silly Tbsp of flour). Then, I took about 1/3 of the sugar cookie dough and mixed it with a dollop of the red velvet dough. (Thought of it later that I could’ve tried simply dumping a pkg of red jello in the dough and see how that works, instead of messing with red velvet). Then I mixed in some chocolate chips. I rolled it out and cut circles, baked them, put a rind on, and cut them in half.
watermelon-cookies-dough.jpg

watermelon-cookies-without-rind.jpg

Btw, to do the green, I just piped a fat line around the edge, then spread it out.
watermelon-cookies-step-by-step.jpg

And ta-da! Watermelon-lookin’ slices!

watermelon-cookies.jpg

You know what I just thought of now? WHY did I not think to make some wedges and make some look half-eaten, like just the rind with a bit of red left on it or use a small flower cookie cutter and cut a ‘bite’ or two out of some of the slices?! So, there’s an idea for you if you make watermelon cookies… I can’t do it anymore with these because I made them last week and they are LONG gone. Oh, and another way to make watermelon cookies would be to make regular sugar cookies (not colored dough) and then frost them red, white, and green and press mini chocolate chips into the red frosting.

So, that’s the end of the watermelon cookies. But if you were paying attention up there, you know that I have most of two batches of cookie dough left. What should we do with all of it?

Mix them together and you’ll have a bunch of red cookie dough. Then, make star sandwich cookies for the 4th of July, which is just around the corner!

star-sandwich-cookies.jpg

Speaking of the 4th of July, I’m going to ‘play’ a little this afternoon and make some fireworks out of white chocolate with the help of blue and red food coloring. Then, tomorrow sometime, I’ll do a 4th of July post with those (whether they end up actually looking like fireworks or not ;) ), USA/flag/stars rice crispies, and maybe another red, white, and blue thing or two.

Comments

3 Responses to “Watermelon Cookies”

  1. Rosanne on June 30th, 2011 8:49 pm

    So cute, and the watermelon cake, I love how they ate it. Love your post, so fun to read. Happy 4th!

  2. Sharon on July 1st, 2011 11:40 am

    So, Kay, if you don’t like sugar cookies, couldn’t you use chocolate chip cookie dough and add red food coloring? Then just bake instead of cutting them out…

  3. Kay on July 1st, 2011 12:37 pm

    Sharon, now THAT is a brilliant idea! Thanks! Where were you last week when I needed you?! :)

Apple Nachos – Gooey Sticky Yummy

This is a perfect summer snack. It’s easy to throw together and it’s cool. Perfect summer snack, as in, if you’re going to make it, summer would be the perfect time to do it. Not everything about the snack is perfect…. the taste and flavor combo is just amazing, BUT the. kids. had. sticky. e.v.e.r.y.w.h.e.r.e. I mean, when you’re talking melted caramels and marshmallows, it’s pretty much a given that it’s gonna be sticky.

And it’s also pretty much a given that it’s gonna be yummy. ;)

So, consider the ’sticky’ a warning and the ‘yummy’ a recommendation, and then you decide from there. :) Maybe the time to serve it would be while the kids are out running thro’ the sprinkler or on the Slip ‘n Slide… think all mess outside and then getting washed off. Now we’re talkin’!

The main thing is that we all kept coming back for more, and they are SO good… which is why I’m posting them and will definitely make them again!

apple-nachos-yum.jpg

Apple Nachos …recipe taken from Taste of Home Oct/Nov 2010 magazine (and going by the picture they have with it, they only put on about an 1/8 of the topping quantities and their apples aren’t peeled)

36 caramels
1 Tbsp. water

30 large mashmallows
1/3 cup butter, cubed

4 medium tart apples, peeled and cut into 1/4″ slices
1/3 cup chopped dry roasted peanuts
1/3 cup miniature semisweet chocolate chips
3 Tbsp. Halloween sprinkles (I skipped this)

In a microwave-safe bowl, melt caramels with water; stir until smooth. You could probably use caramel ice cream topping, but I think melted caramels would taste way better. ;)
apple-nacho-caramels.jpg

Meanwhile, in a large saucepan, melt marshmallows and butter. I think next time I’ll do these in the microwave too… I do it in the microwave when I make rice crispy treats, so why not for this? I also want to try just putting a a jar of marshmallow creme in the microwave and see if it melts and becomes pourable.
apple-nachos-marshmallows.jpg

Arrange apple slices on a large platter.
apple-nachos-apples.jpg

Drizzle with caramel. Love that phrase, the word ’drizzle’ bumps it up a level. “Put the caramel on” just wouldn’t have the same ring to it.
apple-nachos-step2.jpg

Top with marshmallow mixture.
apple-nachos-step3.jpg

Sprinkle with peanuts, chocolate chips, and sprinkles.
apple-nachos.jpg

Serve immediately. Not kidding about serve immediately… we didn’t eat the entire thing and a couple hours later, it was kind of milky and liquidy between the apples and caramel and the marshmallow stuff firmed up. It was fine, just not as easy to eat because huge chunks of toppings wanted to come along with each bite. Still tasted great, though! ;)

Comments

3 Responses to “Apple Nachos – Gooey Sticky Yummy”

  1. Beth on June 23rd, 2011 2:19 pm

    Hey, you posted THREE times before I finally checked this? I really need to have more of a pattern to check your blog. The salad looks yummy, the cake is fabulous (as always) & that apple dip looks to.die.for! Now I’ll have to go eat some ice cream & peanut butter to satisfy the sweet tooth craving you gave me. :)

  2. Beth on June 23rd, 2011 2:23 pm

    And one more thing…love your new profile pic!!

  3. Mom on June 28th, 2011 12:25 pm

    Yeah, I was going to comment on your very good-looking profile picture and description, and adding Megan to your delicious mix of little girls – at least, they sound delicious after eating this snack before the sprinkler wash!

Puppy Cake – Happy 1st Birthday, Megan!

A year ago, I was memorizing the feel of a newborn in my arms; today I have to curl her legs up so she fits between the arms of the rocker.

A year ago, she couldn’t even hold her own head steady; today she WALKS up to me and raises chubby little arms, asking to be held.

A year ago, she wiggled her little self into my mommy heart; today she is wiggled in even deeper.

A year ago, I’d lay her on the couch and go do some work, knowing she’d stay there; today if I’d do that, I’d probably find her 3 minutes later in the bathroom pulling TP off the roll.

A year ago, I had to guess what she needed when she cried; today I still have to guess some, but she can get her point across very well when she needs/wants something.

A year ago:
meg1.jpg

3 months old. I saw this 4-generation picture in the 3-months-old category of pictures and decided to put it on here, for a few reasons… because I’m proud of my dad and yesterday was Father’s Day, because my grandma is very special to me and I’m so thankful I still have her, because some of you who know them might be interested in this picture, and because I love seeing 4-generation pictures.
meg4gen.jpg

And we’ll zoom in so you can see that at 3 months, Megan had some chubbies going on…
meg4chubs.jpg
I’m just noticing that this picture is really neat… young baby skin against her great-grandmother’s aging hand.

6 months. All smiles, which was/is very typical of her…
meg6months.jpg

9 months. Wanna pinch those cheeks?
meg9months.jpg

1 year. And yes, she feels as sturdy as she looks. :)
megan1year.jpg

My little Megan. Easy-going. Happy. Charming. Friendly. Chunky. And surrounded by love. Thank-You, God, for her.

And now for the cake. It was a puppy cake.

Here is the cake sitting beside the inspiration for the cake.
puppy-cake2.jpg

I know, so classy… dig thro’ the toybox for birthday cake ideas. Well, ok, that’s not actually what happened. First, I decided to make a puppy cake. Then, I needed a puppy to look off of. Then, I said, “Tiffany, could you please go find Sammy?”

My friend Kristen helped me with this. She brainstormed with me and we decided to make it pink and brown instead of tan and brown, so if you look closely, or more like just look… it’s not hard to see… you’ll see that everywhere that Sammy is tan, Birthday Puppy is pink, and the dark brown and white are the same on both. And then we added a bow. Kristen kneaded some fondant and made the button on the bow, the nose, and the eyes. She is 13 and she is confident and creative… two things which are very helpful when putting details on a cake!

I only have one progress picture of this cake. It’s one when it was mostly frosted and the legs are already covered with fondant.
puppy-cake8.JPG

The way to spell magic is f-o-n-d-a-n-t. ???? Doesn’t look like much, does it?

But put some fondant on and look what happens…

puppy-cake3.jpg

Yeah, I did smooth the frosting out some, but for some reason a crease showed up where the layers meet. I wanted sort of a lumpy loosely-stuffed look, but not necessarily a crease look! Oh well.

puppy-cake4.jpg

Here is a close-up of the bow.
puppy-cake5.jpg

As I was making the white part of the bow, I told Kristen we’ll need something for the middle of it and right away she started rattling off ideas, so I told her to have at it and here’s the little button she came up with. Cute! :)

The cake was sitting out on the table and one time when I walked through the dining room, this is what I saw… it was Shannon’s doings. ????
puppy-cake1.jpg

Ok… we have some kids around here somewhere. Let’s add them to the cake pictures…

puppy-cake-n-kids.jpg
Yay! It’s cousins from WI!
Tiffany, Kaitlyn, Megan, Lexi, Chad

I was planning to make a bone to give to Megan to dig in, but then that didn’t really happen, so she just got a leg of the puppy. First, she broke off a piece and tried to give it to Kara. Such a thoughtful giving person at such a young age, making sure other people get cake before allowing herself to indulge.
puppy-cake6.jpg

Then, she dug in herself…
puppy-cake7.jpg

Happy birthday, Megan. I hope you stay this sweet and good-natured forever!

Comments

9 Responses to “Puppy Cake – Happy 1st Birthday, Megan!”

  1. Shannon on June 20th, 2011 8:40 am

    Awww that is just so stinking cute!! And Megan looks so squishable! I’m gonna come squeeze her just to see (and talk) to you! :)

    Once again you did a fabulous job on the cake. Love all the little details.

  2. Cindy on June 20th, 2011 8:46 am

    yesyes i wanna pinch those cheeks…
    and squeeze those lil chubby hardly-a-baby-anymore legs!

    you are The Coolest cake maker!
    happy first birthday to megan and her mom!

  3. Freida on June 20th, 2011 8:55 am

    A.D.O.R.A.B.L.E!!!! Both the cake and the girl. Btw- I MISS you! Please come back. :)

  4. Amy Burkey on June 20th, 2011 9:08 am

    The four generation picture is very nice. And your Megan is very precious! I really really liked this post. God IS good!

  5. Jenny on June 20th, 2011 9:53 am

    I enjoyed your post, liked the four generation picture very much, I have a similar one with my Dad and Grandma, last summer.
    Cute cake and little girl too :)

  6. Liz on June 20th, 2011 10:51 am

    Good job on the cake. Which I think or at least hope that I already told you.

  7. Twila Kulp on June 20th, 2011 11:49 am

    Your sweet babe is so cute! And your dad is handsome and your grandma a lovely picture of old age! Thanks for sharing pics. I do not have that kind of talent with decorating cakes, but it’s fun to look. :)

  8. Mom on June 23rd, 2011 9:51 am

    Oh my, what is it that makes a grandma cry seeing pictures like this of far-away sweet grandkiddies? I want her to know me, too, so maybe I’ll just start out for OH and not stop till I get there! See you tonight – NOT!! I love those legs sticking out the back on the puppy! He’s cute, too, and a perfect fit for Megan!

  9. Birthday Flowers on June 27th, 2011 12:13 pm

    This looks so great! The cake looks really yummy too!

Colorific Salad

It appears that the cook around here is on strike, doesn’t it? I think it’s more a thing of needing to hire a scribe because I currently have pictures for 4 posts. I’ve made supper the last 2 evenings, and for some crazy reason, I can’t remember back farther than that. Probably several snacky fend-for-yourself meals in there somewhere. Yeah, we do have those weekly, and then some more on the weekend… that’s why I try to keep frozen pizzas, hot dogs, nacho stuff, cheese & pretzels, and cold cereal on hand. Anyway, the last 2 evenings, we’ve had grilled chicken salad and wet burritos, respectively. I like the grilled chicken salad because all I have to do is throw a couple salads together and possibly pop some refrigerated Pillsbury breadsticks in the oven… the rest is on the grill, which, if you’ve been reading Kitchen Scrapbook for any length of time, you’ll know I don’t touch the grill. I have the 4 plates of salad sitting out on the counter and Shannon brings the chicken in AND cuts it up and puts it on top of the salads. On the wet burritos, I read my post on that last night and thought it was strange that I served crescent rolls and salad with it. Huh? That sounds more like lasagna sides! I don’t even remember serving that with it; now I serve tortilla chips salsa with it. And sometimes applesauce, just because I have a thing aboout that there’s gotta be at least 3 different things on the table, not counting condiments, otherwise it looks skimpy.

I finally made my salad that I’d been craving a couple weeks ago. So, what does the word ‘colorific’ mean? I decided it must be a made up combo, merging colorful and terrific. And that would fit this salad. I got this recipe from Jolene. Thanks, Jolene, it’s a keeper! Connie, thanks for your recipe too, I’d like to try it sometime… I don’t go for feta cheese, but I’ll bet that could be substituted for mozzarella.

colorific-salad.JPG

Colorific Salad
1 c. craisins
1 c. red peppers
1 c. honey roasted sesame sticks
1 c. pecans
2 c. shredded cheese
1/2 of a purple onion
1 head of romaine lettuce

colorific-salad-before-mixing.jpg
Mmmmm… you know it’s gonna be a good salad when you have to say “Where’s the lettuce?” ????

Oh, one little tidbit… I took the idea from Connie’s recipe to saute the pecans… yum! I didn’t sugar them though.
colorific-salad-pecans.jpg

Dressing:
1 T. mustard
1 c. sugar
1/2 c. oil
1/3 c. vinegar
1/4 c. water
1 tsp. salt
1 Tbls. minced onion Blend dressing in blender. I put this picture on here so you can see what color the dressing is…
colorific-salad-dressing.jpg
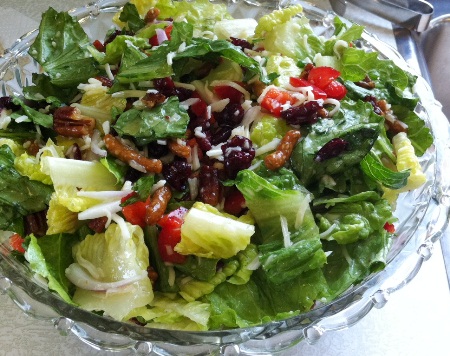
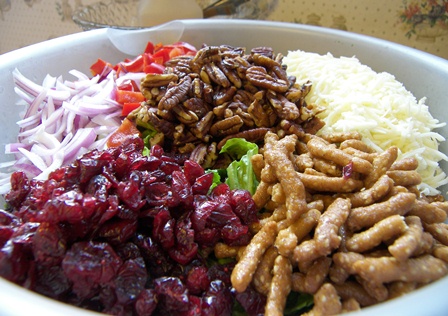
Toss with salad ingredients.
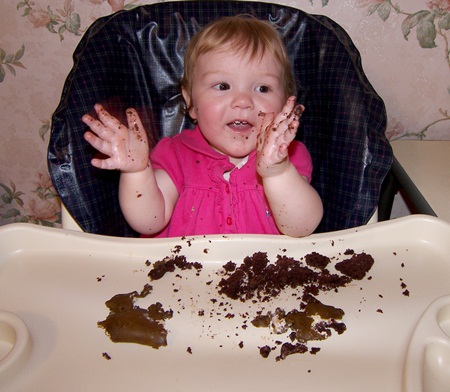
I was taking this to a carry-in meal at church, so I took it in this big bowl with a lid (more room for tossing) and put the dressing in a separate container… you can see it all in the background here.
colorific-salad-b4-mixing.jpg

And then, instead of letting the kitchen help take care of tossing my salad, I went out when church was almost over to do it myself so I could get a ‘done’ picture. ????

colorific-salad.JPG

Next up… Megan’s puppy birthday cake. How did my baby turn 1 already?!

And this afternoon, I’m planning to bake monster cookies. Yay! I just did last week, but who cares. In a perfect world, I’d bake ’em every week. :)

Comments

5 Responses to “Colorific Salad”

  1. joe on June 17th, 2011 6:15 am

    No comments?!?!……hmmmm….well I ain’t sayin a word! LOL

  2. Kay on June 17th, 2011 8:18 am

    Too late… you already gave your opinion on this AWESOME salad yesterday.:) You don’t know what you’re missing, especially with those nuts and craisins in there. Ha.

  3. Liz on June 17th, 2011 5:23 pm

    Monster cookies again? :) They are really good and the scales showed it. :( Oh, well, I’m dieting again anyway. Ha!
    Looks like a salad I would try. If someone else made it. I can’t see it going over real good in this household.

  4. Connie Stoll on June 18th, 2011 9:24 pm

    Yum, this does look good! I’m going to try this one, too.

  5. Kim on June 25th, 2011 7:32 pm

    Finally, something a dieter can eat! ???? It looks delicious. Gonna have to try it soon.
    …always fun to browse here!

Deviating from the Norm in Baking

Posted on May 19, 2011
Filed Under Cakes, Cookies and bars, Pies

You bake cookies. You could do it on autopilot. Your kids even know the drill… one time, Tiffany came out to the kitchen as I was starting cookie baking and said, “Can I help you bake cookies?”
“How did you know I’m gonna bake cookies?”, I asked.
“Because I saw you open the mixer and get that *pointing to the shortening* and the sugar out of the cupboard, and that’s how you always start baking cookies.”, she confidently said.

Sometimes I feel in such a rut with cooking and baking. When we have cookies around, 90% of the time they’re either monster or chocolate chip. When we have cake around, 90% of the time, it’s chocolate with peanut butter icing. When we have pie around, 90% of the time it’s either peanut butter or lemon meringue. And it looks like when I get into a percentage rut, it’s usually 90%. Seriously, though, if I make something other than the things listed above, you pretty much always see it on here. Sometimes I feel too predictable and want to change things up a bit…

We can still have our favorites, but in a different way.

Take chocolate chip cookies, for example. I was making some for an after school snack, so you know, for kids. Instead of using the same ol’ Pampered Chef cookie scoop, I just used a spoon and made teeny little scoops. The teeny little scoops turned into adorable 1-and-a-half-inch-in-diameter cookies. The adorable cookies, placed in a little bucket, turned into an after school snack that was a huge hit… little cookies, huge hit. They thought it was great that they could have TEN cookies for after school snack! ????
chocolate-chip-cookies-in-bucket.jpg

Awwwwwww.

And now, not to wreck the fun I’m-SOOOOOO-gonna-bake-cookies-this-afternoon-and-do-that-cuz-the-kids’ll-love-it mood or anything, but just let me warn you: the dough goes down v.e.r.y slowly, it takes way longer to put them on and get them off the cookie sheet, and the yield is dozens and dozens, do not even try to count.

*WHIPLASH ALERT*

We’re now going to switch from baking dozens of little time-consuming mini cookies to 1 pan of bars.

Let’s say you’re baking cookies and you mix the dough up and while the first panful is in the oven, you realize you’re not really in the mood to bake cookies after all… not in the mood to drop them onto the cookie sheet every 10 minutes, not in the mood to be setting your laptop down and jumping up 5 times an hour.

But, you’ve got a batch of dough sitting there.

No problem. Just spread the dough in a sheet cake pan and bake it for 25 minutes… and ta-da, bars made from your favorite cookie recipe. I just tried this for the first time about 3 weeks ago and thought it was really great that I thought to do this on my own UNTIL some of my friends said, “Oh, yeah, I do that all the time.” :roll:
bars-from-cookie-recipe.jpg
Side note here: that’s my chocolate chip cookie recipe, except that I substituted FUDGE + 1 cup of flour for the chocolate chips. I had about 5 cups of fudge on hand from when I made this cake.
cut-view-lightning-mcqueen.jpg

I was going to use the fudge in the middle layer between the 2 cakes, but then when I started spreading it on, I was afraid it would be too soft and squish out from the weight of the cake plus car on top of it (I used melted-then-hardened chocolate instead). So, I used the fudge up in those cooki— uh, I mean bars.

Another way to change up chocolate chip cookies is to mix them up and bake them, leaving out the chocolate chips. Then, melt the chocolate chips, spread them on something metal to harden and make cutouts. Or just drizzle the melted chocolate over the cookies. After they’re baked, you can cut out some of the baked cookies into heart shapes… the girls (and I) did these 2 years ago for Valentines Day and we shipped them to WI to their 2 grandmas.
valentine-cookies1.jpg

valentines-cookies2.jpg

For cake: sometimes I do chocolate cake with peanut butter icing in a 9×13, sometimes I do it in a sheet cake pan, and once in a great while, into cupcakes. I know, exciting. ???? Next time, I’m going to do mini ones. I made mini cupcakes for the first time last week. If you ever want to do this, one cake mix made exactly 6 dozen… I filled the wells about 3/4 full with batter. And it takes double the frosting. ???? Pile it up even more than this… it’s part of what makes minis fun. I only made a single batch, so I couldn’t put as much on as I wanted to AND I ran out.
mini-cupcakes.jpg

For pie… if you want lemon meringue pie, but not in big piece form, do this: make pie crust, cut 3″ circles, press them into mini muffin pans, and bake. Make your regular lemon pie filling and fill the crusts. Make regular meringue and pipe or dollop it on, brown it in the oven, and you’ve got these sweet li’l thangs…
mini-lemon-pies.jpg

You could do that with probably any kind of pie. It’s great for potlucks or snacks.

And now, still on the pie subject, the grand finale to this whole ‘switching things up’ thing… how about calorie-free… ????
knitted-pie.jpg
I ran across this website (April Cottage Ramblings) one day as I was surfing and immediately saved the link. Absolutely amazing!!! Seriously, this lady is talented… she KNITTED a piece of pie and a donut!!! She knits and crochets other stuff too… I fell in love with a little short-sleeved ruffly purple sweater that she made for her granddaughter. I don’t know her, and I don’t knit, but I’m very impressed. And it sounds like she’s going to knit more cakes, so I’m going to stay tuned. :)

Coming up next… Lately, I’ve been hungry for lettuce salad with craisins and pecans in it, so I’m going to look for a recipe like that. I don’t have one in mind, so if you have a slam good one that you’re bursting to share, let me know! :)

Comments

9 Responses to “Deviating from the Norm in Baking”

  1. Kay on May 19th, 2011 8:37 am

    Every time I see the title, I think “Who’s Norm?” Hmmm, maybe I should’ve worded it differently…
    :)

  2. Beth on May 19th, 2011 9:29 am

    Love this! And I think the title is fine – my ‘normal’ is chocolate chip cookies, but I sure don’t make cakes or pies often enough to call that normal. If I make them, I’m the one who ends up eating it…can’t let that good stuff go to waste! :) I like making dessert though, so I often choose that if I need to take something to family or church activities.

    Hey, do you have the small Pampered Chef scoop? I wonder how that would compare to your method of using a spoon. Also, their large scoop is perfect for filling muffin tins.

  3. Amy on May 19th, 2011 10:47 am

    LOL… That pie slice looks like a skunk tail! I had to read what you said it was, look at it again and then.. AHhh!! Now I see it! ????

  4. Connie Stoll on May 19th, 2011 11:14 am

    Festive Tossed Salad
    12 c mixed greens, 3/4 c dried cranberries, 4 oz feta cheese. Saute 1 c chopped walnuts (or pecans) with 3 T butter, cool and toss with 1/4 c sugar, 1 tsp pepper and 1/4 tsp salt. Toss salad with dressing just before serving. Dressing: 1/4 cup red wine or cider vinegar, 1/2 cup loose fresh parsely, 1/4 cup chopped red onion, 2 cloves garlic, 1/3 cup sugar, 1/2 tsp oregano, 1/8 tsp salt and 1/2 cup olive oil. Puree in food processor or blender, regrigerate until serving. Just had this salad last weekend and it is absolutely delicious!

  5. Shannon on May 19th, 2011 2:34 pm

    Now who did you say Norm was? ???? jk!

    I think my cookie scoop is too small. It always takes forever to get to the bottom of the bowl. I just love that “bar” idea more and more!!

  6. Michelle on May 20th, 2011 8:13 am

    My mom makes those tiny cookies and I LOVE eating them, but since I often feel as though I’m being poisoned in the kitchen (slight exaggeration, of course), I’m a bar kind of girl. :) So I am very happy to know that I can do that with cookies dough, too!

  7. Jolene on May 23rd, 2011 3:04 pm

    I just recently got a wonderful salad recipe with craisins, pecans, sesame sticks, purple onion, red pepper and grated cheese. It’s so good!!! I posted it on “A page in the life of a mom” if your interested.

  8. Beth on June 11th, 2011 6:35 pm

    Isn’t it about time to eat some cheesecake? Ha! I’ll take that back, but I’d welcome a new post. :)

  9. Kay on June 13th, 2011 10:07 am

    Thanks Beth. :) Yeah, cheesecake eaten… new post coming up soon. Actually, it’ll be salad next, not cheesecake.

Little Chocolate Peanut Butter Cheescakes

Posted on May 10, 2011
Filed Under Desserts

They’re rich. They’re cute. They’re LOADED with chocolate. And mildly loaded with peanut butter. And sorta loaded with cream cheese. They’re easy. They’re irresistable. They’re fun to make and fun to eat. They’re sweet. They’re yummy. They’re a guilt-free size… so, go ahead, eat seven. ????

chocolate-peanut-butter-cheesecakes2.jpg

One thing I like about this is that it’s a small recipe. Say you have a family of 2 adults and 3 children, one of which is less than a year old, and the one adult isn’t addicted to all things chocolate/peanut butter/cream cheese, and the other adult isn’t supposed to be eating more than one serving of such things. Well, this recipe doesn’t make a whole big cheesecake. It makes 24 mini cheesecakes, plus a little more.

I originally saw these on Annie’s Eats  and I’ll admit that what grabbed me about them was exactly the part that ended up flopping on mine! It was the beautifully done ganache on top. Well, my ganache flopped (but I’m not giving up, I do want to make it successfully sometime), so mine have more like a puddle of chocolate instead of a twisty gourmet mound of chocolate. But I just switched my focus from beauty to taste and it all turned out great then! I wanted a bit more chocolate in them, so I added some chocolate chips to the batter (smart move! ???? ). To make up for the added chocolate, I backed up the ingredient quantities for the batter, which worked out well because then I didn’t have to break open a second package of cream cheese. So, for the original recipe and to see the gorgeous ganache, go to Annie’s site (Thanks, Annie! You are very talented and you have a lot of awesome-lookin desserts on your website!).

Little Chocolate Peanut Butter Cheesecakes

I’ll post the recipe how I made them with my beloved extra chocolate. ????

Crust:
1 cup Oreo crumbs
2 Tbsp. butter, melted
1 Tbsp. sugar

Preheat the oven to 350.  Spray a 24-well mini muffin pan with cooking spray.  Annie says that using a silicone pan works best for removing the baked cheesecakes. I don’t have one, so I greased my pan well. It worked ok, but some of them got a bit messed up. Annie also said using mini cupcake liners would be another option. Combine the Oreo crumbs, melted butter, and sugar in a bowl. I know, the butter isn’t melted on this pic. I put the whole works in the microwave for a bit to melt the butter.
chocpb1.jpg
Mix with a fork until evenly blended.  Divide the crust mixture between the wells of the prepared pan, about 2-3 teaspoons in each.  Press the crumb mixture into a flat layer on the bottom of the well. I used a glass toothpick holder to press it down. Bake for 10 minutes.  Transfer the pan to a wire rack.

Cheesecake:
8 oz. cream cheese, softened
2 Tbsp. sour cream
½ cup peanut butter
1/2 cup sugar, scant
1 large egg
Dash vanilla extract
Pinch of salt
8 oz. chocolate chips

Reduce the oven temp to 300.  Combine the cream cheese, sour cream and peanut butter. Beat on medium-high speed until smooth and well blended.  Add in the sugar and mix about 1 minute more, scraping down the sides of the bowl as needed.  Blend in the egg, vanilla, and salt.  Continue to beat until the mixture is completely smooth.  Divide the mixture evenly over the cookie crumb crusts and smooth the tops slightly. Kinda looks like I didn’t smooth the tops.
chocpb2.jpg

Bake for 22 minutes, rotating the pan halfway through baking.  Transfer to a wire rack and let cool to room temperature.
chocpb3.jpg

Once completely cool, transfer the pan to the refrigerator and chill thoroughly, at least 3 hours. Once the cheesecakes are chilled, carefully remove them from the pan.
chocpb4.jpg

Ganache:
4 oz. chocolate
½ cup heavy cream
1 tbsp. butter, softened

Place the chocolate in a bowl.  In a small saucepan, bring the cream to a simmer over medium heat.  Once simmering, remove from the heat and immediately pour over the chocolate.  Let stand 1-2 minutes.  Whisk in small circular motions until a smooth ganache has formed.  Whisk in the butter until completely incorporated.  Let the mixture stand at room temperature until slightly thickened for piping onto the cheesecakes. In my case, it never got thick enough at room temperature for piping, maybe because I didn’t use bittersweet chocolate, or maybe because I didn’t have unsalted butter. I thought maybe I should’ve whipped the cream and then added melted chocolate. :) After I spooned it onto the cheesecakes and chilled them, it got stiffer, so having it to do over, I would’ve chilled the ganache, then piped it on. But I wasn’t about to scrape it all off just to do that. :)

chocolate-peanut-butter-cheesecakes1.jpg

chocolate-peanut-butter-cheesecakes3.jpg

These work great frozen, too, like regular cheezecakes do. I froze a couple of them just to try it. They were good right out of the freezer, including the rock-hard chocolate chips ???? , but the ganache wasn’t hard. And after they thawed, they were just as creamy as before they were frozen. I don’t know how long cheesecakes can be frozen for… and I probably never will, what with them always calling loudly from the freezer and all, if I would actually have some on hand in there!

There was a bit of leftover cheesecake batter. My chocolate addition vs. scaling down the recipe wasn’t equal amounts. I didn’t want to just pile it on the mini cups because I wasn’t sure what would happen… I didn’t want an overflowing cheesecake mess in my oven! So, I got Lexi’s mini springform pan out. This pan, by the way, is about the size of my palm, just to give you an idea on the size. I didn’t feel like crushing more Oreos, so I put whole Oreos in the bottom of it, cutting 2 of them down to fit in with the 2 whole ones. Whole Oreos are a bit too big to fit in a mini muffin cup, but that would sure be handy if they would! Maybe it would work to cut them smaller with a sharp round cookie cutter.???

chocpb5.jpg

chocpb6.jpg

And here is the mini springform pan cheesecake. I just threw some of the little cheesecakes on the little dessert plate with it because they were extras just sitting around. Lexi came over to see what I was doing and exclaimed, “Mom! That is SO cute! You made a bear paw!”

So, there you go, bear paw cheesecake dessert. :)

Comments

8 Responses to “Little Chocolate Peanut Butter Cheescakes”

  1. Ali on May 10th, 2011 2:12 pm

    Yum, peanut butter and chocolate, I am there. :)

  2. Rosalyn on May 10th, 2011 3:20 pm

    OH my. Chocolate & peanut butter-my absolute faves! :) I’ve seen different recipes for mini cheesecakes, but they all called for mini springform pans, which I don’t have.
    But now….I see I do have an option. ????

  3. Shannon on May 10th, 2011 4:25 pm

    Oh my. I am so on my way to your house to eat these up!! Sadly I don’t have a more then a few of these ingredients on hand or I would be making these!!

  4. Freida on May 10th, 2011 8:00 pm

    These look awesome! I think its pretty safe to say that I’ll be making these soon. Anything chocolate and peanut butter-ish is yummy.

  5. amber on May 12th, 2011 8:54 pm

    aaaaahhh!!! you can’t hear that but i’m screaming!!! in my head anyways. ???? this look amazing~ i’m so going to have to try them. LOVE chocolate and peanut butter together.

    i like how everything you share here is NORMAL stuff.. not some over the top weird dishes that might look pretty but tastes gross. ????

  6. Mary on May 14th, 2011 8:44 pm

    This recipe looks beyond amazing! Oreos, pb, cream cheese – what is not to like?

  7. Katie Mast on May 17th, 2011 9:11 pm

    i visit her site everyday, i love it. But for some reason i like the look of your cups better. But i do like her swirled ganache on top. But i am sure yours taste just great. thanks for sharing

  8. Liz on August 6th, 2011 10:28 pm

    Made these for a girls slumber party. They are so good! They didn’t look as nice as yours but still really good. I had a hard time with the Oreo part sticking in the pan and just the cream cheese layer coming out???

Haystacks

Posted on April 28, 2011
Filed Under Easy meals, Main dishes

I’ve been hungry for haystacks since February. Yeah, I know. You’d think I’d have made them before now, what with being in charge of the food around here and all! :roll: How I know it was February is because for a couple weeks in a row, the church bulletin had “Haystack Supper Fundraiser: Friday eve, Feb 25″ in the Upcoming Events section for this area. Seeing that every week got me more and more in the mood for them and THEN we ended up not going to the fundraiser! So, to make a long story short (after I already told the long story), last night was the night, and I finally got my haystacks craving satisfied. Man, I could dig my fork into this pile all over again!

haystacks2.jpg

Haystacks are kind of a ‘to each his own’ thing, so there’s not really a set way to do them… the components vary and the order of stacking varies. So, I’ll just show you how we like them and you can tweak it from there. I use the term ‘we’ loosely because I’m the only one who likes rice on it and the tomatoes are not very popular among the little people around here.

Speaking of rice, the rice totally flopped last night. I mean really. Rice. How hard can it be… get it to boiling in a pan and then let it simmer for 45 min WITHOUT lifting the lid, then when time’s up, you lift the lid and there is your rice, magically perfectly done, fluff it with a fork and put it on the table. Well, *ahem*. I now know what happens when you accidently put in too little water. The magic doesn’t happen. Half of the grains are fluffily cooked and half of them look like you just dumped them out of the bag and half of them look partially cooked— ok, I think I got too many halves here, but you get the picture. I noticed it when I was about to dish everything up, so I put more water in, cranked the burner to High and cooked the rice like crazy for about 10 minutes. It worked ok and was soft enough to eat.

Here are the components to our haystacks. We thought of salsa later, so that’s missed on the picture.

haystacks3.jpg

Here’s the order I layer it in:
— Corn chips, slightly crushed (you can also use crackers, but I like the extra flavor and crunch of chips)
— Rice
— Meat mixture (brown hamburger with onion, then add a packet of taco seasoning and a can of kidney beans)
— Cheese sauce (1/4 cup melted butter, 2 Tbsp flour, 1 cup milk; bring to boil, then stir in 1 cup cheddar or Velveeta)
— Lettuce
— Diced tomatoes (can also open and drain a can of diced tomatoes, a handy time-saver tip from my friend Linda Y.)
— Shredded cheese
— Salsa

Maybe there is something I miss that would make haystacks even better, so if you make them different than this and if you feel like it, I’d love to hear what variations you do to haystacks!

haystacks1.jpg

While I was making this, I was thinking that this would be a good meal option for those it’s-4:30pm-and-I’m-staring-in-the-fridge/freezer/cupboards-for-a-menu-inspiration moments. Or maybe you guys never do that… I do it more often than I care to admit. Anyway, I think I’m going to keep this meal option on hand from now on… The rice takes very little time to get it to simmering, the meat would be fast (especially if it would be already browned in the freezer), cheese sauce takes very little time and the rest of the stuff is basically just putting it on the table… which the kids did last night. Actually, this meal isn’t far away from the kids totally doing!

Speaking of which, my goal this summer after Lexi gets out of school is to perfect about 5 good, but easy enough, meals that the girls can do by themselves. Then, once in awhile, I can say, “Hey, you guys go make ____________ for supper, please.” ???? Haystacks may just be on that list.

Not sure what’s up next, but it’s seems like f.o.r.e.v.e.r since I’ve made or eaten sinful chocolatey richness, so I see that in my future for this weekend. And since I have to feature it on here in order to make it ‘legal’, that might just be coming up next……….

Comments

26 Responses to “Haystacks”

  1. Connie Stoll on April 28th, 2011 11:11 am

    We love haystacks for family get-togethers! We use crackers and corn chips, rice, meat sauce with beans seperate because there are always those who don’t like beans.:) Onions, sunflower seeds, tomatoes, lettuce and for a quick cheese sauce use canned cheddar cheese soup with some milk. Yum! Your post made me want some!

  2. Lisa@The Cutting Edge of Ordinary on April 28th, 2011 2:19 pm

    Oh we call these Frito Pies. I was looking for the haystacks saying, maybe they are coming up after the Frito Pies, lol. I guess it’s a cultural things. We never added rice though. Great addition!

  3. Shannon on April 28th, 2011 2:27 pm

    Now guess who’s hungry for haystacks! ????

  4. Larinda High on April 28th, 2011 2:33 pm

    We do Ritz crackers, rice, meat with chilli beans, lettuce, tomatoe, onion, green olives(a must have at this house), salsa, sour cream, cheese sauce, jalopeno pepper rings. We had hay stacks at our wedding:) We LOVE haystacks! I don’t make them near often enough. I often make them for the youth, or when I have company. It’s a very easy Sunday lunch for company!!

  5. Larinda High on April 28th, 2011 2:35 pm

    OOPs! I forgot to add chips…and it must be corn chips not dorito type chips:)

  6. Kay on April 28th, 2011 2:52 pm

    I’m lovin’ these new ideas!
    I always thought the corn chips take the place of the crackers… never thought of them in addition to the chips! :)
    Raw onions and green olives wouldn’t go over good with any of us here, but the sunflower seeds, sour cream, and jalepenos will definitely need to be added to the table next time!!
    I like the idea of using cheddar soup for cheese sauce and mixing chili beans with the meat… Larinda, do you not add taco seasoning to the meat/bean mixture then? That would be great… one less ingredient. ????

  7. Monica on April 28th, 2011 4:42 pm

    A haystack is NOT complete without crushed spicy nacho Doritos and homemade French dressing. :) Yeah, I’m weird, I know. :) :)

  8. Cheryl Weaver on April 28th, 2011 4:59 pm

    We had them last night too. One thing that my children WILL notice if it is missing is black olives. I like pepperoncinis on mine, too. And yes, the homemade French dressing is a MUST!

  9. Kay on April 28th, 2011 7:42 pm

    Wow, more ideas of stuff that all sounds good! Twila, chopped nuts? That actually sounds GOOD! I love nuts in salad.
    Karen, great idea to use refried beans… we had a bit of complaining about beans last night. ????
    You guys and your homemade French! :) I don’t even know how to make that! I’d be glad if you’d want to post a recipe here! Wonder if it’s like the ‘Tally-Ho’ my mom used to make.???
    Lorene, thanks much for the rice tips! Rice is always sort of blah to me, and how you said to do it almost sounds like it could have a little flavor if you’re not careful! ????
    Sandra, I did the butter really quick and no, they didn’t get soggy… did you do them right out of the oven? as in, at first they were almost too hot to hold. Not sure what else you could do different, unless it would’ve been the brand of the butter??? I used Land o Lakes, but you may have, too.

  10. Karen on April 28th, 2011 6:02 pm

    We like corn chips and doritos mixed…mushrooms,olives, jalepenos,hot salsa,sour cream or ranch….depending who you are, plus what you had. I mix refried beans with my meat/taco seas. mixture, that way the non bean eating ones don’t notice! =)

  11. Lorene Miller on April 28th, 2011 6:12 pm

    What lovely blogs you always post! Just a note on cooking rice…I learned from my sister who was a missionary in C.A. that if you put a tablespoon of oil in pan and stir fry the raw rice till it is a little brown before adding water it helps to get that stir fried fluffy rice that doesn’t stick together. After you add the water, bring to boil then turn down as low as possible. In 15 min. it will be perfect if you don’t lift lid. I always add some chicken base to the rice, but that is not a must.
    Thanks for giving me ideas!

  12. Liz on April 28th, 2011 6:29 pm

    Ok, now I’m hungry for haystacks!
    Like your updated profile pic too.

  13. Twila on April 28th, 2011 6:40 pm

    I like to add diced celery, somehow just adds a nice flavor. And we usually start with crushed crackers and also add the nacho chips somewhere along the way! I also like it with pork and beans but the kids don’t, so I don’t usually bother. My original recipe from 25 years ago also has chopped nuts as the very last item.

  14. Sandra Hershey on April 28th, 2011 7:16 pm

    Yeah i have a new meal for next week!!..I have made it before and but the kids never seemed to like it when they were little.
    I did make your yummy donuts…they were a hit!! Great for sunday morning breakfast!!Next time I need to a double batch:)
    Kay, i do have a question…when you rolled your donuts in the butter…mine got soggy..so i skipped that and rolled them in the cinn mix,they were ok.Did I do something wrong?

  15. Amy Burkey on April 29th, 2011 7:41 am

    We make the haystacks with Doritos, and the meat sauce is made with chili beans instead of kidney. And we just use real grated cheese and no cheese sauce. And I’m the only one who eats rice with it.:( Which is sad…. About rice. I’ve learned a few fun things. Always buy rice that says parboiled on the pkg. For rice that I’m using to eat with things mexican I like to put something tomatoey in for part of the liquid and add some cumin and other seasonings. For rice just to eat with pork chops or fish I like to throw in some real butter and dill, mint, cajun, and a little garlic and onion pwd and some lawrys when it’s done boiling…put it in in the “fluff with fork” process. It’s really good. And to cook the rice so it always turns out? simmer 10 min in hot liquid and then pour off excess water and put the lid back on with a wet towel to seal the lid good and simmer again for 10 more minutes. It fluffs beautifully. make sure you have a thick bottomed pan though and you will have a little crust over the bottom of the pan. Anyhow, enjoyed all these good ideas for haystacks..taco salad…whatever you call it! :)

  16. Arla on April 29th, 2011 3:44 pm

    I made haystacks for the Graber family once and didn’t have enough of it. I coulda died of embarrassment. Seems like desert took care of it, but those completely clean bowls and kettles was scary to me. Do you remember that, Kay? I would guess it’s one of our favorite meals around here summer or winter. And we use beans and rice too besides the meat. Cheese sauce is our pick for cheese, and we like onions,lettuce, ranch and salsa if I have it on hand. Lance uses hot sauce on his, and not many of us likes the tomatoes.

  17. Eleanor on April 29th, 2011 10:21 pm

    This was interesting. And my husband pretty much has a standing order for haystacks any time I want to make them. We do Doritos instead of corn chips and add salsa, sour cream and French dressing and usually just use cheese instead of cheese sauce.

  18. Sandra Hershey on April 30th, 2011 9:55 am

    Thanks Kay!..I did do it right when they were hot..but i never thought that it may be the butter.I used GV..so that could be it:)..They were still a hit!

  19. Kay on April 30th, 2011 11:37 am

    More rice tips! Thanks alot, Amy!!!

    Oh, Arla, I can just feel it… running out of food, but no, I do NOT remember that! At least it was just the Grabers… or should I say Oh no! and it was the Grabers of all people! ???? I have 3 major fears when it comes to serving a meal… something flopping, someone finding a hair, and not having enough!

    Eleanor and whoever else suggested Doritos, good idea. Seems like they’d add more flavor than corn chips!

    Sandra, I was more just grasping at straws… I don’t know if brand would’ve made a diff or not. The recipe actually calls for margarine!

  20. Freida on April 30th, 2011 11:48 am

    Nobody mentioned instant rice? That makes the meal even quicker. :)

    Our haystacks consist of taco meat mixture w/ chili beans, rice, lettuce, tomatoes, cheese sauce, chips, (for hubby) crackers (for me), salsa, and ranch dressing or my homemade french island dressing. Yumm! Now I’m hungry! Me thinks this will make a delicious Sunday lunch tomorrow. ????

  21. Tonya on April 30th, 2011 6:42 pm

    We do crackers, rice, taco meat, dorito chips, shredded cheese, lettuce, cheese sauce, salsa, olives, sour cream, tomatoes. We love them too and I don’t make them nearly as often as I should.

  22. Judi on May 3rd, 2011 4:18 pm

    I make a variation of this. I start with refried beans, seasoned beef, tomatoes, onions, cheese and sour cream. We then scoop it all up with corn chips. Yum… just had it last night.

  23. Jan on May 4th, 2011 7:22 pm

    Need another rice tip? I fry mine in a little oil, then dump in the water (slightly less than asked for)and some salt. I cook it until the water level is down to the rice level and then shut it off. I peek in all I want to. You have to so you can check the level. Let it set there for about twenty minutes or so and the water will continue to be absorbed. The end result is not sticky, undercooked, or overcooked. One of the few foods Dan is picky about is rice and he is proud of mine! I am cooking rice right now (Yes, for haystacks) and almost forgot to shut it off. ????

  24. amber on May 5th, 2011 3:30 pm

    i now know what we’re going to have for dinner.. :)

  25. Larinda High on May 10th, 2011 6:49 pm

    Yes, we still add Taco seasoning to the meat…it’s a must:) the spicier the better!

  26. Shannon on May 19th, 2011 2:32 pm

    Some GREAT ideas now that mine is all made! ha :) It will pass but it’s not great.

    I posses those same 3 fears when cooking! Failure, hair and not enough. Tonight I’m worrying about not enough because it’s the youth group and I have no idea how much they eat.

Lightning McQueen Cake… Happy Birthday, Regan!

Posted on April 25, 2011
Filed Under Birthday cakes

I’m really glad I have friends who have boys. And that they let me make birthday cakes for them. Otherwise, when would I get a chance to make boy cakes, what with having only girls? I know girls love Lightning McQueen and Thomas the Tank Engine too, but when it comes to birthday cakes, a zoomin’ car or train isn’t the first thing they’d usually pick… although, while I was making this cake, Lexi said, “Mom, I know I’m not a boy, but I WOULD really love a Lightning McQueen cake next time.” I’ll bet she’ll change her mind before December 7. :)

This Lightning McQueen cake was for my friend Joe’s son, Regan. Regan turned the big 5 this past week. Here he is. Cute little guy!

lightning-mcqueen1.jpg

And a brave little guy. He’s all smiles… on the picture, anyway.

This is the first time that I’ve ever written a Kitchen Scrapbook post that I felt like just closing my laptop and crying.

There was pain behind the smiles at the party and there is pain woven throughout this post. There was a mama-shaped hole the size of Texas at this birthday party. Regan suddenly lost his dear mama this past January. It just breaks my heart. And no 5-yr-old should have to celebrate a birthday without a mama. Thus, a little extra love was built into this cake because that thought was in the front of my mind the entire time I was making it. Deb was a dear friend and I feel very honored to have had the privilege of making a birthday cake for her son.

lightning-mcqueen2.jpg

1-2-3 BLOW, Regan!!!!!

I didn’t ask Regan what type of cake he wanted… I was just going to do something in the cowboy/horse dept because that’s a significant part of his surroundings. But… Lexi is in 2nd grade with Regan’s older brother Riley, and she came home from school one day and said, “Riley said Regan wants a race car cake.” So, I asked Joe and he said Regan would love that, either Lightning McQueen or Dale Earnhardt Jr. By the way, did you know that Dale Earnhardt Jr and I have the same birthday? He’s 2 years older, though. Brett Favre and I have the same birthday, too… only he’s 7 years older. Anyway, that’s my claim to fame… being in the October 10 Birthday Club with them… we get together every year on our birthday and split the time in 3rds, talking about Nascar, NFL, and birthday cakes. I could be wrong on some of these details. But even though Dale Jr and I have the same birthday, we decided on Lightning McQueen because Missy was going to get party decor to go with whatever the cake is and there’s anything and everything you could ever want for a Lightning McQueen party.

lightning-mcqueen3.jpg

lightning-mcqueen4.jpg

lightning-mcqueen5.jpg

I didn’t take progress pictures of making this cake because it’s made pretty much the same as the Lightning McQueen I made a couple years ago (I’ll post a link at the end of this post).

I did do something different with this one for the spoiler because the spoiler of the other one had issues and had to be propped up with toothpicks… and toothpicks propping stuff up sort of takes away from the coolness of a 3-D cake. With this one, I cut a slit in the cake and put a graham cracker in it, then covered the whole works with fondant. Here it is before it’s covered with fondant…
lightning-mcqueen-progress-pic.jpg
I think the graham cracker eventually took on the moisture from the cake and broke because at first, it was solidly in place, but after a couple hours, I could easily wiggle it. It didn’t matter though because by that time, the fondant had dried enough to hold it firmly at the proper angle.

In case you wonder what something is or how it’s done, I’ll just make a list here, hopefully answering some questions before you need to ask them. ????

lightning-mcqueen6.jpg

Cake board – flat cardboard box, covered with wrapping paper and a strip of tin foil for the cake to go on.
Flags – wooden skewer with white fondant square, I took a paintbrush and painted little black squares on it (my ‘paint’ was food coloring paste)
Birthday wish – piped on with red frosting, the moisture from the frosting soaked into the wrapping paper a bit… it worked fine, but you wouldn’t want to do it too far in advance because it gets worse and worse and looks like dark shadowing around the writing.
Base under racetrack – 2 white sheet cakes with a layer of melted-chocolate-chips-mixed-with-peanut-butter between… because just plain ol’ white cake is booooooooooooooooooring (that’s a fact, but you can consider it an opinion if you prefer to ???? ). The cakes are covered with a layer of white frosting. Here is a cut view…
lightning-mcqueen-cut.jpg
Checkered squares around base – I love this look, but I’d do it different next time. How I did it was very time-consuming. I cut a bunch of little fondant squares, then fit them all in on all 4 sides of the cake. Next time, I’d put a black strip the entire way around the cake and then cut little white squares and put them on, spaced appropriately to get the checkered look. Or I’d put a white strip all the way around and paint black squares on like I did the flags.
Race track – black fondant with piped frosting accents, graham cracker crumbs for dirt in the middle
Car – chocolate cake carved into a car shape and covered in frosting, then in fondant. I was afraid the weight of the car would make it sink down into the frosting of the base, so I cut a piece of cardboard roughly the footprint of the car, covered it in tin foil, put the car on it, and then set it on top of the base where I had spaced and poked 5 skewers down thro’ and cut them off about even with the top of the cake.
Details on car – it’s all fondant with frosting accents except the Rusteze logo and the eyes. The brown circle on the logo is… ahhhhhh… FUDGE! and the writing is peanut butter. The eyes are painted on with a paintbrush and blue and black food coloring paste.
And you’ve gotta notice the candles! I was so tickled to find them! They fit in SO perfectly!!! :)

Now… I KNOW you’re itching to make your own Lightning McQueen birthday cake for that sweet little guy in your life ???? , so here is the post with step by step directions with progress pictures: Lightning McQueen step-by-step

And for those of you who are thinking “Oh, I could never do that!”, this post is for you: Pictures of Lightning McQueen cakes that readers have made and emailed to me. So proud of them for taking on the challenge! And a couple of them said, “It was easier than I thought it would be.” ????

Have fun being 5, Regan!

Comments

29 Responses to “Lightning McQueen Cake… Happy Birthday, Regan!”

  1. Shannon on April 25th, 2011 7:26 am

    Another beautiful job Kay! I can only imagine how it felt to make this and think about Debra! Cheers to you for doing this for him!

  2. joe on April 25th, 2011 7:41 am

    Kay….words fail me…I wish I cud interpret my tears…

  3. Katie Mast on April 25th, 2011 8:57 am

    Thank you, Thank you for so lovingly making a cake for this sweet guy. I cried reading it. So glad you could make this birthday boy cheerful inspite of him not having his mommy there. We all miss her, but thanks for doing your part. It is very well done. Wish i was closer to help out as well.

  4. amber on April 25th, 2011 9:08 am

    absolutely AMAZING, lady!! you rock!

  5. esther on April 25th, 2011 10:02 am

    Such a kind thing to do Kay, for a 5 yr old who cannot control the circumstances of his life. At one time, our family was at the mercy of friends and family for this kind of thing. My brother had his 8th birthday 2 days after mom’s funeral. He had a cake, I don’t remember who made it. But someone took the time and cared.

  6. Mom on April 25th, 2011 11:15 am

    Ditto sentiments that were already expressed above. Proud to be “mom” to a talented, but even more so, a caring, big-hearted lady.

  7. Mom on April 25th, 2011 11:30 am

    Oh, and I forgot to mention the famous part, too, besides being talented and caring – the October 10 birthday club!

  8. lisa on April 25th, 2011 2:49 pm

    this post made me get teary…jase’s next birthday is his 5th and to think of him celebrating it without me…wow. i am really crying. your kind, gentle heart has always inspired me, so that you would do this does not surprise me. but it makes me even more proud to call you a friend.

    i hope regan always holds some cherished memories of this birthday party in his heart! i wish hope and healing for him and his family!

    p.s. just LOVED your mom’s comments!

  9. Renita on April 25th, 2011 3:23 pm

    Why am I always amazed at your bday cakes? They always get better! No joke! God bless you for helping a hurting family. The birthday club-my brother’s bday is Oct. 10th but he’s a few yrs older. :) And NOT famous. :)

  10. Liz on April 25th, 2011 4:15 pm

    Way to go Kay! That is so awesome that could do this for Joe, Regan, and the rest of the family.
    And way to share a birthdy with some popular people. I just didn’t know I had such a famous SIL! :)

  11. Jana on April 25th, 2011 6:40 pm

    Wow, cool cake! Looks like you had way too much fun! :)

  12. Rita on April 25th, 2011 7:09 pm

    Kay…..thank-you, thank-you, thank-you!!! I’m Deb’s sister and am so thankful that Joe and the kids are surrounded by such loving and supportive friends. You did such an awesome job on that cake. My son was in awe! So thanks again for taking the time to be Jesus’ hands in this way.
    ~RIta Miller

  13. Ruthie on April 26th, 2011 6:07 am

    What a touching post…and amazing cake! Now I know I can’t take any credit for your talents and big heartedness(I have to leave that to your Mom)but, don’t you think I should have a little credit for teaching my son how to choose a wife? =)
    I quickly serched to see if I’m in any famous birthday club, but all I could find was Henery VIII’s first wife. She was a bit older than me, so we never did get together.

  14. Cindy on April 26th, 2011 6:10 am

    wow. you are so amazing! you have a way of making it sound like anyone could do this…but i ain’t fallin for that. :) that is one cool cake.

    i can see all of the love in it for a little boy having a birthday without his mom…i am so sorry for their loss…and yours.

  15. Marylou on April 26th, 2011 7:38 am

    The cake is amazing and I’m sure he loved it. I have a friend whose 6-year-old absolutely LOVES Lightning McQueen. He would go bonkers over this cake!

  16. Rachel H. on April 26th, 2011 7:48 am

    Kay, this is just precious of you. Beautiful cake and beautiful words.

  17. Judi on April 26th, 2011 11:51 am

    You make the most amazing cakes!! And yes, Ryan’s loss put a tear in my eye too. *hugs* for Ryan

  18. Judi on April 26th, 2011 11:52 am

    make that Regan :)

  19. Kay on April 26th, 2011 3:44 pm

    JOE (INSERT MIDDLE NAME HERE)!!!!!!!! ;), go away!!!! That’ll be enough out of you! I’m just glad YOU’re not in our little birthday club or we’d be doing good to get 5% of the talking time!

  20. Kay on April 26th, 2011 2:25 pm

    Ok, you guys! I feel like I need to step in and add my own comment.
    I love your comments, and wow, it melts my heart to see that the sadness of a 5-yr-old celebrating without a mom makes you cry too, even those of you who don’t know the family.

    I just want to clarify something… some of the comments have a “helping them” twist to them, as though this was a sacrifice or noble thing on my part. I’m not sure how to explain what I’m trying to say, but it’s bumped up a level. It was simply a casual conversation with Joe about Regan’s birthday… “What about the cake?” “Not sure yet.” “Can I make it?”(thinking yay!! a boy cake!) “Do you want to?” “Yeah! I LOVE making cakes!” and that’s as far as my thoughts went.

    Once I got to making the cake then, it hit me what I was actually doing and I felt very honored to be making this cake, so it was more a thing of me being in awe that I actually got the honors to do it!!!! So, yeah, please skip the lofty comments… they make me uncomfortable. Plus, it was 100% FUN FUN FUN to make this cake!!! :) The condolences and feeling the pain right along with us are very appreciated, though! And I’m glad to hear that the cake passes inspection. :) And of course I’m very comfortable talking about my birthday buddies, Brett and Dale Jr!

  21. joe on April 26th, 2011 3:36 pm

    And just to clarify the muddy water some more…..I did talk to “junebug” this afternoon and he confirmed what most of us thot all along….I merely mentioned that “kay” seemed fine with splitting the conversation pie in thirds, and he abrubtly rolled his eyes and said and I quote “that girl can talk better then she bakes cake!”

  22. verna on April 26th, 2011 8:19 pm

    Kay, just so you know I have had occassion to insert middle name , too… Did figure out that JOSEPH in a very loud high pitched voice works , pretty well..for future reference.
    Bless, you for making Regan’s day and as a result his dad’s too.

  23. Shikha on June 24th, 2011 4:12 pm

    Wow .. I am so happy I found you .. From a very long time I was searching to how to make this cake. I have a birthday cake to bake for my nephew next week, he is turning 5 and love this mcqeen car.. When my brother asked me if I could bake one for him I said yes but was so tensed how will I do it..
    Thank you so much for sharing this, Love your website and now I am a big fan of you.. you are an inspiration… with kids around you handle it so well :)

  24. Kay on June 24th, 2011 5:02 pm

    Shikha, thanks for the comment. Same to you about being an inspiration… I was just on your website from your link here… I’ve GOTTA try that rose-shaped cake, it’s beautiful!! I saw your other amazing cakes and alot of other creativity going on over there and I know you’ll ROCK Lightning McQueen! I’d love to see a picture when you’re done! :)

  25. Shikha on June 24th, 2011 6:14 pm

    Thank you Kay, thats so sweet of you to say.. :) I shall try my best to get it as wonderful as yours.. I Was just showing this to my hubby and he was like so cool .. :) I will surely send you the pic once I finish the cake.. :) takecare

  26. Shikha on June 29th, 2011 11:24 pm

    Hi Kay,
    need some info, I just finished my cake, I was wondering can we place it in fridge, I am afraid for the fondant car.. The base is butter cream but the car is fondant.. What did you do ? Please advise thank you :)

  27. Kay on June 29th, 2011 11:41 pm

    Great! You did it! Can’t wait to see it! :)
    Almost all of my cakes do not go in the fridge because *ahem* till I finish them, it’s usually only hours till party time (that’s not on purpose, that’s just how I roll and I know it’s crazy because what if something would go wrong?! This particular cake was finished about 8 hours before the party. The closest one was the school bus cake with 45 min till party time! Anyway, why am I saying all this?!) Is the party tomorrow? Just let it sit out on the counter. If the party is later this weekend, go ahead and put it in the fridge.
    The puppy cake I featured recently, I did 4 days before the party and I had it in the fridge and then got it out a few hours before the party and set it on a table in an air conditioned room. Allegedly, if you get a fondant cake out of the fridge and set it out when there’s alot of humidity in the air, it’ll sweat. I’ve never tried it.
    Whatever you do, don’t put it in the freezer. ???? I did that with a winter wraps cake and the fondant got wet and shiny and the colors started running as it thawed!

  28. Shikha on July 6th, 2011 2:26 pm

    Thank you kay for the lovely info, I have just emailed you my cake pics, :) I had so much fun making it. I love your cakes its amazing.. thank you again for the help..
    takecare :)

Mini Donut Muffins

Posted on April 22, 2011
Filed Under Snacks, Sweet rolls and Coffee cakes

If cooking was basketball, this would be a slam dunk! Seriously, these little things are aWeSOmE!!! (I only put 3 exclamation marks there because I know some people get annoyed when bloggers go wild with exclamation marks, but in my mind, I’m adding about 30 more.) You’ve gotta try them… your taste buds will love you. They won’t take much of your time… 40 min from walking into the kitchen to popping one in your mouth.

STOP.

What was it that you could be doing 40 minutes from now?

Ok, just wanted to be sure you caught that.

Here’s a little unnecessary tidbit… I made these with one hand. I was going to quickly get them into the oven before putting Megan down for a nap. Well, just as I was ready to start, she got crabby and clingy, it was over, naptime was NOW.
Unless I was holding her.
So, I thought ‘oh well, no age is too young to start training a little cook’. Actually, I didn’t think that, I just thought it right now, but it would’ve been a cool reason to hold her while making these! So, yeah, from measuring the first ingredient to spooning the batter into the pan (including taking pictures), I had a 24-lb 10-month-old on my hip. She was tired enough to just lazily watch and not grab stuff. Then, while they were baking, I put her to sleep. Yep, I rock my babies to sleep. My babies were never trained to just lay down and go to sleep on their own. Not saying it’s for everyone, but it’s definitely for me. It’s 18 months out of each of their little lives that I rock them to sleep and that’s some cozy little moments that I’ll never regret. And it gives me plenty of time to try to memorize the feel of them in my arms in hopes that when they’re all grown up, I can reach in and grab those memories again… and remember.

Ok, where was I? (Yeah, I know this is a cooking blog, but I don’t do a personal blog, so I like to (and my mom likes me to) stir bits of life into here sometimes.)

donut-muffins2.jpg

Donut Muffins …taken from here, but I’d have probably never found and tried them if my friend Diane hadn’t alerted us to them on a message board I frequent. So, Diane, if you’re reading this, thanks a ton! :)

1/2 cup white sugar
1/4 cup margarine, melted (I used butter)
3/4 tsp. ground nutmeg
1/2 cup milk
1 tsp. baking powder
1 cup flour

1/4 cup margarine, melted (it’s up to you… you can either add a few Tbsp more right away or you can melt more butter when you’re running out halfway through dipping them ???? )
1/2 cup white sugar
1 teaspoon ground cinnamon

Preheat oven to 375. Grease 24 mini-muffin cups. Mix 1/2 cup sugar, 1/4 cup margarine, and nutmeg in a bowl.
dm1.jpg

Stir in the milk, then mix in the baking powder and flour until just combined.
dm2.jpg

Fill the prepared mini muffin cups about half full. Yeah, I know these aren’t all evenly filled, but I was never a perfectionist, and probably never will be. Plus, I was holding a baby and by this time, my left arm was starting to kill me.
dm3.jpg

Bake until the tops are lightly golden, 15 to 20 minutes. During this time, a mouth-watering nutmeggy smell will be wafting throughout your house. While muffins are baking, place 1/4 cup of melted margarine in a bowl. In a separate bowl, mix together 1/2 cup of sugar with the cinnamon. Remove muffins from their cups, dip each muffin in the melted margarine, and roll in the sugar-cinnamon mixture.
donut-muffins1.jpg

Let cool and serve. I don’t know WHY it says ‘cool and serve’! I say ‘serve warm’! I only had one and that was a warm one and it was such incredible melt-in-your-mouth awesomeness that I’d try to serve them warm on purpose, if possible.
donut-muffins3.jpg

I don’t know what category to put these in. They’re so versatile.
— Make them for an after school snack.
— Take them to a ‘bring food’ church function.
— Make them for brunch.
— Serve them for dessert.
— Make them this evening for a bedtime snack.

Coming up next… a Lightning McQueen cake. ????

Comments

14 Responses to “Mini Donut Muffins”

  1. Cindy on April 22nd, 2011 1:53 pm

    note to self: never read kay’s blog when this hungry!!!!!!!!!! (using lots of exclamation points because i like to. and they don’t annoy me, i have kids that do that. so excessive punctuation does not.)

    these sound wonderful. i already printed off the recipe and am going to make ’em instead of folding laundry. :) yum.yum. only 40 minutes till heaven. and btw. i like how you stir bits of life here in your kitchen blog. you have a way of “seasoning” it just right.

  2. Shannon on April 22nd, 2011 2:37 pm

    They look marvelous! Might have to give them a shot (if I have nutmeg). :)

  3. Cindy on April 22nd, 2011 2:39 pm

    my laundry is still in heaps…
    but my taste buds are.so.happy.

    these are what we call in our family, make-again-good!!!!!!!!!!!!!!!!!

  4. Kay on April 22nd, 2011 3:01 pm

    CINDY!!!!!!!!! You totally made my day! Honestly, the best thing anyone could do for me in the comment section is say they’re gonna make what I posted RIGHT NOW and then come back in less than an hour and give a review on it. :) Love ya!

  5. Wilma Troyer on April 22nd, 2011 6:00 pm

    Unfortunately I cannot make these muffins right now, but I WILL make them sometime very soon. And btw, I like the life bits you share. I also rocked my babies ~ all six of them. I know, too, that it’s not for everyone, but I sure don’t regret it. I cherish the memories now.

  6. Beth on April 22nd, 2011 6:42 pm

    I also like the life bits…keep ’em coming! These things look good — we had cinnamon rolls around here today, so these will need to wait for another day, but I already know I’ll LoVe them. So…may I ask what a serving size was this time? Ok, I won’t ask. :)

  7. Mary Gingerich on April 22nd, 2011 8:17 pm

    This is very similar to a recipe my mom used to make…that we called french breakfast puffs! I haven’t made them for quite awhile and my boys have been asking for them. Maybe it will be tomorrow morning!

  8. Kay on April 22nd, 2011 10:06 pm

    Beth, in this case, serving size was one…. until I needed another one, then 1 suddenly morphed into 2. :) No really, I justified it because I could’ve made these into 12 reg-sized muffins and had a whole one (which would’ve been the same mass as 2 little ones) AND I really needed to try a room temp one to see if they were still good after they cooled.

    So, here I am with an “after they’re cooled” opinion… good and still could’ve eaten half the batch, but not NEAR as good as warm. Not near. When they’re warm, they just melt in your mouth; when they’re cooled, they taste exactly like a donut hole (a cake donut, that is).

    Wilma, glad to hear of another rocked-my-babies mom… I’ve always been in the minority in that dept. :)

  9. Twila on April 23rd, 2011 8:58 am

    Oh my!! I made these for brunch this morning and 4 of us ate almost all of them!! I couldn’t remember what they were called because yesterday I just jotted the recipe on a sticky note, so we just kept saying, “pass whatever those things are called!” I think there were about 5 left which I just put on a plate because I knew they’d get eaten as people walk through the kitchen. I will definitely be making them again. Often!!!!

  10. Amy Burkey on April 23rd, 2011 9:19 am

    We’ve been making these here for a few years too and we love them….but I never thought of doing them in a mini muffin pan! I’ll bet they’re even batter that way. So that’s what I’ll try next! After I lose these next few lbs…..Ha Ha!

  11. Chandrima Pal on April 25th, 2011 1:55 am

    Hi there,
    I have recently started a saturday morning baking session with kids – all for fun and teaching ourselves some team spirits and ways to have fun. I was searching for some new ideas and saw your blog. It is very nice resource and specially you have done a lot of kids friendly stuff. Stories behind the food you cook are very good read too I will keep coming to you!

  12. Mom on April 26th, 2011 1:02 pm

    Hey! How did I miss this one? – must have been off to AK at the time! Yes!! that’s the “sugary spice” I like “stirred” into your posts! And yes! the recipe will have to be tried, maybe next Sunday (40 minutes from start to finish!) when we have company here for breakfast – they’ll be warm!! Count my exclamation marks!!!

  13. Kay on April 26th, 2011 1:21 pm

    Mom, I just knew you like it because you said that when I make a cookbook, I need to put that ‘extra’ stuff in there too, not just the recipe. :)

  14. Evangeline on May 1st, 2011 3:39 pm

    I made these and they were very good! Has anyone tried these, rolled in powdered sugar? I think I’ll try that next time. I’m not real fond of crunching white sugar, so thought that might be a nice alternative. Thanks for sharing this delicious recipe!

Think Spring with Food… aka playing with your food :)

Posted on April 18, 2011
Filed Under Breads Biscuits and Rolls, Cooks in Training, Holiday cooking

You can do so much more with food than just eating it. I mean, yeah, eating is usually the end result, but how about having a little fun first? ???? It comes naturally, really. Kids do it without being taught… I remember using Bugles for fingernails, biting eyes and a mouth out of a round slice of bologna and using it for a mask, making roads with stirred up ice cream, shooting baskets with popcorn or M&Ms (in which the basketball net is your or your sibling’s mouth), and best of all was peanut butter playdoh… you could form a bowl and spoon and peas in the bowl, and then actually eat the ‘peas’, and well, eat the spoon and the bowl, too.

Now, I play with food in a more grown-up way. So does my mom. She made garden meatloaf a couple weeks ago for a group of school children.
spring-meatloaf.jpg

The middle 3 rows are obviously corn, tomatoes, and peas. The 2 end rows are potatoes and carrots, which are there, but underground, of course. :) She made sure to put a potato and a carrot against the edge of the pan so you could see it from the outside. And that’s not all… she put in mushroom pieces and the white ends of green onions and told the kids to look for slugs and worms. They had a heyday, digging through their meatloaf.

She also made bird-shaped dinner rolls, which were also a real hit.
spring-bird-rolls.jpg

When Mom emailed these pictures to us girls, my sister Jan wondered if she had taken progress pictures. I thought that was a bit strange that Jan would need progress pictures because she has proven herself quite capable of creating in the kitchen with no directions (more on that later). Mom didn’t have progress pictures, so, Jan, this portion of the post is just for you. Awww. :)

Roll a rope about 7″ long. Tie it in a knot. Fan out one end and make little snips for tail feathers. Put a sliver of almond in the head for the beak and cookies decorations or bits of raisins or something for the eyes… I used cloves.
spring-bird-rolls-making.jpg

spring-bird-rolls-unbaked.jpg

Let them rise and bake them. And TA-DA! fat little birds awaiting butter and jelly. Ok, that may be an unappetizing choice of words.
spring-bird-rolls-baked.jpg

If you notice that the one bird (lower right in the picture with 3 unbaked in a pan up there) has some brown on it… I was making mini cinnamon rolls with this same bread dough, so I made a cinnamon roll bird by rolling the dough extra thin and into about a 4″ wide strip, spreading on butter, brown sugar, and cinnamon, rolling it up, cutting about 7″ off, and knotting it the same as the rolls above. Then, glaze it.

———————————————————————————————————-

Another Spring thing we did was Bird Nests. This portion should be a Cooks in Training post, since my little cooks did these. Melt 1 cup of chocolate chips with about 1/2 cup of peanut butter and mix it with 2 cups chow mein noodles. You can either spoon them onto a plate of some sort and then make a little indent for the eggs to go in, or you can do it like the girls did and put them in little containers to keep them round. They put them in the freezer for about 10 minutes to harden the chocolate, then popped them out of the container with a spoon, put eggs in and put a chic— oops, I mean, a BIRD on top. Really, who ever heard of a little yellow chick sitting on a nest… of COURSE that’s a canary! :)
spring-nest1.jpg

spring-nest2.jpg
Uhhhh, is that what I think it is in Tiffany’s apron? How did part of her nest get there?!

spring-nest3.jpg

spring-nest4.jpg

Then, they took them in the dining room to eat some and Lexi in a very excited voice said, “Mom! Come look! If you’d ever make a river cake with beavers, this would make a PERFECT dam! See? Doesn’t that look just like a dam? All I did was flipped my nest upside down!” So, there you go… an idea for all those of you out there who are planning beaver cakes. :) Then, Tiffany flipped hers upside down on her chic-, uh, canary, and said, “Or, it would make a good hat too.” I think it looks more like a turtle shell, considering the size ratio of hat to bird. Wow, the possibilities are endless with this chocolate chow mein noodle combo! Ha.
spring-nest5.jpg
It tastes really good too. Could forget about the whole nest thing and just make these things and drop them on wax paper until they harden and you’d have a yummy snack. I’d double the amount of chocolate and peanut butter for that though. Meanwhile, Megan sits in her highchair, healthily eating peeled apple chunks.

—————————————————————————————————————–

Now, I want to add one more thing yet, even though it has nothing to do with Spring. It does, however, have to do with my sister Jan (who I mentioned up there) and playing with food (which I mentioned up there).
Once upon a time, Jan won a contest. It was a Make Real Food Look Like Something Else contest from a few years ago on my cooking blog. If you feel like checking out the entries, here’s the link: Contest
Jan won it fair and square, I might add… no rigging of votes by her big sister.
Here was her entry:
contest-jan-teacup-set.jpg
She has that miniature tea set  (in the back) as decor in her kitchen and made a little knock-off set from it. It’s all cake and frosting except the ‘coffee’ is chocolate syrup and the cup/pot  handles are piped chocolate covered with frosting. She had some truffles on hand, so she put 3 on a plate to go with the coffee. So, this lovely detailed 5-piece tea set coming from a lady who sees bird-shaped rolls and asks for progress pictures?! C’mon, Jan! :)

As I was looking at these contest pictures again, I saw this, so I’ll throw it in here because it DOES actually have to do with Spring. You could serve this for dessert at your garden-themed party…
contest-dirt-pudding.jpg
Dirt pudding, in which one of the ingredients is crushed Oreo cookies. I think this entry was submitted by Lavonne.

———————————————————————————————————————————————————————————————————————————————————————————————————————————————————————————————————————————————————————————————–

In other news, not really related to anything, but just something I’m excited about… I get to make a Lightning McQueen birthday cake tomorrow afternoon! I found this post with directions how to do it. ???? The one tomorrow will have cake under the racetrack and maybe a couple other differences. We’ll see how it all turns out, but the thing with having made it before is that I can learn from my mistakes. :)

Comments

7 Responses to “Think Spring with Food… aka playing with your food :)”

  1. Jan on April 18th, 2011 11:19 am

    Thanks, Kay! I’m honored.

  2. Beth on April 18th, 2011 11:31 am

    Neat-o! This being.awesome.in.the.kitchen obviously runs in the family! Loved the post & am looking forward to seeing how you could possibly improve on the Lightning McQueen cake! Have fun with it.

  3. Rosanne on April 18th, 2011 12:52 pm

    Have fun making the cake! And the garden meatloaf is so adorable!

  4. Liz on April 18th, 2011 8:46 pm

    If you would live closer a certain nephew would be begging for a Lightning McQueen cake. Well, he might beg anyway because he wouldn’t get the reasoning of not being able to transport a cake very good.

  5. Audrey on April 19th, 2011 8:33 am

    I remember when Jan won that competition and I was in AWE of her tea set. So pretty!

    I love that you are posting more often, Kay. I really enjoy the way you write and the pictures you take of your cooking and baking!

  6. Renita on April 19th, 2011 3:46 pm

    I didn’t realize the “greatness” in the kitchen runs so much in the family, WOW! The tea set is awesome. So when are you gonna show your brothers or dads’ work in the kitchen? Or did the girls “get it all”? :-) I enjoy the posts. Thanks.

  7. Kay on April 20th, 2011 7:21 pm

    Uhhh, Liz… the directions are right there! Make Lightning McQueen for his 3rd birthday! Worst case scenario, it would flop and you’d grab a DQ cake instead (did I just call a DQ cake ‘worst case scenario?!!!), but it would most likely end up great, and easier than you thought.

    Renita, my brother can make trifles that look like thick disks laying in the bowl. Seriously, they are so neat and perfect. He’s pretty handy with the grill and gourmet desserts and coffees.

Ladybug Birthday Cake – Happy 5th Birthday, Tiffany!

Posted on April 12, 2011
Filed Under Birthday cakes

ladybug-cake-tiffany.jpg

Yeah, I know… you’re thinking “Ewww, a ladybug.”

Me too.

But hey, I’m just the cake-maker, not the cake-decider.

Tiffany isn’t really a cake-decider either… she had THE hardest time nailing down what cake she wanted. For awhile, it was a big huge whoopie pie cake. Then, for awhile it was a gazebo. (The difference between those 2 cakes in time and skill is like night and day!) Then, about a week before her birthday, she started switching daily… seriously, we were all over the place… castle, house, ballerina, heart, ladybug, bird nest, space shuttle, garden…

The morning of her birthday, I was ready to bake the cake. Once I bake the cake, it’s pretty much no-turning-back because depending what it is depends what I bake it in. At the moment, we were on a bird’s nest with eggs in it and a bird sitting on top (and the bird sitting on top would be sturdy and removeable so it could be played with beforehand… we weren’t planning to have a cake party, so I didn’t care if the girls played with the cake before eating it). I got the cake mix out of the cupboard, then said, “So, we’re doing a bird-on-a-nest cake, right?” She said, “No, I was just thinking… I’d rather have a ladybug.”

Oh. Ok. Uhhh. Yeah. Sure. No problem. :)

Turns out a ladybug is a VERY simple cake to make. There are 2 things I’d have done different, though.
1. I baked it in a mixing bowl and I wish I’d have picked a mixing bowl that was a little deeper, that curved more at the bottom. I thought this ladybug got too flat and wide. But, on the other hand, maybe looking LESS life-like is a good thing! :)
2. I cut about a third of the circle off for the head… should’ve cut off more like a fourth. I thought the head looked too big.

But anyway, here it is in pictures. You’ll see that it is easy… no carving involved. And you could just use black and red frosting instead of the fondant.

lb1.jpg

Cutting off excess red fondant. The other part is frosted and ready for black.
lb21.jpg

Making the line down the back where the wings separate…
lb4.jpg

Starting to look a bit more ladybug-ish. You can see the leaf on the right… I rolled out green fondant, cut out a leaf shape, and made a few indents for veins. Then, I put wads of tin foil hit-n-miss around underneath it until it dried… that way, the leaf has a bit of character to it instead of just laying totally flat.
lb5.jpg

Looked around in my cupboards for something the perfect size to cut out circles for spots. Found a water bottle lid. ????
lb6.jpg

lb7.jpg

The antennas are made out of fondant wrapped around a twist-tie… not kidding about that! I got to that part and hunted around for something to use. My first thought was to use little pretzel sticks, but we didn’t have any. Everything else is either cake, fondant, frosting, or covered cake board.

lb8.jpg

“Done, Tiffany. Here’s your ladybug.”

“Mooooooooommmmm! You forgot the mouth!”

Oops!

(That did actually happen… I didn’t make up that little exchange just because the pictures look like it.)

NOW we’re done…

ladybug-cake.jpg

ladybug-cake-candles.jpg

lady-bug-cake.jpg

Tiffany’s birthday wasn’t totally party-less. She woke up to a little ribbon & balloon canopy, complete with her name and a couple of gifts. For her birthday meal in the evening, she opted to go to a restaurant with Preston and Kara (and us, of course), where the waiters and waitresses gave her a birthday wish. As we were walking out, a couple of the waitresses wished her a happy birthday again. She was surprised that they remembered it was her birthday.

Comments

10 Responses to “Ladybug Birthday Cake – Happy 5th Birthday, Tiffany!”

  1. Rosanne on April 12th, 2011 3:55 pm

    Adorable is what I am thinking!

  2. Shannon on April 12th, 2011 4:27 pm

    Now that is just plum cute, not gross at all! :) As always, you did a fabulous job! Happy birthday Tiffany!!

  3. Ida Friesen on April 12th, 2011 7:12 pm

    Kay, that is adorable! Nothing gross about it:)Happy Birthday Tiffany. You’re a lucky little girl to have such a talanted Mama:)

  4. Christy on April 13th, 2011 4:50 am

    I think ladybugs are adorable, so I love it. I like your creativity that comes out in your supplies for the cake–tinfoil balls, twisties. I remember Anita’s girls changing their minds about their cakes almost daily when they were little. :) The mouth exchange sounds like the kind of conversations we have here. You know what’s a little crazy? When I first started blogging, Tiffany and Katlyn were babies and I was pregnant. I remember one of the first pictures I saw on your blog was the one of all you moms at church lined up with your babies. Now here we are with 5 year olds!!

  5. Beth on April 13th, 2011 8:00 am

    Love it!!! These girls are going to grow up thinking all their friends have boring moms!!! jk. But seriously…you did it again. Make it sound so effortless & if I’d try it, I’m sure there would be no blogging — more like running & hiding. It also shows Tiffany’s creativity to even think of THAT many options for a cake!

  6. Katrina on April 15th, 2011 10:58 pm

    That cake is so cute and you make it seem so simple. You also look great, by the way, Kay!

  7. Di on April 17th, 2011 12:30 pm

    Awesome cake, like always. I am the mean mom that buys the birthday cakes which normally are fairly boring.

    Was looking at your diet post a little back, and WOW girlfriend YOU are looking GREAT!!! :)

  8. Emi Puglisi on April 17th, 2011 3:17 pm

    Love it! I really love you blog! It is on my favorites tab! :)

  9. Emi Puglisi on April 17th, 2011 3:18 pm

    oops meant to say “your blog” not “you blog”.

  10. Kim on April 19th, 2011 7:14 pm

    Kristen likes your ladybug cake, Tiffany! She thinks she will make one for their last day of school program because their program is about “A Day at NMS from a Ladybug’s perspective.” :) Thanks for the inspiration.
    Once again, enjoyed browsing!

Chipotle Deviled Eggs

Posted on April 9, 2011
Filed Under Garnishing, Side dishes

Is this recipe made up, you wonder?
Yep, it is.
All because I fell in love with some chipotle mayo from Yutzy’s Farm Market and I use it on everything that I think it might possibly go with.

We had a fish fry last night. One of the couples from church (Jr. and Darla) go up to Lake Erie to fish every year. Then, they clean the fish. And then, they GENEROUSLY share them with us. I know. We’re privileged. And we realize it and are very grateful.

They and their kitchen helpers fry/bake the fish (there’s some of each) and make a big roasterful of scalloped potatoes and do pork chops for anyone who doesn’t like fish. Then, the rest of us bring salads and desserts. It’s quite a spread… the row of food tables is roughly the length of an airport runway (give or take a few hundred yards) and is lined down both sides with food food food. Good stuff! I’m wishing right now that I’d have taken my camera along to take a picture of it.

So, anyway, I was trying to decide what to make in the salad category. I just got a new Dessert Decorator, and it HAD to be something that I could use that for. The decorator was a just-for-anyhow gift from my husband, which are THE best kind of gifts.

So now, we’re only eating soft foods that can fit thro the decorator… but hey, at least we’re eating pretty stuff. ????

I made twice-baked potatoes a couple days ago and piped them into the shells with the decorator, but then I had a problem. I hadn’t thought of the cheese. So it was forfeit cheese and see the beauty or have potatoes with yummy melty cheese on top. The cheese won. Oh well. I still had fun doing it.

Anyway, back to what to take to the fish fry, I thought of Deviled Eggs.

deviled-eggs.jpg

And while I was getting the yolks out of the whites, I thought of my beloved Chipotle mayo and decided to throw some of that in there. Next time, I’d add more… it adds a little kick and I didn’t want to add too much kick for some unsuspecting person at a church fish fry who doesn’t like kick.

Chipotle Deviled Eggs

12 eggs
3/4 cup mayo (use less if you prefer a stronger egg yolk taste)
2 tsp. Dijon mustard
1 Tbsp. Roasted Chipotle Mayonnaise (more would be better ???? )
1/4 tsp. salt
1/2 tsp. pepper

Hard boil the eggs. Peel and cut in half. Put yolks in a food processor; set whites on a serving tray.
dev-eggs1.jpg

Running the yolks thro’ the food processor makes for a creamier filling. After there are no chunks left, add the rest of the ingredients. Pipe the filling into the egg white shells. (Side note: sometime, try piping egg filling into an egg white with one hand WHILE holding still enough to take a picture with the other hand :) )
dev-eggs2.jpg

Here’s a little tip: when you’re getting the last of the filling out of the bowl, it’s nice to have one hand to hold the bowl and one hand to use the scraper, putting the filling right into the decorator as you’re scraping. This leaves no hand to hold the decorator so… prop it in a cup.
dev-eggs3.jpg

dev-eggs4.jpg

deviled-eggs5.jpg

If you want to garnish the tray with tomato roses, but don’t know how, this link is for you: How to Make Tomato Roses.

Coming up in the next few posts: Tiffany’s ladybug birthday cake, Fun play-with-your-food Spring-themed stuff, and Donut Muffins.

Comments

6 Responses to “Chipotle Deviled Eggs”

  1. Arla on April 9th, 2011 9:52 am

    Kay, I’m so glad you’re back here at your scrapbook!
    My family would be terribly awed if I were to follow in your footsteps and create in the kitchen. I have no clue! So you inspire me, thanks.

  2. Christy on April 9th, 2011 12:49 pm

    They look pretty and I really like the idea of adding the Chipotle kick!

  3. Ruthie on April 9th, 2011 2:28 pm

    Wow! They look so good! I’m going to have to try the processor next time, mine are always kind of lumpy. I would be the one that doesn’t want the kick. =) The tomatoes look lovely! Your whites are so white, no dark edges. Good looking dish!
    Do you ever sprinkle paprika over them?

  4. Celesta on April 9th, 2011 6:38 pm

    The eggs were lovely. I would surely have tasted them for the chipotle flavor, but there were none left when I got to go through the line! I admired the tomato roses. It has been too long since I made them. Love your blog!

  5. Judi on April 11th, 2011 12:19 pm

    The eggs look great, but I was amazed at how easy your directions are for the tomato roses. I’m definitely going to try those soon.

  6. Sheila on April 13th, 2011 9:50 am

    That second to last picture is so cool! My children love deviled eggs and beg me to make them. I hardly ever do, though, just for our family. But, lucky for them, there is a family from church that almost always brings them to snacks and carry-ins. I fill my eggs with a decorating tip, too. It’s a little more bother to transger the filling to a bag or decorating tool, but I think it goes faster when you get to filling them.

Randomness… 12 pictures that have something to do with food or kitchen

Posted on April 4, 2011
Filed Under Tidbits

This is just going to be a miscellaneous post of 12 pictures that have to do with kitchen/cooking/eating that happened in the last few months. It’s called catch-up. :) These incidents fall into one of 2 categories:
1. Not important enough to merit their own post.
2. Happened too long ago that a whole post on them now would be like digging up old bones.

I didn’t know I was going to do this post, or I would’ve just thrown my Before/After picture in this list because that whole deal was a bit embarrassing in the previous post. I’m not going to keep talking about my diet in future posts, but I do know that getting it out in the open now definitely makes me feel more accountable, which is a good thing. 

First up is a birthday cake by Lexi and Tiffany. Lexi is 8 and Tiffany is 4. This was this past January and since then, Tiffany had a birthday and turned 5… her ladybug cake will be featured sometime soon. But here, it was Shannon’s birthday. The cake was Lexi’s idea, so I let them have at it. It’s a chocolate sheet cake with peanut butter icing… because a sheet cake would give them more room to scribb—oops, I mean, decorate, than a 9×13 would. I helped with the baking and spreading the frosting, but they did ALL the decorating. Lexi made the smiley face and the heart and did all the writing… meanwhile, Tiffany did the picture down in the corner (yeah, not exactly sure what it’s supposed to be, but I think I can make out a person on the left of it). Lexi was surprised how hard it is to write with frosting. ????
1bday-cake.jpg The other day, Tiffany purposefully went to her room, got her apron on, then came to me and said, “Mom, the ONLY thing I ever eat is cupcakes. So… *pause* can I have one?”. Could YOU have said no? Me neither.
1cupcake.jpg
Tiffany was playing with her little doll named Paige while drinking chocolate milk. She thought it was so cool that Paige would stay hanging when she’d let go of her. (And no, she doesn’t have her eyes closed like it looks.)
1doll.jpg
A random kid snack, all happy and yummy…
1snack.jpg
This is a window in my mom’s kitchen/dining room. At Christmastime, she took all her grandchildren over to it and sprayed some spray-on “snow” over their one hand (and then washed their hands right away). Long after they were gone back to Pennsylvania/Missouri/Ohio/the other side of town, she still had this little souvenir on her window. 
1handprints.jpg
Here is some monkey bread that I made one lazy Saturday morning earlier this year that I never featured. And now, I’m not even sure what recipe I used! It got rave reviews, but really, you can’t go wrong with biscuits, butter, brown sugar, and cinnamon, can you?! 
1monkey-bread.jpg
This is a pie from one time a few months ago when I NEEDED a chocolate peanut butter fix NOW. I pulled a baked pie crust out of the freezer, spread a layer of peanut butter on it, filled it with some instant pudding, put chocolate and Cool Whip on top, sprinkled it with Nestles powder, and TA-DA! I had a ready-to-eat-pie in 10 minutes flat!
1pie.jpg Here are some sour cream cookies that I made last week that didn’t make the cut, according to my food critics who live here. Here’s what I wrote beside this recipe in the cookbook: “Kinda dry. Don’t make again. Good, but with a million other cookie recipes out there, don’t bother with this one.”
1sour-cream.jpg
Here are some of my scrapbooking buddies of yesteryear… Ruthie, Linda, and Liz. We moved to Ohio a couple years ago and went back for a visit to WI this past year for Christmas, so of course we girls had to work a good-ole-days catch-up evening in. Well, ok, we got together the next day, too. This particular evening involved restaurant-hopping. Shannon and I went on a double date with Ruthie and her husband. Then, when we were done there, our men dropped us off at this restaurant, where Liz and Linda were waiting for us at a cozy table by the fireplace. We got dessert here. Then, this restaurant closed at 10:00, so we went over to McDonalds, which closed at midnight. Welcome to Small Town, where 24-hr businesses are hard to come by and Main St rolls up its sidewalks at 5:00, but aw, is it ever cozy and friendly! Even the policemen are friendly, we found out. Heehee. Ok, I won’t go into that or say which one of my friends was driving, but it turned out well because no speeding tickets were involved… the I-was-just-talking-to-my-friends-and-not-watching-my-speed explanation worked. :)
1group.jpg
Here was our SuperBowl party cake. The cake was sweeter because we had cake and ice cream after the game was over… the sweet taste of victory. 
1packers.jpg
I saw Pioneer Woman several weeks ago! She was in Columbus on Feb 19. I didn’t take my camera, so these are with my phone. It was a bit surreal, I’ll have to say! On the talking picture, I was probably saying, “I CAN’T believe I actually get to SEE you!” I forget what all I said, but I do remember saying that.
1pw.jpg
And last, but not least, here’s Megan. She’s 10 months old. She doesn’t get enough to eat, so she has to supplement her diet with Princess tiaras.
1megan.jpg

Comments

9 Responses to “Randomness… 12 pictures that have something to do with food or kitchen”

  1. Shannon on April 4th, 2011 12:30 pm

    Aww love this post, esp the last 2 photos! :) She doesn’t look tooo malnourished! :)

  2. Liz on April 4th, 2011 1:14 pm

    You got to see Pioneer Woman?! Yay for you. I’ve thought of it when she comes to Minni but it doesn’t happen.
    Megan is looking older and cuter. Her hair is growing. I’m sure she would be so much more fun to talk to/hold than she was at Christmas.
    Your Packers cake is neat. I’ll have to make sure Elvie sees it.(Should I just go ahead and comment on all the pictures?)
    Yay for you for letting the girls ‘have at it’ with decorating Shannons cake.
    Ah, that was a good night with the old scrapbooking group. (Not sure that it’s an old one beings a new one hasn’t really replaced it.) And we all said, “Thank God!” that there was no ticket issued.
    I know the kid snack is kind of basic but I like it. Don’t know that i would have thought of doing that.

  3. Christy on April 4th, 2011 2:05 pm

    Kay, you look SO GOOD!!!! Wow, I’m proud of you!

    Your cake looks great!

    Hey, another spin on choc. p-butter pie–just make crumbs like you do for peanut butter pie, and use chocolate pudding instead of vanilla. Mmmmm, it’s my favorite!

  4. Jan on April 4th, 2011 2:24 pm

    I have been wanting to comment on your last post, but here you have a new one before I got around to it! First of all, you look fantastic! I am looking forward to my “halfway” picture, but first I have to take a “before” picture. :( Leta would love if I’d set a snack plate like that down in front of her! She has a weakness for smiley faces. I just noticed that Mom had geraniums blooming at Christmas time. Did you inherit her green thumb? I can’t find it here! Megan looks totally irresistable! Wish I could give her a squeeze!

  5. Dorothy on April 4th, 2011 6:43 pm

    Great to hear from you again. Was good to chat with you at Christmas too. You look great keep up the good work. You either put me to shame or challenged me there.

  6. Katie Mast on April 5th, 2011 7:56 am

    you got to see Pioneer women!!!!! wow!!! She came to DC once and i had something planed and then NYC and i couldnt go then either. I hope someday she comes to Harrisburg that will be much closer. Glad you had a chat with her. I love her cooking blog

  7. amber on April 6th, 2011 7:28 pm

    loved catching up a bit with your life here, kay~! every shot was so fun & now i’m HUNGRY!! :)

    so cool you got to meet PW. and you look amazing~

  8. Sheila on April 13th, 2011 9:39 am

    I really enjoyed this one! How could I not enjoy it with all those pics? :-) I’m going to have to try that smiley snack for an after school snack sometime. The children would probably fall over if they would walk in and see a snack all ready for them – it’s been so long since I’ve done that.

  9. Kim on April 19th, 2011 7:20 pm

    You’re looking great, Kay. Inspires me to keep on. We’ve got a Northwoods dieter’s group going. Helps to have some support. Don’t think I’ll take a before picture though. ;( Just an after one. :)

Mint Patties plus an Out-of-My-Comfort-Zone Tidbit

Posted on April 1, 2011
Filed Under Candy, Tidbits

You know how when you have a problem, you try to find a solution? And then sometimes the solution doesn’t work because it hinges on another problem? And then you have to back up and fix that problem before you can fix the initial problem?

Is anyone still with me? If you didn’t follow, I’ll explain it using a few more words… I know I was kind of concise in that first paragraph. Ok, just kidding.

Well, here’s my problem: I miss this cooking site. And having fun in the kitchen. And trying new stuff, making tried-and-true stuff, playing with food, etc.
Solution: Ok, duh, so start cooking, making, playing, and updating!
Problem hinging on that solution: I’m on a South Beach diet, and I couldn’t eat 90% of the stuff I’d make. And if I can’t taste it, how would I rate it? Plus, it would take ALOT of the fun of cooking away. I started posting alot around Christmas time and was planning to keep it up, then one day in January, I looked in the mirror, and decided to go on a diet, and well, you know the rest of the story (see above).
So, I found a solution: Make a diet exception. So, I did that. I decided that I can have 1 serving of anything I put on here. It’ll just be, you know, a cross I have to bear, you know, because I really DO actually want to stay on my diet, you know.

Anyway.

I hope you won’t get tired of me posting cheesecakes ALL. THE. TIME! ????

When I was thinking out loud, rambling to Shannon about my problem/solution/problem/solution and told him how I’m solving it all, his comment was (as if he was saying this one day after my blog was up and going regularly again), “37 posts on Kitchen Scrapbook today?! and 24 yesterday?!!!” :)

Here’s where the out-of-my-comfort-zone tidbit comes in… I’m putting on a Before/After picture of myself. WAY out of my comfort zone…even if I keep the pictures small …and even if the pictures are in poor lighting. But by posting this, it’ll give me some accountability to keep on and get to the Final picture. So, here you go, this is what the halfway mark looks like, I just passed it a few days ago…

beforeafter.jpg

Now, onto the mints. Not sure if you can trust my judgement on these… of course they were good! Hello… it’s CARBS!!

Ahhh, carbs. How I love thee.

Maybe if I was eating normally, they’d get a good/average rating instead of a ‘they were absolutely awesome’ rating. I don’t know. So, just make them yourself… they’re easy enough!

This recipe was not taken from a cookbook. It was taken from the book The Hand that Rocks the Cradle. The book title doesn’t even have to finish that sentence …we all already know that we rule the world. :) If you’re a mom and don’t have that book, you should. It’s great. Every 2-page spread is loaded with inspiration, Bible verses, real life experiences, and here’s my favorite: little sayings/quick quips/advice. A few pages have some fun little recipes on them, like page 145 with Mint Patties.

mint4.jpg

Mint Patties

1 lb. powdered sugar (I’ll save you some research… that’s 3 3/4 cups)
2 tsp. cream
1 Tbsp. soft butter
1 egg white (unbeaten)
1 tsp. vanilla

Mix together and shape into patties. Dip in chocolate.

And there you have it, simple as that. I got done putting all the ingredients in and then thought “Uhhhh, MINT patties? It must mean mint patties in looks only, because there’s no mint in the recipe.” So, I added about 1/2 tsp. of peppermint extract.

mints3.jpg

I just threw everything into a bowl and mixed it, but it made little pea-sized balls, so I added a bit more cream and then it all blended together like a dough.

Instead of shaping the patties (which I thought would be too time-consuming), I rolled the ‘dough’ out and used cookie cutters. Got a variety of shapes that way too, which inspired me to make a mental note that these could go with any theme or holiday… just make it in whatever shape is right for the occasion!
mints2.jpg

I chilled the patties in the fridge for about a 1/2 hour before dipping them. I dipped some, half-dipped some, and ‘scribbled’ on some. You could even leave some plain, or add a tint of green food coloring.

mints1.jpg

This recipe made about 6 dozen mint patties.

So, I can only have 1 serving… how many patties is 1 serving? Just wondering, because the recipe doesn’t say. Oh well, I’ll just assume the whole batch is 1 serving. ????

Comments

16 Responses to “Mint Patties plus an Out-of-My-Comfort-Zone Tidbit”

  1. Aug on April 1st, 2011 5:54 pm

    I can NOT get over how great you look! I called Jeremy over to see the “before and after” cuz, wow! You are looking SO much thinner and I think you look amazing! I am wondering what you will look like by the time you get all of the way there, if this is only 1/2 way!! I am so happy for you!!

    Excited about you doing a little more updating on here. That will be fun for all of us!

  2. Liz on April 1st, 2011 7:06 pm

    I asked Kaitlyn who the person was on the picture and she said, “Kara?” I thought you would appreciate that. :) You look great! Glad we can look forward to lots of updates. Except now I’m trying to diet. So I’ll just look hungrily. I don’t think I would have enough self-control to just eat one.

  3. becky on April 1st, 2011 7:20 pm

    omGOSH! kay!! seriously, you look amazing! i cant believe how much younger you look. great job, girl!

  4. Beth on April 1st, 2011 7:37 pm

    Love that you went out of your comfort zone to let the world see that you got 1/2 way! I thought the last line was too funny. The whole batch is a serving…wouldn’t that be nice?! I’ll say at least 1 dozen is a serving. :)

  5. Michelle on April 1st, 2011 7:43 pm

    Kay, you look aMAZing!!!!!! You go, girl!!!

    I always wish your blog posts came with those little sample things like they have at Sam’s Club. :) B/c I just want to taste one without having to make it! (Would that make my original problem laziness?)

  6. lisa on April 1st, 2011 8:28 pm

    oh my word! KAY! you look incredible. really, really good!! makes me excited to have this baby and start working on the (minimum of) 30 pounds that are sure to be hanging on! YOU GO!

  7. linda hershey on April 1st, 2011 9:50 pm

    kay, i cannot believe how good you look!!! smashing!!like i said, i am so proud of you!!! because chocolate is chocolate and cooking good is cooking good and you somehow just busted through with nerves of steel, baby! so happy to see you up and running with the show and i hope cooking is kind to you and you are able to eat and enjoy and still see all the good results that you want! i’ll be trying the patties and letting you know how they rated!

  8. cretora on April 2nd, 2011 6:58 am

    Like I said before-you’ve inspired me to keep on my diet. Just when I was feeling like giving up, i saw your pics-thanks for posting! :)

    ps-I made mints like that at christmas and they were one hot commodity on cookie trays. your recipe looks creamier than mine though-i’ll have to try that this year.

  9. Kay on April 2nd, 2011 7:13 am

    Thanks for all your encouragement in the diet realm!!! Linda, you said it well when you used the term “busted through”… that’s exactly what dieting is, there are no easy secrets. ???? Michelle, I’ve often wished I could somehow put samples on here! That would be so fun! Then we could do polls of how each recipe rates.

  10. Shannon on April 2nd, 2011 11:09 am

    These look delicious!! I love Mint patties so I might have to try them, but I’d be the only one eating them!! Bad deal. -Just got to say again how great you look!! Keep it up!

  11. Loretta on April 3rd, 2011 12:16 pm

    Wow!!!! Good job on the weight loss!!! I make mint patties to sell at christmas time!! These look good too! I roll mine in logs and stick it in the freezer for awhile and than slice it!

  12. Sandra on April 7th, 2011 12:21 pm

    Wow lady!! you look beautiful!! So happy for you!..I wonder wahat I could do to lose some###:)

  13. Christy on April 9th, 2011 1:04 pm

    I missed this post somehow, but I am in AWE! Hello, you look PERFECT! How can this be 1/2 way. I’m so jealous, too, because I’ve been on the crackdown for 3 weeks (no sugar or flour) and I have lost 1 lb. I just want to jump ahead to where you are. :) I’m so impressed because I know you worked really hard for it. And it makes me wonder if you’re checking off your list. ????

  14. Judi on April 11th, 2011 12:27 pm

    you look amazing!! Keep it up – hope the warmer weather and outside activities help you move along too.

  15. Sheila on April 13th, 2011 9:11 am

    Here I come, way behind everyone else, but I just had to comment on this one. I couldn’t believe it when I saw the pics! Your Mom had told me that you were losing weight, but I didn’t know it was that much! Like everyone else said, you look SO good! I had to get the computer out and show my family the pics when they were here the other night. :-) Thanks for getting out of your comfort zone to post these pics. I love looking at before/after pictures! And, thanks for the giving me the push I needed to start reading my “The Hand That Rocks The Cradle” book. I had been planning to read it again ever since Patrick was born, but hadn’t got around to digging it out until I read this. Now it’s on the table beside my chair and I’m enjoying reading it while I feed Patrick.

  16. Lydia Jo Martin on June 21st, 2011 1:22 pm

    Ok, so I just had fun catching up on your site here. Since we’re in the same diet group and all. You do look amazing. Good job! Such hard work, but so rewarding huh? I don’t grill either. I can’t even turn it on. And last summer when I tried to star the charcoal grill I nearly took off my eyebrows. mmm… I wish all us diet girls could get together. we’d have fun. hope your day is great. -Jo

Chocolate Chip Craisin Cookies… with a chocolate comparison

Posted on January 10, 2011
Filed Under Cookies and bars, Holiday cooking

Ok, people, take note. I am about to write a phrase that I have NEVER written before and that I will probably never write again. Ever.

White chocolate was better than milk chocolate. Oh, that sounds weird. Seems wrong. I feel like a traitor to milk chocolate.

But I made this cookie dough, split it in half, and added milk chocolate to one half and white to the other. When they were baked and cooled, I tasted them. In all my die-hard loyalty and love for milk chocolate, I’ll have to admit that white chocolate just plain goes better with craisins.

craisin3.jpg

This all reminds me of a little conversation Shannon and I have had now and then about the museum at Lambeau field. I know, it might seem strange that chocolate reminded me of that conversation, but I have always loved analogies. Analogies help me understand things, see them in a different perspective. And this is an analogy… in which I am the milk chocolate, Shannon’s brother Preston is the white chocolate, the Packer museum is the cookies, and Shannon is the taste-tester. In this conversation, we talk about his dream of some day going to Lambeau field and spending a day there going thro the museum, reading every piece of info and history, and when he does, it’s not me (you know, ME, his favorite person ever) that he wants along …the person he wants to go with is his brother. Evidently, strolling thro’ a football museum is not date material, holding hands as you go from one display to the next.????? :) I do totally get it, though… I wouldn’t want to browse Hobby Lobby and Michaels with him for a day. Things are always the most enjoyable when you get the right combo.

Like craisin cookies and white chocolate.

White Chocolate Craisin Cookiesrecipe ripped out of either Taste of Home or Country Woman magazine, I forget which one

2/3 cup butter, softened
2/3 cup brown sugar
2 eggs
1 1/2 cups oatmeal
1 1/2 cups flour
1 tsp. baking soda
1/2 tsp. salt
1 6oz. package craisins
2/3 cup white chocolate chunks or chips

Preheat oven to 375. Beat butter and sugar together until light and fluffy. Add eggs, mixing well. Combine oats, flour, baking soda and salt. Add to butter mixture in several additions, mixing well after each addition. Stir in dried cranberries and white chocolate. Or do the taste-test for yourself and split the dough and try dark or milk chocolate.
craisin1.jpg

Drop by rounded spoonfuls onto ungreased cookie sheets. Bake for 10-12 minutes or until golden brown.
craisin2.jpg

This made 28 cookies.


These are wonderful for Christmas! Or for any time of the year, since Christmas is about 11 1/2 months away… (read: didn’t get it posted in time for Christmas). ????

Comments

4 Responses to “Chocolate Chip Craisin Cookies… with a chocolate comparison”

  1. Jan on January 10th, 2011 3:21 pm

    I like your analogy. “Pancakes and blueberry syrup!”

  2. Amy Burkey on January 10th, 2011 3:30 pm

    Shilah made these for us (with white chocolate) when we were in Idaho. I’ve been craving them ever since.

  3. Shannon on January 10th, 2011 5:37 pm

    Just so you know, I’m laughing out loud! ????

  4. Judi on January 28th, 2011 2:37 pm

    I’m usually a milk chocolate kind of girl too, but I love white chocolate macadamia nut cookies. thanks for the recipe

Snickers Cake… Happy 8th Birthday, Lexi!

Posted on January 5, 2011
Filed Under Birthday cakes

snickers-cake-lexi.jpg

For over 3 years, Lexi’s favorite candy bar has been Snickers. Usually, the reason a food is your favorite kind is because you’ve tried some variations and one was head and shoulders above the others. Well, not so with Lexi and Snickers bars.

Here is how Lexi came to like them… Once upon a time, when she was 4 years old, we went to our small hometown county fair, a county fair in which there are veggie races (“Will the corn beat the cucumber? Oh look! The potato is taking the lead!”) and a cornbox (as opposed to a sandbox) and pig swimming races (I didn’t even know pigs could swim, so that I had to see!) and, of course, pony rides. Like all good dads, Lexi’s dad gave in to her big brown eyes when she asked for a pony ride. There was a line of kids and a circle of ponies. When Lexi was at the front of the line, her dad helped her up on the next pony as the man in charge of the pony ring told her with a smile, “YOU can ride on Snickers!”. It was surreal, a dream come true, she was sitting on a REAL pony… and she wasn’t even dreaming!
snickers-pony1.jpg
Sure, she had sat on ponies before, but they were always hard cold pretend ones on a carousel, and wow, this was more fun than a carousel! It was a little scarier too, but sometimes scarier goes with funner, like ponies vs. carousels.
snickers-pony2.jpg
She talked about Snickers for days. One day, I said, “Did you know there’s a candy bar that’s Snickers?” The poor Snickers-candy-deprived child said, “No! There is? What does it taste like? Can we get one?” I said, “Sure. Remind me next time we go to town.” She did remind me and during her first bite, she declared it her best candy. And they lived happily ever after. Just between you and me, I’m pretty sure Snickers knocked M&Ms out of the favorite candy slot BEFORE she even tasted it… beloved ponies can have that effect on little girls.

On to the cake…

First, I baked a sheet cake and then cut it in 3rds and then stacked it up with frosting between the layers. The reason I did that is because a 9×13 would’ve been just the wrong dimensions to get the length and height I wanted.
snick1.jpg

snick2.jpg

snick3.jpg

Next, I melted caramel (just plain caramel, I didn’t mix any milk or anything in). It was a caramel loaf (consistency of wrapped candy caramels) from a bulk foods store. Then, I mixed peanuts into it. Then I waited til it was still soft enough to spread, but hard enough to not drip down over the side of the cake.
cake2.jpg

And there it is. All spread out. And not dripping out over, although some was kind of threatening to at the ends.
cake3.jpg

Now, it’s time for…. THIS!!!
*be still, my beating heart*
It’s 2.7 lbs of pure milk chocolate, which I chunked up and melted.
cake4.jpg
Side note: I purposely chewed gum during this cake project so I wouldn’t gain 10 lbs from snitching!

I lined a cookie sheet with tin foil because it holds its shape when bent, which will come in handy in a bit. I made a chocolate pond on it, then set the cake on top, then poured some over the top.
cake5.jpg

Then, I bent up the tin foil, which made the pooled chocolate have no place to go except up the side of the cake… exactly where it was supposed to go. :) I let it sit there for a bit til the chocolate hardened, which didn’t take long because I had put it in the fridge for a bit while I took care of my baby, with the hardening faster idea in mind.cake6.jpg

When I pulled the foil down, this is how it looked…
cake7.jpg

Then I repeated the process, but used tin foil AND Saran wrap. Not sure why the Saran wrap. It was just a whim. And when it hardened and I took it all off, it looked like this. Oh, before it hardened, I swirled the chocolate on the top. I did smooth out the chocolate on the side a bit between this picture and the next one, by using a hairdryer on Low to soften it WHILE smoothing it with a knife.
cake8.jpg

Now, let the fondant fun begin. I colored the fondant brown and rolled it out. Then, I rolled out some white and laid it on top, which was actually the underside… because I wanted to flip the wrapper back and wanted it to be white inside, not brown. The ‘glue’ for fondant to stick together is water. Easy enough.
cake9.jpg

Then I put it over the cake, with enough extra to wrap underneath too.
cake10.jpg

Next, I tucked it underneath, folded it in the back, trimmed it evenly, and crimped it with a fork. Fondant is pliable until it dries out, and I wanted that back part to stand out, not point down, so I poked a few toothpicks into the cake in under there to hold it up. Then, I trimmed it unevenly in the front and pulled it back a bit. What you can also see here is how I did the lettering. I printed it out and could actually sort of see thro the fondant to trace it on. I mixed up some watery blue mixture, but it was too light, so I just ended up doing it right out of the food coloring paste can. I used a small paintbrush.
cake11.jpg

cake12.jpg

Then, I put the white part on (with water ‘glue’), piped the white ‘shadowing’ on (that REALLY made a world of difference! Compare the writing on these 2 pictures.), and made a ‘snake’ with red fondant and put it around the white (‘gluing’ it with water). Then, I piped “Happy Birthda LEXI” on it. Yup, there’s no Y, but an A is hiding under the wrapper.
cake13.jpg

Then, I laid a paper towel on a cooling rack, covered it all with tin foil, ‘scribbled’ blue and green on it for a festive/kid look, and made an 8 out of fondant and put the top of a taper candle in the middle (yeah, I know, cheesy, but in all my cake-ingredient shopping, I didn’t think to put candles on the list and I didn’t have 8 on hand and I didn’t think it was worth running for some. I did get a pack of 8 little Snickers though, which were each going to hold a candle, sitting around the cake like they are.) This is a view from towards the back so you can see the crimping on the back of the wrapper.
cake14.jpg

There’s nothing on the back of the bar. I could’ve written “Hungry? Grab a Snicker bar!” or some other slogan that they have on wrappers, but I decided not to mess with it anymore. Plus Tiffany ate some of my frosting and there wasn’t enough left to pipe it.
cake15.jpg

snickers-cake-end.jpg

Here’s my FAVORITE picture of all! :)
snickers-cake-big-bite.jpg

Comments

24 Responses to “Snickers Cake… Happy 8th Birthday, Lexi!”

  1. Amy Burkey on January 5th, 2011 1:05 pm

    I just really love your cake ideas! I wonder if I shouldn’t learn how to use that playdough stuff sometime!

  2. Twila on January 5th, 2011 1:22 pm

    Amazing!! This cake is so cute!!

  3. carmen byler on January 5th, 2011 1:32 pm

    you are amazing!!! i did a fondant cake for Elyse’s first bd and pretty much decided never again.
    Wow, you could def win a contest w/ this one!!

  4. Shannon on January 5th, 2011 1:41 pm

    Kay! You are an amazing woman, I tell ya!! :) Beautifully done and explained. I’m with Lexi, if I have to eat a candy bar, I’ll eat a snickers! :)

  5. Ruthie on January 5th, 2011 2:10 pm

    Kay! tell Lexie that Snickers is my favorite bar too, but I haven’t had one in oh so long —

  6. Amber S on January 5th, 2011 2:28 pm

    That is an amazing cake.

  7. Berneice on January 5th, 2011 2:49 pm

    Wow! I am once again in awe! It is beyond cool!

  8. Rosanne on January 5th, 2011 3:01 pm

    I love this creation!!! And was that a big block of Wilber chocolate!!? Woow you got me thinking what to make for my daughters 12th birthday. Maybe a candy bar cake.
    Love it!!
    Great Job!

  9. Liz on January 5th, 2011 3:10 pm

    Oh, wow! That looks so good! Wish I could have tasted some. And I’m still impressed with your cake decorating abilities even if you think it’s not that hard.

  10. Freida on January 5th, 2011 3:50 pm

    Words fail me. That is just way beyond neat!

  11. Beth on January 5th, 2011 4:20 pm

    You are a genius. I can’t imagine dreaming up something like that. I would also like to say that her invention tasted delicious. That caramel layer was awesome! Love the line “be still, my beating heart” that went with the 2.7 lbs. of chocolate!

  12. Lisa@The Cutting Edge of Ordinary on January 5th, 2011 5:23 pm

    Beautiful! You are the cake master! Wow! I’m amazed!

  13. Vicki on January 5th, 2011 7:42 pm

    You did an excellent job!

  14. Rosalyn on January 5th, 2011 9:07 pm

    Wow! Truly amazing! I want one now! ????

  15. Christy on January 9th, 2011 10:14 pm

    KAY! This is amazing!!!!!! You really need to enter it to Taste of Home or Family Fun or somewhere. Seriously!!!!! When I saw the first picture, I thought, “but the sad thing would be it looking so good, and tasting like cake and icing.” But it didn’t. The fact that you put the carmel and nuts in there and covered it with chocolate puts it over the top. Wow, Wow. Wow. The logo looks perfect, too.

  16. lisa on January 9th, 2011 10:50 pm

    incredible!!

    makes my pregnant self crave a snickers bar.

  17. amber on January 9th, 2011 10:58 pm

    A-MA-ZING!! Kay~ i am so impressed! i had no idea you did this sort of thing. wow. i’m learning all about your secret talents this week!! ????

    that last shot is great!

    love ya

  18. Rachel on January 10th, 2011 5:59 am

    ohmygoodness!!!
    this is AWESOME!!
    you should teach a class!
    your children are very lucky to have such a creative and giving mommy!!
    happy monday!

  19. Becky on January 10th, 2011 2:24 pm

    oh my gosh. that is just fantastic, kay!! looks so real! have you ever watched that show on tv about cakes??…cant remember the name of it offhand.

  20. Paul on January 10th, 2011 7:26 pm

    Wow. I’m not sure if you watch the show Cake Boss, but you should definitely be on it! Excelent job once again.

  21. Jessi on January 11th, 2011 7:09 pm

    What an amazing job!!!

  22. cindy on January 19th, 2011 10:06 am

    that is the coolest cake ever! my word girl. you are aMaZinG and clever in sooooo many ways! ????

  23. Judi on January 28th, 2011 2:55 pm

    WOW!!! that cake is amazing… talk about work. I’m sure Lexi just LOVED it! Just like she loved Snickers :)

  24. Nicole on February 3rd, 2011 9:33 pm

    These instructions were easy to follow. The pictures were very useful. The taste was amazing, adding that layer of caramel and peanuts was a great idea. Thanks for sharing.

Chocolate-covered Ritz with Peanut Butter

Posted on December 18, 2010
Filed Under Candy, Holiday cooking

chocolate-ritz-peanut-butter-done.jpg

This is the first year that I’ve done so much chocolate dipping. Kinda fun. I was looking around for more stuff to dip… did you know mini marshmallows dipped in chocolate are good? And peanuts, of course.

I just wanted to put these dipped Ritz cracker things on here because I learned something with them.

First step is to put peanut butter on one side of a cracker. So, I got a knife, the pack of crackers, and the jar of peanut butter and went to work, spreading crackers with peanut butter. You wanna talk about tedious and hard to get the peanut butter even along the edges, plus not be messy with it!

I was about to stop the project when a lightbulb went on… I could pipe it on! So, I got a plastic bag, filled a corner with peanut butter, snipped of a little corner and started coiling it on till the cracker was covered. It really worked, but it took too long.

Then, the lightbulb got brighter and I snipped the corner off bigger and made a pile in the middle of the cracker, got another cracker, and pressed it down on top till the peanut butter was evenly to the edge of the cookie. Fast. Easy. Fun.

So, I started mass producing… laid a bunch of crackers out on the table, squirted piles of peanut butter on them all, then went through and pressed all the top crackers on. The whole batch was done in no time. Maybe you all already do it like that, but just in case there’s someone out there going crazy, still spreading peanut butter with a knife and getting your hands messy, here you go.

ritz-peanut-butter-chocolate1.jpg

ritz-peanut-butter-chocolate.jpg

Before dipping, I put the filled crackers in the fridge because chocolate hardens faster when whatever it’s about to cover is chilled. I don’t know any secrets to dipping… I just dip them one at a time, dig them out with a spoon, shake of the excess, and put them on Saran wrap/wax paper to dry. I’ve thought of using a cooling rack and pouring melted chocolate over them, flipping them, and pouring more over, then catching what runs off and re-using it, but that just seems a bit too messy and I’d have to wash the rack and what if it wouldn’t cover the sides right.

I want to make one more thing yet, then I think my Christmas cookie/candy making is done for this year… the first part of next week, I want to make Chocolate Chip Craisin Cookies… half of the batch white chocolate and half milk chocolate, and compare them. ???? I decided to wait till after Christmas to post Lexi’s birthday cake because I’m kind of in Christmas food mode, and her birthday cake has nothing to do with Christmas.

Comments

11 Responses to “Chocolate-covered Ritz with Peanut Butter”

  1. Berneice on December 18th, 2010 1:49 pm

    This is something my mom has made for years (and of course I don’t like them=they have pb) but just recently they started making them with marshmallow cream too.

    oh and I am enjoying all these updates on your blog! Keep up the good work. Maybe it will inspire me to get cookin!

  2. Freida on December 18th, 2010 2:37 pm

    I was gonna say something along the same lines as Berneice. This is something we have always made.. for as long as I can remember. Never heard of adding marshmallow cream till I got married, but now that I tried that, I can.not.leave. them alone. So yummy!

  3. Christy on December 18th, 2010 9:07 pm

    Another idea for spreading the peanut butter is to give the job to your child. They think it’s cool. :) I love these things! We’ve already dipped Ritz Bitz, but there’s just something about real peanut butter crackers dipped in chocolate that’s hard to beat.

  4. Renita on December 18th, 2010 9:27 pm

    I do the pb ritz bits. I like that size. It’s a pop-in-the-mouth-one-right-after-the-other and there’s chocolate all the way around. I’m more for chocolate than pb.
    The mini teacup chocolate is SO adorable. I just had some cappuccino mousse that would be perfect in the choc. cup. I was thinking the chocolate roses you’ve made already would be a perfect match!Thx for the “updates” I always enjoy em!

  5. Amber S on December 19th, 2010 8:59 pm

    Use a big fork to dig them out of the choc. It lets the excess drip through the tines. :)

  6. Beth on December 20th, 2010 1:16 pm

    Putting the pb into a bag seems like more mess to me than just using the knife. Hmm…maybe I should try it before I knock it?? :) My mom helped me this year, so that makes it go faster. lol As always…enjoyed the post & love how you show us new ways to do things!

  7. Kay on December 20th, 2010 1:47 pm

    Ok, Berneice and Freida, I’ve gotta try these things with marshmallow creme! But, man oh, if I thought peanut butter was a mess, I can’t imagine marshmallow creme!!!! Sounds worth the mess though. :)

    Renita and Christy, thanks for the Ritz bits idea… the pop-in-the-mouth size sounds delightful.

    Yeah, I should’ve got my girls to do it, Christy. And, Beth, yeah, a mom would be a nice feature in the candy-making process… would make anything better and faster! ????

    Amber, thanks for the FORK idea! Brilliant! I shall do that from now on!!!

  8. Cheryl Weaver on December 28th, 2010 12:56 pm

    I just need to share a non messy way to get that peanut butter in the bag if I’m able to put it into words. I just put the corner of my bag into a drinking glass (kinda short and squatty) then take the top of the bag and fold it down around the outside of the glass. Kinda like you are starting to turn the bag inside out. Then get your spoonful of p.b. or frosting or deviled egg filling or whatever you are putting in there and drop it in. Hope that isn’t too confusing. Just something that works for me.

  9. Dena Skrivseth on January 1st, 2011 8:34 am

    Was going to suggest the Ritz bits…someone beat me too it…and then the fork…was beat to that too. But when I am finished dipping…then I throw in the peanuts for clusters…it finishes up the choc quite nicely! Another thing I like to do is to buy those mini Oreo cookies, and cover them with white choc,(brown works too, but when you have both, you know which you are getting if they are white!) then throw in either raisins, peanuts, or mixed at the end to finish up the choc

  10. Katie Mast on January 4th, 2011 10:17 am

    i make these crackers all the time, but i never thought of the bag. I love it, thanks for that tip i will use it next year. We also add a third cracker with marshmellow cream. Love all your new recipes.

  11. Judi on January 28th, 2011 3:02 pm

    Okay, I was good with crackers and peanut butter… who needs anything else lol. But chocolate covered WOW and Marshmallow?? Oh my. How about if we mix peanut butter and marshmallow creme then dip them in chocolate? A little on the messy side, but hey, we’re already getting a little down and dirty. My daughter does Dove Chocolate home parties… she’s a chocolatier, so I have an endless supply of chocolate… yes, I still have to buy it, but it is delicious.

Mini Teacup-shaped Chocolates

Posted on December 17, 2010
Filed Under Candy, Holiday cooking

teacup-chocolates8.jpg

My sister-in-law Sheila had a birthday last month and her mom got her some teacup truffles from a local bakery. She was showing them off …notice I said SHOWING, not SHARING! ????
Here is a picture of them…
chocolate-teacup-truffles.jpg
Aren’t they adorable? As soon as I saw them, they went into my oughta-try-them-sometime cooking folder in my OneNote. By the way, Sheila took that picture. One of my Kitchen Scrapbook New Years Resolutions is to research food photography (lighting/props/angles/how to make it look good/etc) and practice and get to know my camera and aperture and focus and settings on it to up the photo quality a bit on here. I was planning to go online for that education, but it looks like I don’t need to go any farther than our family gathering over the holidays to get tips… I love this picture! Looks like it came out of a magazine. Of course, the truffles look like they came out of a magazine, too!

I was at a cookie exchange today and I took a plate of candy instead of a dozen cookies. WAY more fun to make and nobody seemed to mind. :) I decided this was my chance to try the teacups, thought it would be a cute touch to a candy plate.
teacup-chocolate-candy-plate.jpg
On the candy plate is:
Rice crispy rolls
— Chocolate-covered Ritz crackers filled with peanut butter (to be featured tomorrow)
— Misc chocolate-coated/drizzled tree-shaped pretzels
O’Henry bars
— Chocolate teacup
— Store-bought peppermint candies

These teacups are not as hard and time-consuming as they may look. I want to make some more and next time, I’m not gonna go as crazy with piping trim on! Actually, I think I’ll skip the piping altogether. I wanted them all coordinating with white and brown chocolate and I think it ended up looking too busy or messy or something. I think next time, I’d make the cup and saucer both the same monotone color. So, minus all that piping, these teacups were done in 7 steps, mostly easy steps:
1. Line the cups  of a mini muffin pan with white or dark or milk chocolate to form the cup part.
2. Make a saucer out of partially hardened chocolate.
3. Form a handle out of partially hardened chocolate and ‘glue’ it on with melted chocolate.
4. Fill the cup with fudge (that’s what I did here) or truffles or mousse or whatever.
5. Pipe white frosting on top to look like whipped cream (remember that cup of frosting I had left over from the red velvet sandwich cookies? It came in handy here! ???? )
6. Sprinkle the whipped cream with a bit of Nestles Quik powder.
7. Form a little decoration out of partially hardened chocolate or make a chocolate curl or use some other decoration for garnish.

Here are pictures and “What I learned” tips with each step…

Step #1.
teacup-chocolates1.jpg
What I learned:
Grease the cups WELL.
The thicker the chocolate, the better… if it’s too thin, the cups might break as you get them out (see the one in the front right has a hole in the bottom).
Chill before getting them out.
Best way to get them out is to push against the inside of the cup and turn it, when it comes loose, pull it out.

Step #2:
teacup-chocolates2.jpg

teacup-chocolates3.jpg
What I learned:
Use utensils/Saran wrap to do the work… using fingers melts the chocolate and creates a sticky mess.
Cut a perfect circle by using a round cutter… a drinking glass works great.
Lay the saucer on a measuring cup… it will sink down just a little in the middle to create a ‘saucer’ look.
The fridge was my friend. Chocolate hardens faster in the fridge. ????

Step #3:
chocolate-teacups4.jpg
What I learned:
If the cups are chilled before putting the handles on, they adhere faster.
You need to hold the handle against the cup until the melted chocolate between them has hardened… otherwise the handle might fall off when you set it down. *rolleyes*

The rest of the steps don’t have ‘what I learned’ tips because there were no issues/problems/lessons learned. That’s a good thing:)

Step #4:
teacup-chocolates5.jpg

Step #5:
teacup-chocolates6.jpg

Steps #6 & 7:
teacup-chocolates7.jpg
I made stars because, you know, Christmas. I thought stars would be easier than holly or trees or a wreath or a gift or a manger scene. ???? I just made a ball, then flattened it, then pinched it in 5 places, then perfected the points. Haha, perfected the points? Then why aren’t they perfect?! :p I guess I should’ve said I just made a ball, then flattened it, then pinched it in 5 places, then messed around with it till it looked more or less like a star. :) Oh, and the one doesn’t have a star, in case anyone noticed. It was the last one and REFUSED to turn out, so I ate it and just stuck in a random dripping from where I had drizzled the pretzels.

Oh, and here are the 5 plates of cookies that I came home with… Peanut Butter Kiss cookies from Rosalyn, Frosted Sugar cookies from Beth, Monster cookies from Sherri, Pumpkin cookies with caramel frosting from Rita, and White Chocolate Chip cookies and some coated party mix and chocolate-covered peanut butter crackers from Mary Esther. I love love love cookie exchanges!!! When else can you mass produce one thing and end up with a fun variety?!
cookie-exchange2.jpg

Comments

14 Responses to “Mini Teacup-shaped Chocolates”

  1. Shannon on December 17th, 2010 8:07 pm

    These little things are so cute. Waaay to much work for me tho! :)

  2. Ruth Hochstetler on December 17th, 2010 10:12 pm

    A very interesting project, and well done! I have one question on an ingredient. On the candy plate you mentioned ‘tree shaped pretzels.’ Years ago, that was one of the ingredients in my party mix, but I can’t find them anymore. Where do you get them? I like them because they are so dainty and thinner than most pretzels. They go well in a Christmas mix.

  3. Kay on December 17th, 2010 10:19 pm

    Ruth, yeah, I agree, they’d be perfect for Christmas party mix! I got the pretzels at our local bulk foods store. I don’t know if you have any in your area, but I’d check there. Good luck!

  4. Rosalyn on December 17th, 2010 10:35 pm

    I’m in Indiana wishing that I’d have my yummy cookies along instead of at home in my freezer. :) Can’t wait to inhale them!! :)

  5. Beth on December 18th, 2010 12:15 am

    Today was so fun!! I vote for you to make candy every year. Those things are so cute & I still didn’t eat mine…just waiting for the perfect moment. :) Also wanted to say I’m excited that you are doing this daily post!!

  6. Cheryl on December 18th, 2010 1:07 pm

    Cute!

  7. Loretta on December 20th, 2010 12:59 am

    Oh can’t wait to try these little teacups!!What a perfect idea for a little girls Birthday party!!!

  8. Sheila on December 20th, 2010 9:17 am

    Wow Kay! I should have known you would try these truffles. :-) They look good! Ha, don’t expect to learn many photo tips from me. I love taking pics of food, but so often am not happy with them. Getting the right lighting has been my main source of frustration. I’ve always wondered how much difference having a better camera would make. Well, Jared got a new camera recently, and then rented one of those huge zooms for a week to shoot pics at a wedding. We were at their place a couple of times while he had it and I had so much fun “playing” with it. I just walked around the kitchen taking pics of food preparations, and I couldn’t believe the difference! Honestly, they almost looked better on the camera than they did in real life. :-) Now, that was fun! So, the fact that a good camera really does make a difference could be encouraging or discouraging, if you know what I mean. :-/ BTW, I’ve seen some really nice food pics on this particular site, so don’t be too hard on yourself. :-)

  9. Jan on December 23rd, 2010 1:38 pm

    I am trying to make some of these for a Christmas present. How did you line the muffin tin with chocolate? I can’t get the things out no matter how much cooking spray I use or how chilled the stuff is.

  10. Jan on December 23rd, 2010 2:15 pm

    Problem solved! I lined the cups with foil and then when the chocolate was hardened, I lifted them out and peeled off the foil. Worked perfectly!

  11. Judi on January 28th, 2011 3:26 pm

    You amaze me. I buy the chocolate cups from my daughter :) Maybe it’s my age, but it’s just too much chocolate for me. Quick, someone call the DR. The chocolate mousse mix that she sells is also to die for. Usually by the time I’ve eaten the whipped topping and chocolate mousse I just am on sugar overload without even eating the cup. I do save it for later though :)

  12. Judi on January 28th, 2011 3:27 pm

    oops, now I remember what I was going to say. For the stars that you were trying to make… do you have any chocolate candy molds? I have some small molds that have lots of different shapes… even a star. You just mold the chocolate and pop it out… perfect every time.

  13. Margarita Brajak on March 13th, 2011 9:53 pm

    Where did you find the teacups with the halow handle, in the second picture? Please respond to mbrajak@hotmail.com Thank you. Margarita.

  14. Kay on April 30th, 2011 9:43 am

    Margarita, those little teacup truffles were being sold at a small bakery in WI.

    Judi, using candy molds… great idea! Thanks! :)

O’Henry Bars

Posted on December 16, 2010
Filed Under Candy

Every year, there are some cookies/candy that are a MUST, but I also like to find a couple of new recipes too. This is one of them. A few weeks ago, I was trying to catch up on my way-behind Google Reader (I won’t tell you how many unread items there are because Shannon gives me a hard enough time about it, I don’t need you all to, too ???? … I know he’s right when he says, “You oughta just mark them all ‘Read’ and start over!” but instead I say, “No! What if there’s a post or two in there that I FOR SURE don’t want to miss?!”) and anyway, I clicked on The Cutting Edge of Ordinary and Lisa had just posted these bars. I knew right then and there that they had to be on my new-things-to-try-this-Christmas list. And they didn’t disappoint me. They are just as good as they sound and look! And a few people that I gave some to let me know they were a hit at their house, too.

ohenry-bars.jpg

O’Henry Bars

1 cup Karo syrup
1 cup sugar
1 cup peanuts (unsalted, do not chop) I didn’t notice this before I got ingredients and I bought salted peanuts, oops, but they turned out great anyway!
1 cup peanut butter
3 cups rice krispies
12 oz package chocolate chips
12 oz package butterscotch chips

Stir together the syrup and the sugar. Microwave for 2 minutes. Add the peanuts and the peanut butter to the Karo mixture. Microwave again for 1 minute.
ohenry1.jpg

Add 3 cups of rice krispies.
ohenrys2.jpg

Spread into a greased 9×13 pan.
ohenrys3.jpg

I pressed them into the pan with a buttered plastic bag.
ohenrys4.jpg

Combine the chips in a bowl and microwave for 2 minutes. Stir until smooth. Spread over the rice krispie mixture and cool in the fridge. Cut into 1 inch squares to serve.
ohenrys5.jpg

ohenrys7.jpg

ohenrys8.jpg

I should’ve taken a picture of them cut in the pan, but I think I cut them 6 across the short way and 10 the long way, so 60 little bars. What they lacked in size, they made up for in taste. :)

I think I might make some more of these and try something different… make the bottom part and cool it til it’s firm enough to handle, then shaped them into little logs, chill them, then melt the chips and dip them. Maybe twice. ???? The end result would be like a fun size candy bar!

Comments

3 Responses to “O’Henry Bars”

  1. Lisa@The Cutting Edge of Ordinary on December 16th, 2010 3:05 pm

    Fun sized candy bars…what a great idea! Thanks linking back to my blog. I love when I see people actually making something I posted. Glad you liked them. I’m still dreaming about those red velvet ones!

  2. Cheryl on December 16th, 2010 3:10 pm

    Yum! I bet they would be great with dark chocolate, too!

  3. Renita on December 16th, 2010 9:57 pm

    Kay- are you SURE you put some of these on my cookie plate? Oh yeah you probly did. There were 4 boys that somehow devoured ALL the candy fast!!! And I get the red velvet ones all to myself. Reckon I just have to make these myself now that I have the recipe. Thx again! I also want to make carmels and dip pb ritz bits in choc.

Red Velvet Sandwich Cookies

Posted on December 15, 2010
Filed Under Cookies and bars, Holiday cooking

cookie8red1.jpg

I was trying to picture a festive cookie plate to take to the cookie exchange. For awhile, I was waffling between White Chocolate Craisin Cookies and these. I ended up with these. I kinda got hung up on the white chocolate in the others, wondering if I wanted to ‘waste’ a couple batches of cookies on white chocolate… Shannon, maybe you should try them. :) (Side note: This might be confusing to some of you because I have 2 Shannons in my life (my husband and one of my friends), both of which I refer to on here hit n miss, but if you know there are 2, you can usually tell which one I mean by the context. ;)) Back to these craisin cookies, I am planning to make a batch, and add the chocolate last, dividing the dough in half and adding white to one half and milk choc to the other.

Wow, I just spent a whole paragraph writing about something that has nothing to do with what this post is about. Good grief.

First, before the recipes, I’ll give amounts: I used 5 cake mixes, which made 9 1/2 dozen filled cookies, so I actually baked 19 dozen individual cookies. Me and baking 19 dozen cookies goes great together, I loved it… if it wouldn’t make me gain 100 pounds, I’d bake every day. On the other hand, Megan (my 6-month old) and baking 19 dozen cookies does NOT go great together. Let’s just say her naptime was blissful. Although, she thought it was bliss sitting back in a corner up on the counter playing with everything within reach (except toys). It’s amazing how far a 6-month-old can reach, I found out! Anyway, I made the frosting recipe 3 times and had about 1 cup left over. So, I’ll break this down for you to save you having to get out the calculator… 2 cake mixes would make approx 46 finished cookies (mine were anywhere from 2″ – 2 1/2″ across) and one batch of frosting would do approx 38 cookies… could become one of those deals where you make more frosting to use up the rest of the cookies, then you have too much, so you make more cookies to use up the rest of the frosting, then you have cookies left, so you make more frosting…… and so on. :)

Red Velvet Sandwich Cookies

1 red velvet cake mix
2/3 cup shortening
2 eggs

Mix. Shape into balls.
red-velvet-balls.jpg

Bake at 375 for 7 minutes.
red-velvet-baked.jpg

Meanwhile, this was going on…
red-velvet-megan.jpg

Marshmallow Creme Filling

2 sticks (1 cup) butter
1 7oz. jar marshmallow creme
3 cups powdered sugar
1 tsp. vanilla

Beat til creamy. Spread it on however you want, but I put it in a bag and piped it on. Easy and less mess!
red-velvet-filling.jpg

Put another cookie on top and you’ve got yourself a yummy little red velvet sandwich cookie!
red-velvet-tiffany.jpg

You know, I was just thinking, we could do all sorts of stuff with this because there are all sorts of cake mixes out there… use a white cake mix and put in green food coloring and have green sandwich cookies, make any kind of cake mix cookies and tint the frosting red or green, roll the assembled cookie in crushed red & white candy canes so it sticks to the frosting, dip half of a red velvet sandwich cookie in chocolate, mix up a white cake mix and a red velvet one and then fold them together til it’s red & white swirled… any other ideas?

Comments

6 Responses to “Red Velvet Sandwich Cookies”

  1. Shannon on December 15th, 2010 1:18 pm

    I’m the other Shannon and I have no ideas because I could barely get past the fact that you might not use all White Chocolate in those cookies. 8(

    That does sound like a cool and easy way to make cookies. Gonna have to think of what non chocolate kinds would be good. :)

  2. Berneice on December 15th, 2010 3:06 pm

    Hmm, these look good! I have some confetti cake mix here that someone gave us. We are not cake eaters, so they might become cookies! with red and green icing. Thanks! Oh and I can’t wait to hear about those Craisin cookies! I love craisins!!

  3. Lisa@The Cutting Edge of Ordinary on December 15th, 2010 3:33 pm

    Love these!! You are so right the possibilites are endless. I am so making these! Maybe for New Years cause my Christmas cookie baking is full-up!! Thanks!

  4. Liz on December 15th, 2010 5:35 pm

    What the world?! I thought you had a baby. I’m pretty sure that’s Megan up there and she just doesn’t look like the baby I remember.
    I used milk choc for some monster cookies I made recently. Thought you should be proud of me. :) But when I snitched the dough with a choc chip in it, it just didn’t taste as good as semi sweet. Grr. I guess maybe that would help me not to eat as much dough.

  5. Elvida on December 16th, 2010 10:11 am

    This looks really good and I have all the ingredients…just wondering if you meant crisco by shortening, or oil? Thanks!!

  6. Paul on December 16th, 2010 10:51 am

    Looks amazing!I love how simple you make it. Keep up the good work, looking forward to future posts!

Christmas Cookie Exchange 2010

Posted on December 14, 2010
Filed Under Cookies and bars, Holiday cooking

It’s that time of year when I need to unlock my extra reservoir of willpower. Here is what’s sitting on my table RIGHT NOW…
cookie8all.jpg

Seriously, the table these are on is 5′ away. I could stand up, take 3 steps, reach out and grab a handful. Or 2 handfuls (I have 2 hands). They are even all still uncovered from taking the picture. Thing is, I’m not even tempted. Nope. Huh-uh. Not me. Not at all. ????

I’m not even sure what they’re all called, so I’ll just make up a name for them if I don’t know. Oh, and hey, I’m really curious. What’s your favorite of all those cookies? If they were, say, sitting on a table 5′ away from you and you could only pick one, which one would you pick?

First, we have Monster Cookies made by Carla. Monster cookies are my all-time favorite… I’d better hide them, the others would never know. :)
cookie8monster.jpg

Next is Thumbprint Jam Cookies made by Julie. So pretty.
cookie8jam.jpg

Here are Christmas Cutouts and Candy Cane Cookies made by Janae. Way too cute.
cookie8cutouts.jpg

Then, we have Peanut Butter Cookies Dipped in Chocolate made by Linda. These call to me almost as loud as the monster cookies.
cookie8pbutter.jpg

Next is Snickerdoodles made by Deb. Shannon will claim this plate.
cookie8snick.jpg

Here are Cream Wafers made by Renita. So beautifully Christmas-y.
cookie8wafer.jpg

Next is Chocolate Crinkles made by Mary. Ohhhhh, yum!
cookie8crinkle.jpg

There are 2 plates left, one cookies and one candy. I made those. Here are Red Velvet Sandwich Cookies.
cookie8red.jpg

And this plate is Chocolate-covered Tree-shaped Pretzels, Chocolate-covered Ritz crackers filled with Peanut Butter, and O’Henry bars. The O’Henry bars recipe came from Lisa @ The Cutting Edge of Ordinary. Thanks, Lisa! They are awesome!!!
cookie8candy.jpg

Oh, and I need to point out my candle and snowflake holder… don’t you just love it? Julie (the one up there who made the jam cookies) gave it to me for my birthday this year. I LOVE it!
cookie8candle.jpg

Ok, now I know I haven’t been posting on here very much and I don’t want anybody to faint, but I have some recipes to get in before Christmas, so I’m going to post one about every day for awhile. *thud* You fainted, didn’t you?! Here are the planned upcoming posts, not necessarily in this order:
— Red Velvet Sandwich Cookies
— O’Henry bars (I know, you can get the recipe on Lisa’s site, but I want it on mine, too :) )
— Teacup Chocolates (excited about this one, this one happened only in my head so far, so hopefully they’ll turn out!… I’m making them Thurs for another cookie/candy exchange on Friday)
— Chocolate-covered Ritz Filled with Peanut Butter (I know, you know how to do that already, just by the title, but I want to show you a trick that made the process faster and funner… more fun, whatever)
— Lexi’s 8th birthday cake (it was a snicker bar with a fondant wrapper)

Don’t forget to humor me with what kind of cookie up there you’d like best! :)

Comments

23 Responses to “Christmas Cookie Exchange 2010”

  1. Aug on December 14th, 2010 3:40 pm

    Oh, wow! Those look so good. And I totally believe you that you are not even tempted. (not)

    I would pick either the red velvet sandwich cookies or the monster cookies.

    But they sure all look pretty. Those wafers look like something I would want to try too.

  2. Lisa@The Cutting Edge of Ordinary on December 14th, 2010 3:43 pm

    So glad liked the O’Henrys! They are delicious! All the cookies you guys made are making my mouth water!!

  3. Liz on December 14th, 2010 3:58 pm

    Well, the monster cookies do look really good! Is one of each not an option? I would like try the O’Henry bars too.
    Maybe you SHOULD just eat all of them that way I wouldn’t have as many temptations when you come up. :) There will probably be enough stuff here.

  4. Cheryl Weaver on December 14th, 2010 3:58 pm

    The chocolate crinkles would be my favorite. Its the first thing I saw on your table. I MUST go make some. TODAY!!

  5. Arla on December 14th, 2010 4:13 pm

    Hi Kay,
    They all look very pretty and festive. I want one of the O’Henry Bars, please. I love the cookie part of Christmas. We did a few chocolate covered pretzels this year, too. They’re time consuming but they sure do make a plate look good. BTW, Kay, when you and Shannon are in our area in about two weeks or so; don’t you dare drive by and not stop in. Just come in for ten minutes, okay, please. If you come by in evening the guys will be playing with trains, or Catan, mostly likely.

  6. Karen B on December 14th, 2010 4:16 pm

    I think i’d pick the jam thumbprints or the red velvet sandwhich cookies..? or maybe grab 1 of each! =)

  7. Freida on December 14th, 2010 4:16 pm

    Oh yum. Those look so crazy good. It would be a hard choice and I would probably sneak more than one when you’re not looking. ???? One would be the Chocolate crinkles. I have been CRAVING those for the last several weeks! Those are on my favorite cookie list! I’ll be waiting for those recipes. :)

  8. Dawn Landis on December 14th, 2010 5:21 pm

    Wow… they all look so good! I think I would first try the Thumbprint or the Creme Wafers (never had them). Your Thumbprint cookies look so much nicer & yummier than mine… I had problems with mine last year… would love to have that recipe if you have it! Later this week I am making Christmas cookies with my Mom and sis-in-law… will be great to have a selection of cookes in the freezer again!

  9. Christy on December 14th, 2010 7:04 pm

    Peanut butter dipped in chocolate. Sounds like perfection!

  10. Beth on December 14th, 2010 7:12 pm

    I definitely fainted. :) The chocolate crinkles would call my name quite loudly, but that would then be followed with a few others. :( Can’t wait to taste your candy!

  11. Shannon on December 14th, 2010 7:37 pm

    Umm, not sure what to choose after coming up from a dead away faint. :) The Choc-peanut butter ones… snicker doodles or the cut outs, obviously I don’t go for the choc like most of you. Those O’Henry bars do look awesome. Should try them, but then again, I shouldn’t, because then I’d just eat them! :)

  12. Shannon on December 14th, 2010 7:38 pm

    Forgot to say, I’m gonna sit at the computer all day tomorrow waiting on your post. ????

  13. Cheryl on December 14th, 2010 7:42 pm

    I’ll take 3 of each!! Amazing, and what fun I bet! I need to have/attend a cookie exchange!

  14. cindy on December 14th, 2010 8:49 pm

    these look so yummy! i love Christmas cookie baking and will have to come back to check out your recipes!

  15. Rosalyn on December 14th, 2010 9:51 pm

    Those Monster cookies are waay too tempting! :( Good thing they’re at your house and not mine. I’d also like to try those peanut butter dipped in chocolate ones. And the O’Henry bars. :)

  16. Jan on December 14th, 2010 9:54 pm

    You can save me one of the peanut butter ones and also some of the O’Henry bars. I need to try the tree shaped pretzels, too. Where did you find them?

  17. Kay on December 14th, 2010 10:12 pm

    Arla, yeah, we’ll take you up on those 10 minutes… we’ve got lots to squeeze in while we’re up there, but we for sure want to see you guys! Will be in touch between C-mas & New Years sometime.

    Dawn, I emailed Julie about the thumbprint recipe. She or I will post it in the comments here sometime… IF it’s not a top secret recipe that she can share. :)

    Haha, Shannon, hopefully you’re not waiting till 11:59 p.m. :p

    Cheryl, yeah, you DO need to do this! It’s so fun!… you mass-produce a bunch of cookies and then bring home a beautiful assortment!

    Rosalyn, they’re not that far away! Stop in and I’ll let you have your pick! :)

    Jan, I got them at the local bulk foods store. We oughta dip some at New Years… Northwood Co Mkt might have some. Or really, any pretzel would work. :) I was wishing I’d have gotten sprinkles to put on them before the choc hardened, but while I was doing them was a poor time to think of that!

  18. Kay on December 15th, 2010 6:53 am

    Dawn,
    Here is the thumbprint cookie recipe, complete with helpful sidenotes, from Julie:

    Thumbprint Cookies

    2/3 cup sugar
    1 cup butter
    1/2 tsp. vanilla
    Combine and beat a couple min.
    Add: 2 cups flour
    Shape into balls. (I used a cookie scoop)
    (I flattened the balls a little with a glass that has a flat bottom before indenting them) Indent with thumb or round 1/2 tsp. Fill with 1/4 tsp. (heaping) Raspberry jam. Bake at 350* 14-18 min. just till brown; don’t overbake. Cool. Drizzle with glaze. (ziploc bag worked great)
    Double batch = approx. 3 1/2 dozen
    I baked them 14-15 min.
    Glaze: 1 cup powdered sugar
    1 1/2 tsp. vanilla
    2-3 tsp. water

    Let us know how they turn out! Mmmmm, I think I’ll go eat one of these for breakfast! :)

  19. Michelle on December 15th, 2010 7:45 am

    Oh yum! I want a chocolate crinkle or two. I’ve never made them but whenever I see them somewhere else I scarf up as many as I dare without being socially kicked out. :) And then after another cup of coffee, I’d like a peanut butter cookie dipped in chocolate.

  20. Lanita on December 15th, 2010 8:20 am

    Hard to choose between the red velvet sandwich cookies or the chocolate dipped pb cookies. They all look so yummy and festive.

  21. Sheila on December 16th, 2010 10:37 am

    I have to admit my mouth did fall open when I saw a post from kitchen scrapbook. :-) The timing is really good, too, because I have a bunch of Christmas cookies sitting out on my table, so I can go fulfill the cookie/candy craving that you just gave me. :-) Although, the ones on my table certainly aren’t as good looking as yours here. They all look so nice! I would have a hard time selecting just one, but maybe I’d go for the O’Henry bars. Maybe you’ll bring some along to WI? :-)

  22. Dawn Landis on December 16th, 2010 7:30 pm

    Thanks Kay for the speedy “delivery” of the Thumbprint recipe! I’m anxious to try it!

  23. Leah Anderson on January 15th, 2011 12:58 pm

    Wow these treats look awesome! Where on earth do you find the time? Ive been reading your blog for about a year & love it! Im originally from NW Ohio now living in NC. Love your blog!